


iOS Unlocker is a powerful unlocking tool available for iPad, iPhone, and iPod. This is a step-by-step guide for users to register, install and use iOS Unlocker to erase their screen passcode, remove Apple ID, or delete the Screen Time passcode.
Guide des matières Part 1. Download and Install iOS UnlockerPart 2. How to Register iOS UnlockerPart 3. How to Use iOS Unlocker – 3 FeaturesD'autres questions ? Contactez-nous dès maintenant.
Part 1. Download and Install iOS Unlocker
Étape 1. Cliquez sur le lien de téléchargement ci-dessous pour télécharger Déverrouilleur iOS sur votre ordinateur Windows ou Mac.
-
- Pour les utilisateurs de Windows: https://www.ios-unlocker.com/download/ios-unlocker.exe
- Pour les utilisateurs de Mac: https://www.ios-unlocker.com/download/ios-unlocker.dmg
Téléchargement gratuit Téléchargement gratuit
Étape 2. Une fois le processus terminé, ouvrez le package de téléchargement et commencez l'installation du logiciel en suivant les instructions.
Step 3. Once the installation is successful, launch iOS Unlocker on your PC.
Part 2. How to Register iOS Unlocker
An email with your license key will be sent to your inbox right after you purchase a license from our website. Please check your email inbox and register iOS Unlocker to get access to the full version.
Voici les étapes à suivre:
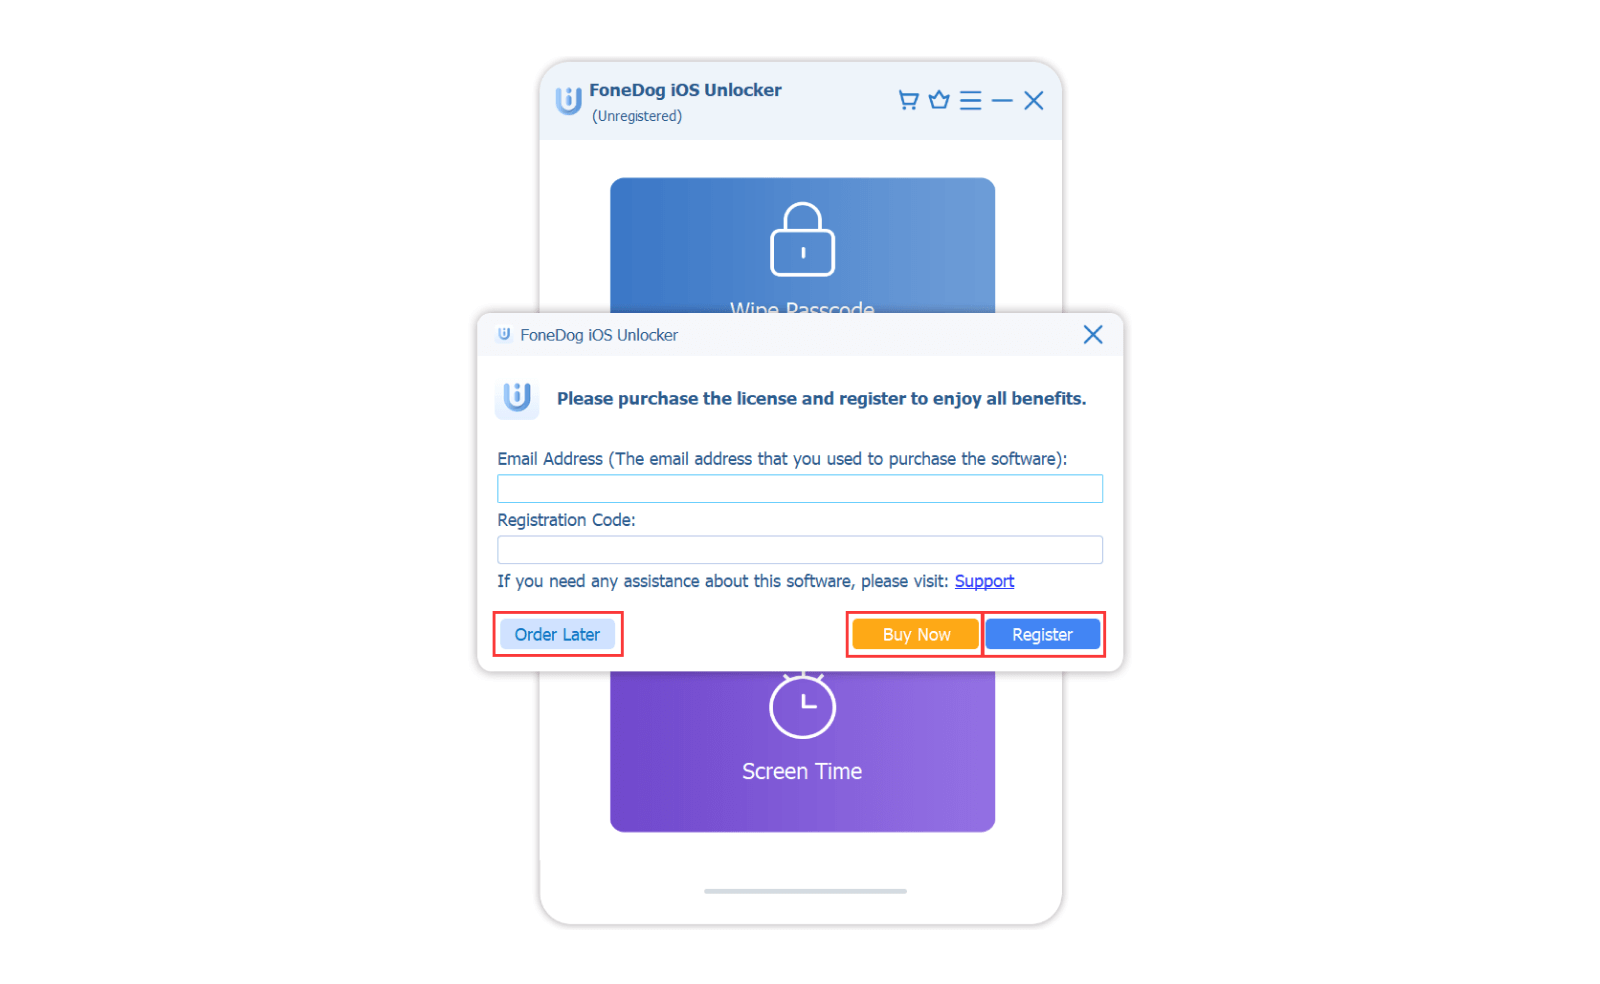
- Step 1. Run iOS Unlocker and click the crown icon from the upper right corner of the software.
- Étape 2. Remplissez votre Courriel (utilisé pour acheter la licence) et Clé de licence (i.e. Registration Code). Simply copy the license key from your email inbox, then go back to the software and paste it.
- Étape 3. Cliquez sur "S'inscrire "Et vous vous êtes inscrit avec succès.
Note: Vous souhaitez supprimer toutes les restrictions mais vous n'avez pas de clé de licence ? Dans ce cas, veuillez cliquer sur « »Acheter maintenant "depuis la fenêtre pour acheter une licence d'abord.
L'inscription peut échouer pour plusieurs raisons :
- Ajouter accidentellement un espace avant ou après votre code d'inscription ou votre adresse e-mail.
- Vous avez acheté la mauvaise version de la licence. Par exemple, les utilisateurs Windows ont acheté la version Mac au lieu de la version Windows.
- L'adresse e-mail saisie est incorrecte.
Si vous avez acheté la mauvaise version ou si vous n'avez pas pu déterminer la raison de l'échec de l'enregistrement, n'hésitez pas à contacter notre centre d'assistance via support@ios-unlocker.com.
Part 3. How to Use iOS Unlocker – 3 Features
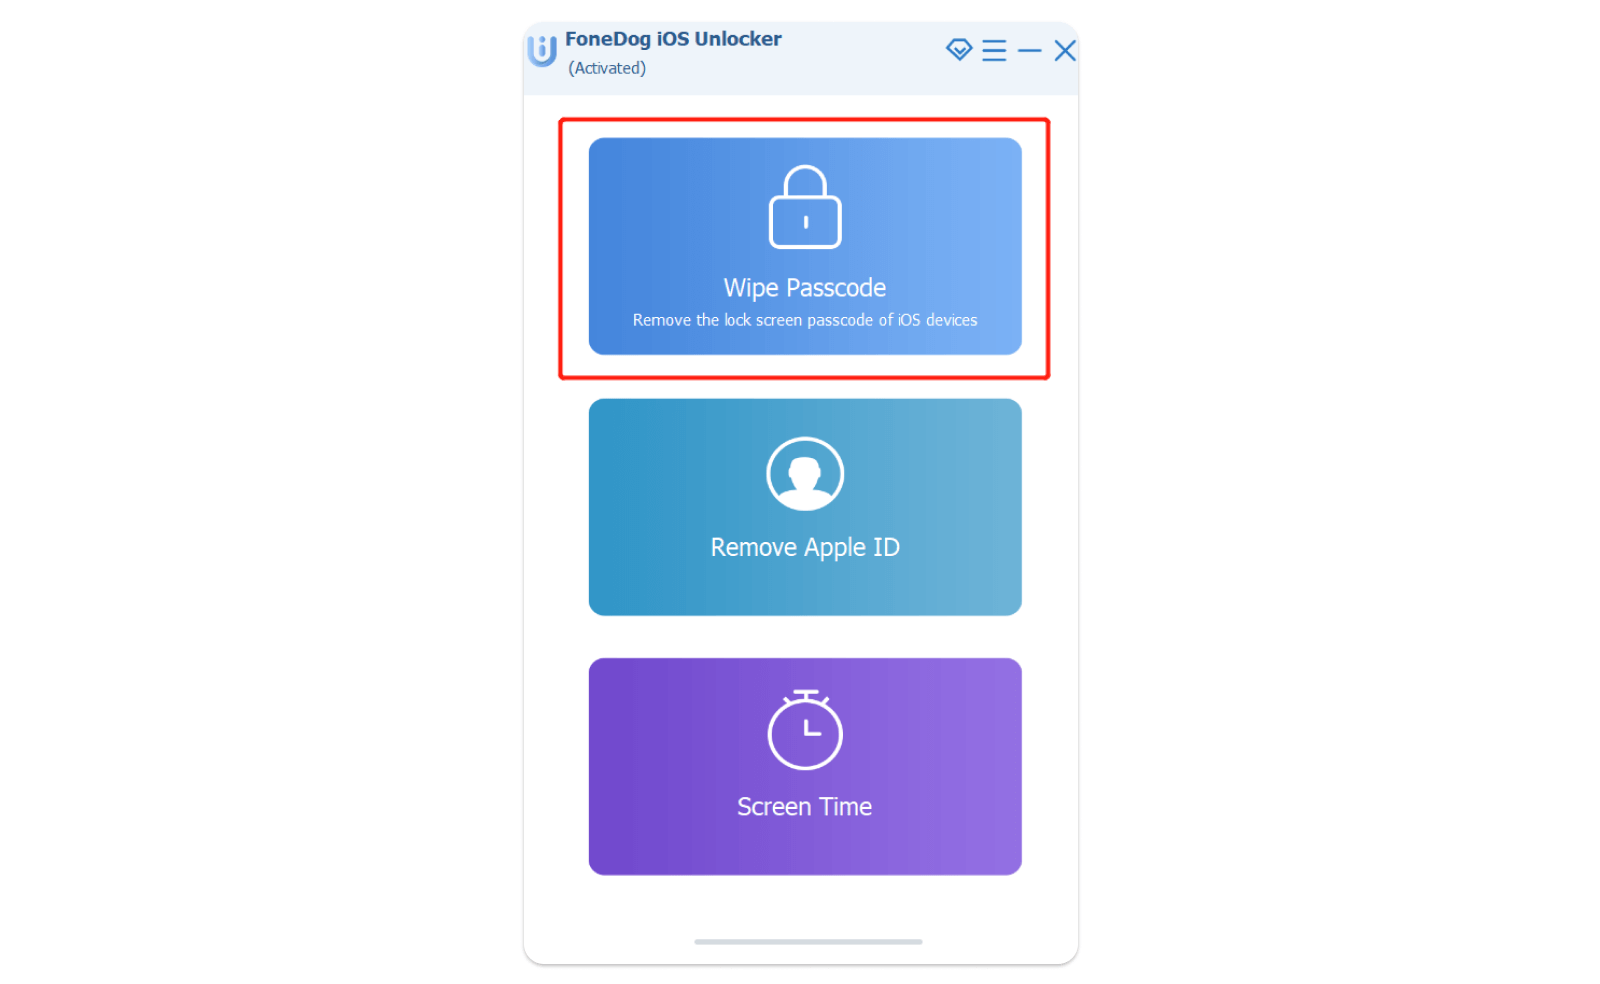
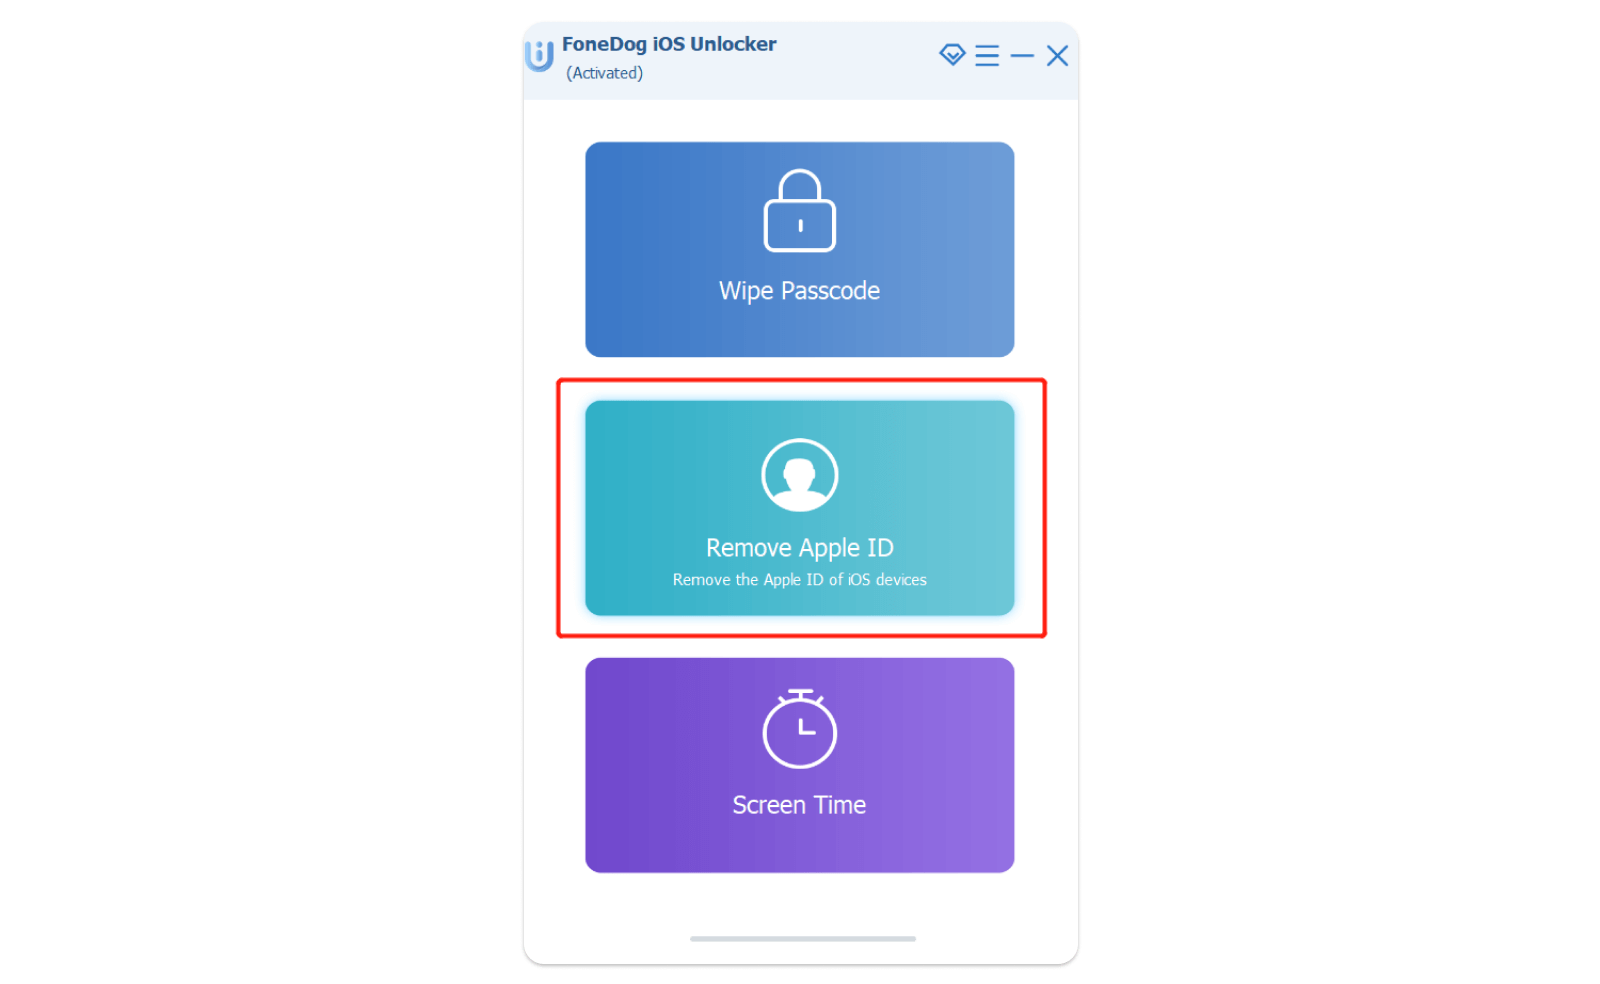
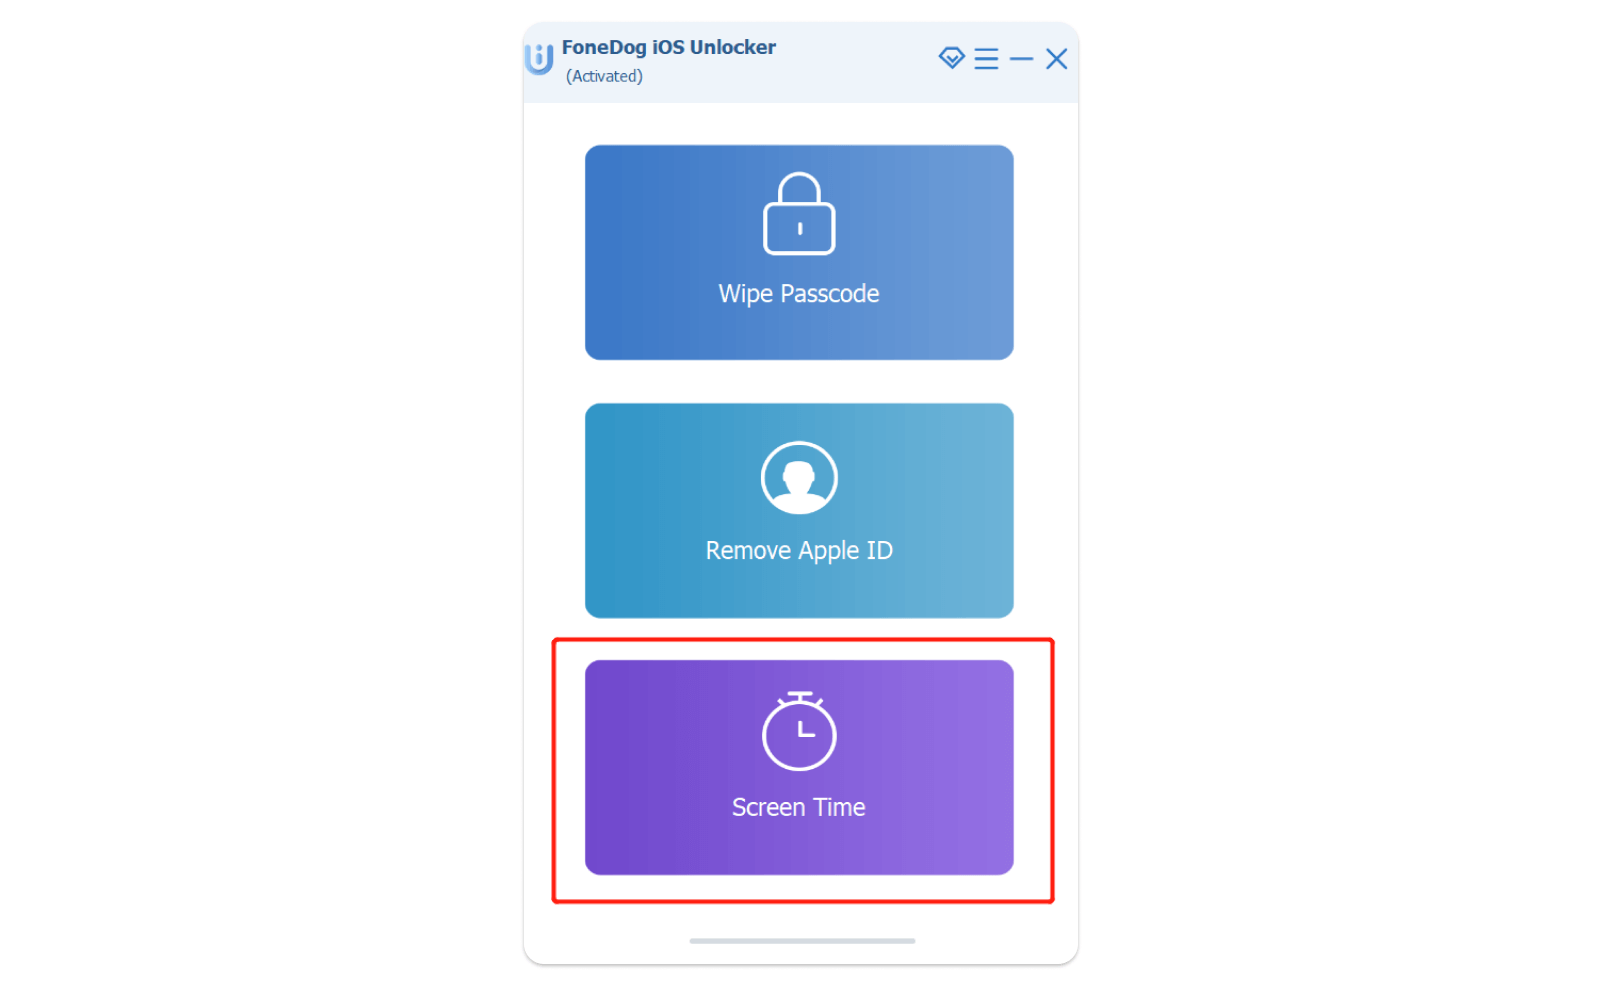
With iOS Unlocker, you can easily wipe the lock screen passcode, remove Apple ID, or delete the Screen Time passcode. Here’s how to use these three features in detail.
Feature 1: Wipe Passcode
Feature 2: Remove Apple ID
Feature 3: Recover/Remove Screen Time
Feature 1. Wipe Passcode
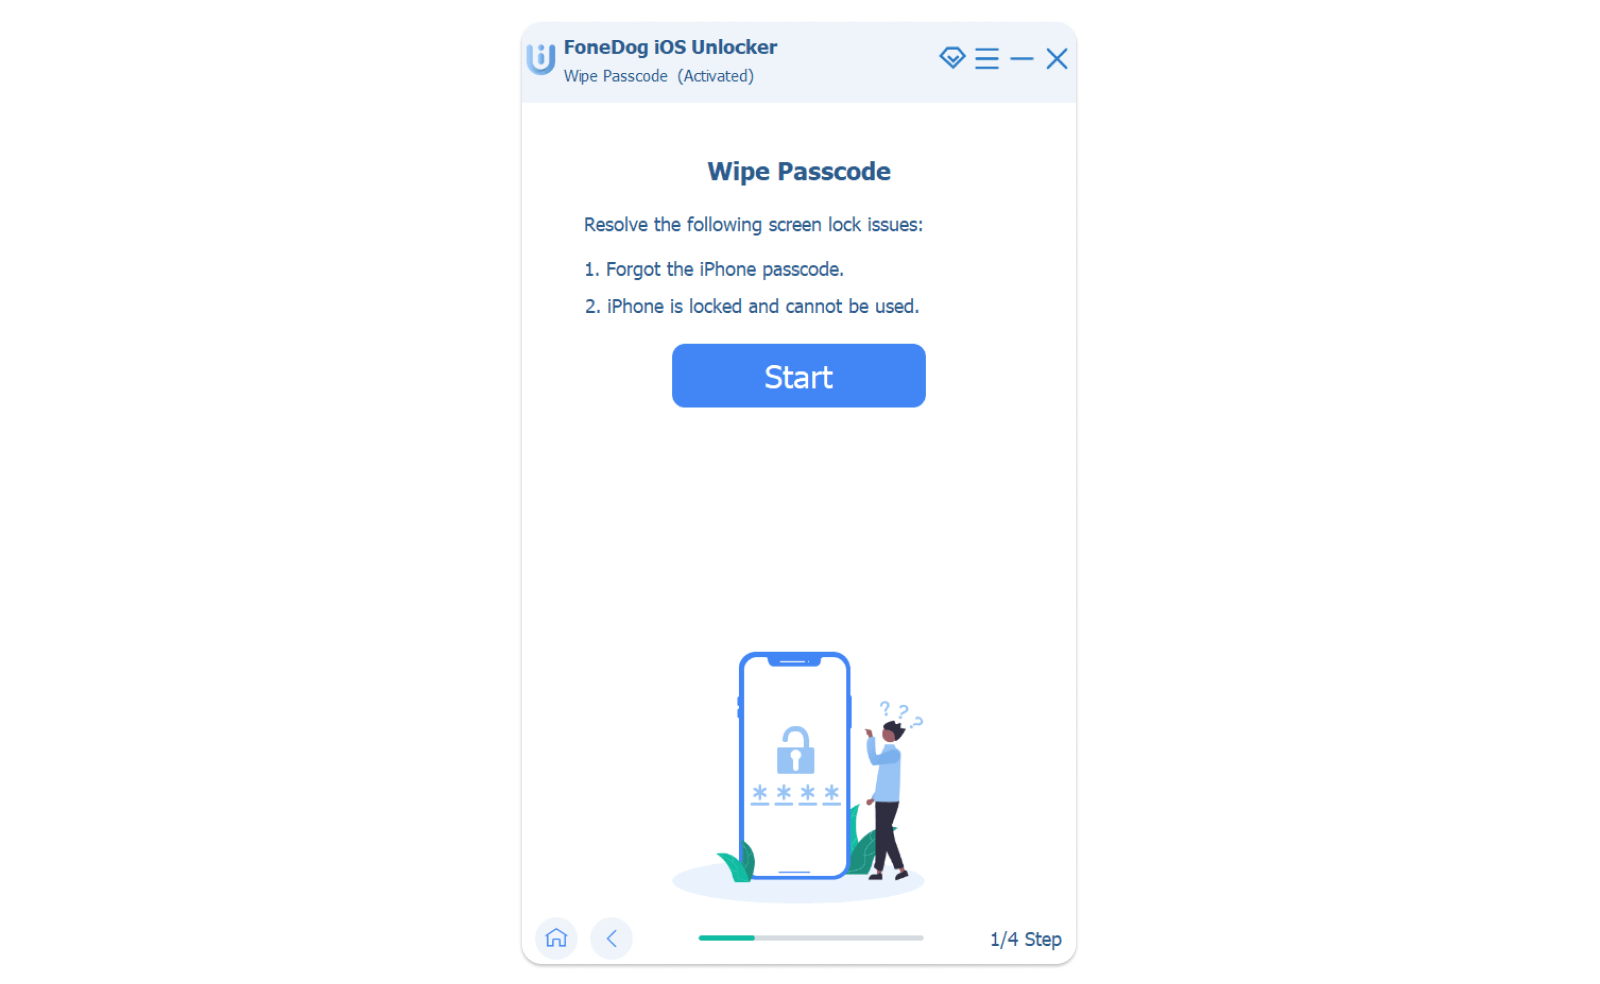
No matter your device is disabled, screen-broken, or just locked because you forget the Screen passcode, the Wipe Passcode feature of iOS Unlocker will help you unlock your iPhone/iPad/iPod quickly and get into your device successfully.
Note:
- All of your data will be erased when wiping the lock screen passcode.
- The erasing will update your device to the latest iOS version.
- Make sure your device is connected to the computer during the unlocking process.
Step 1. Run iOS Unlocker on your computer, and then choose the Effacer le mot de passe .
Étape 2. Appuyez sur le Commencez button. Then connect your device to the computer with a USB cable. Tap the Confiance button on your device to trust the computer.
Step 3. Confirm your device information, then press the Commencez .
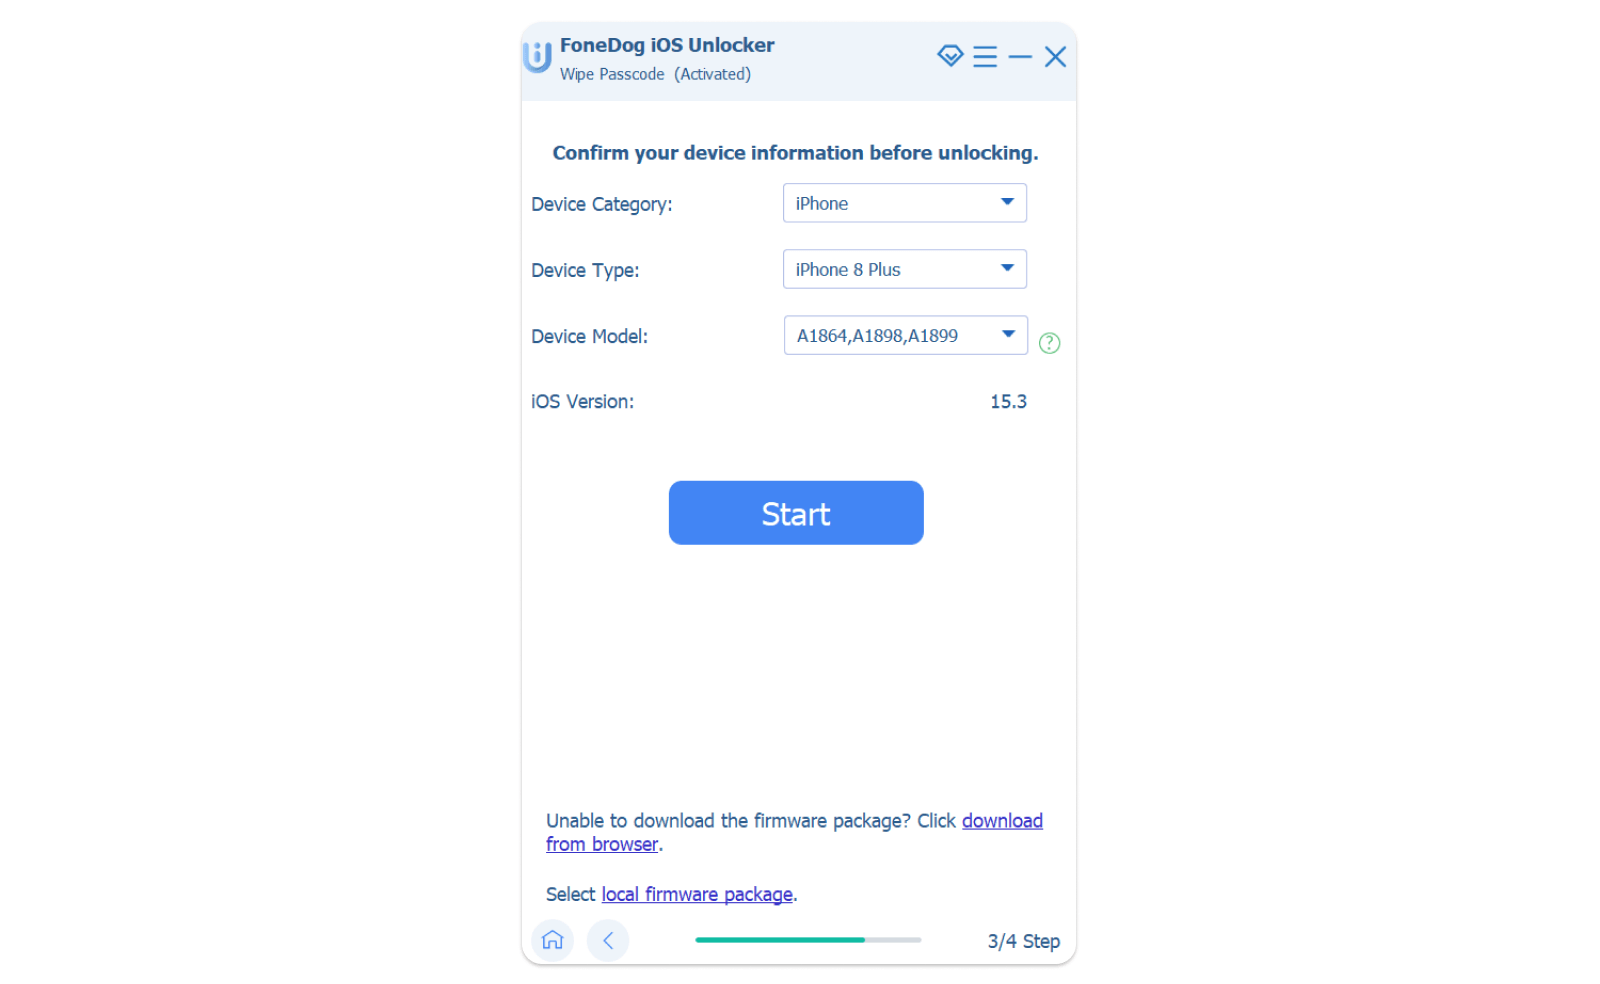
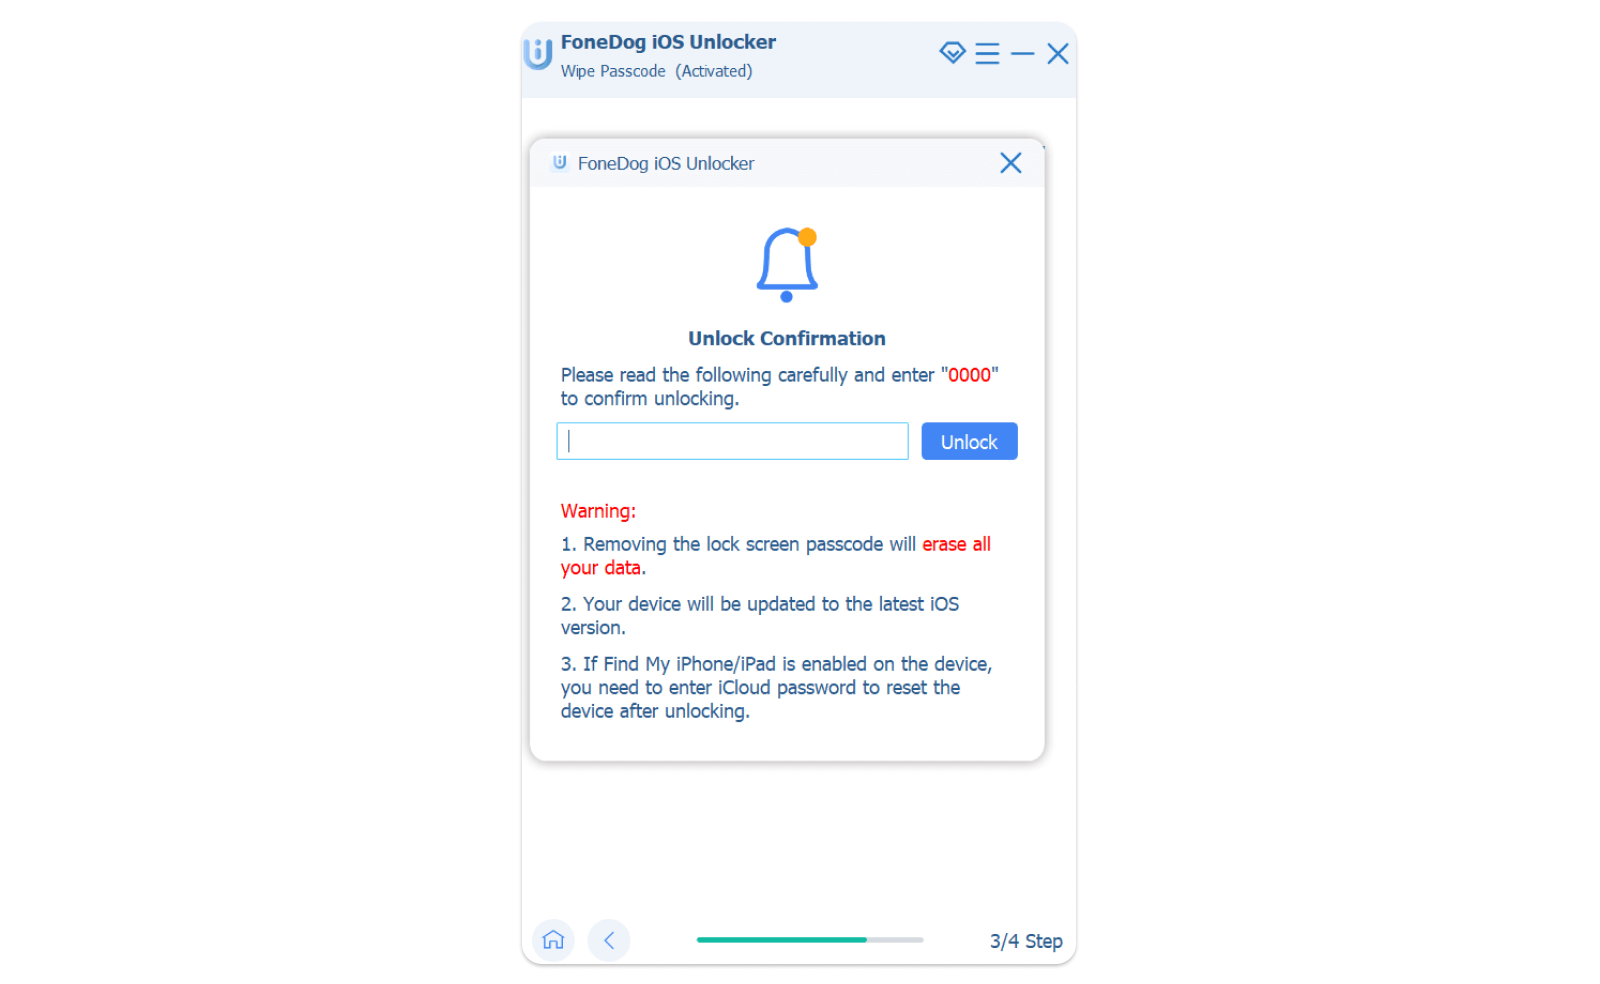
Step 4. Wait a few moments for the downloading process of the firmware package. When it is done, click the Débloquer button and enter “0000 ” to confirm. Then after a few minutes, your device lock screen passcode will be erased.
Feature 2. Remove Apple ID
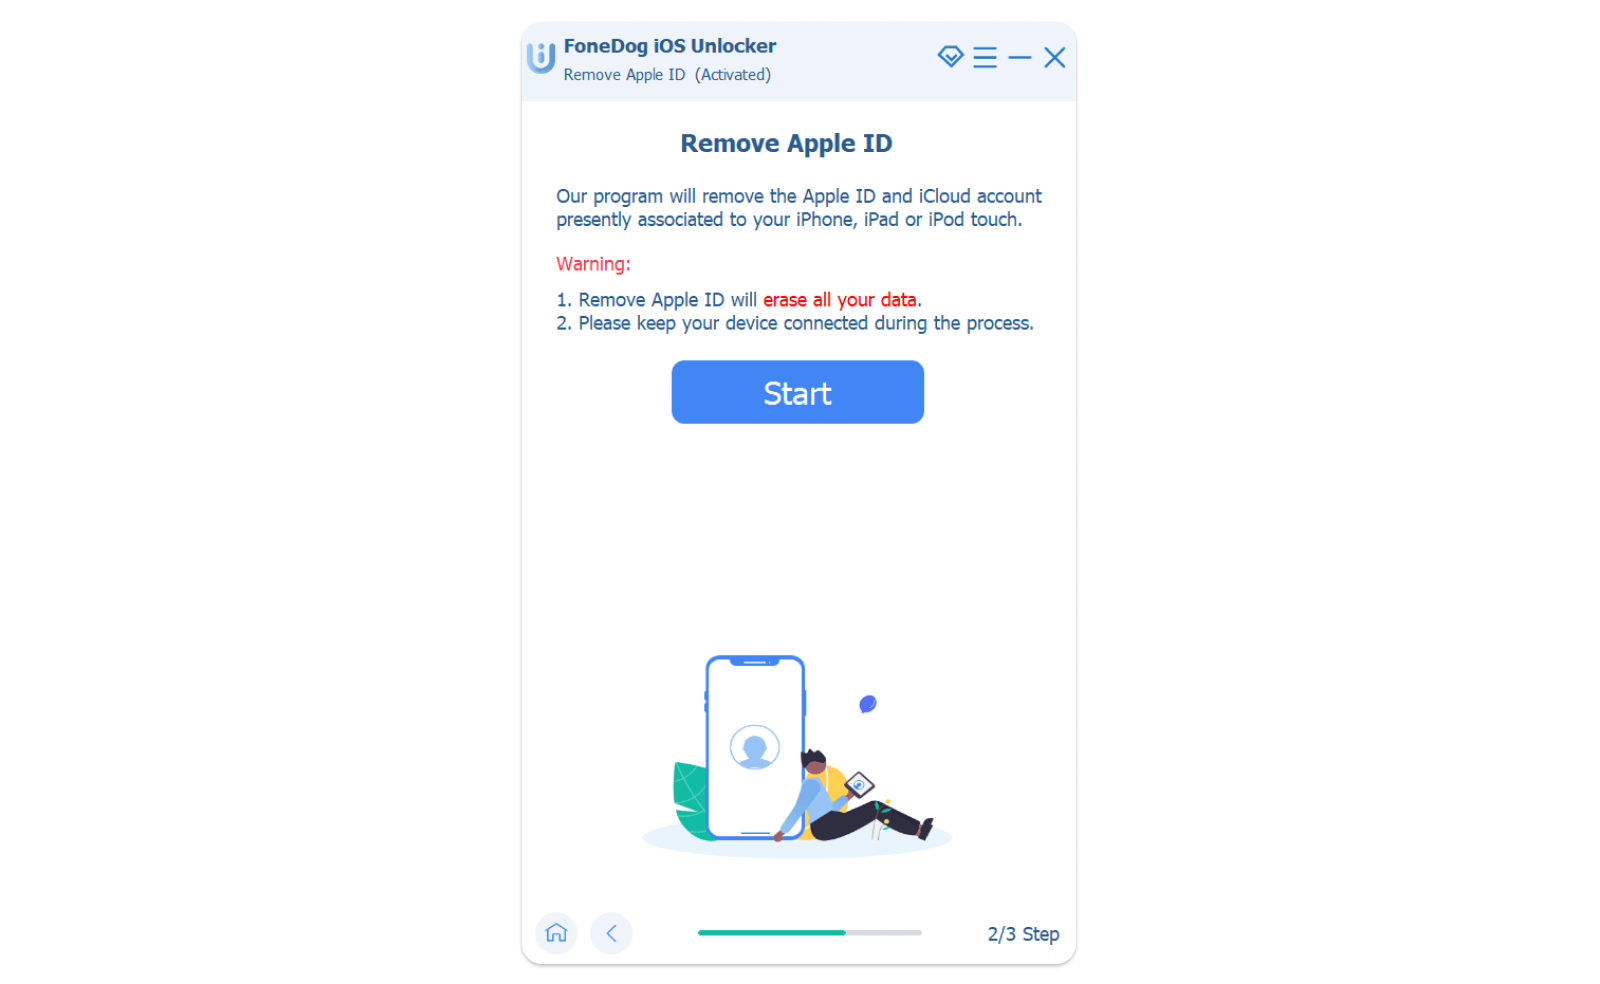
This feature is able to help you easily remove your Apple ID and iCloud account from your device (iPhone/iPad/iPod).
Note:
- The removal process will wipe all the data of your device.
- Make sure your device is connected to the computer during the removal process.
- Do not use Erase All Content and Settings feature on your device. It will cause your device to permanently link to the old Apple ID.
- Do not update or restore your device via iTunes. It will lead to your device being blocked from the old Apple ID permanently.
Step 1. Run iOS Unlocker on your computer, and then choose the Supprimer l'identifiant Apple .
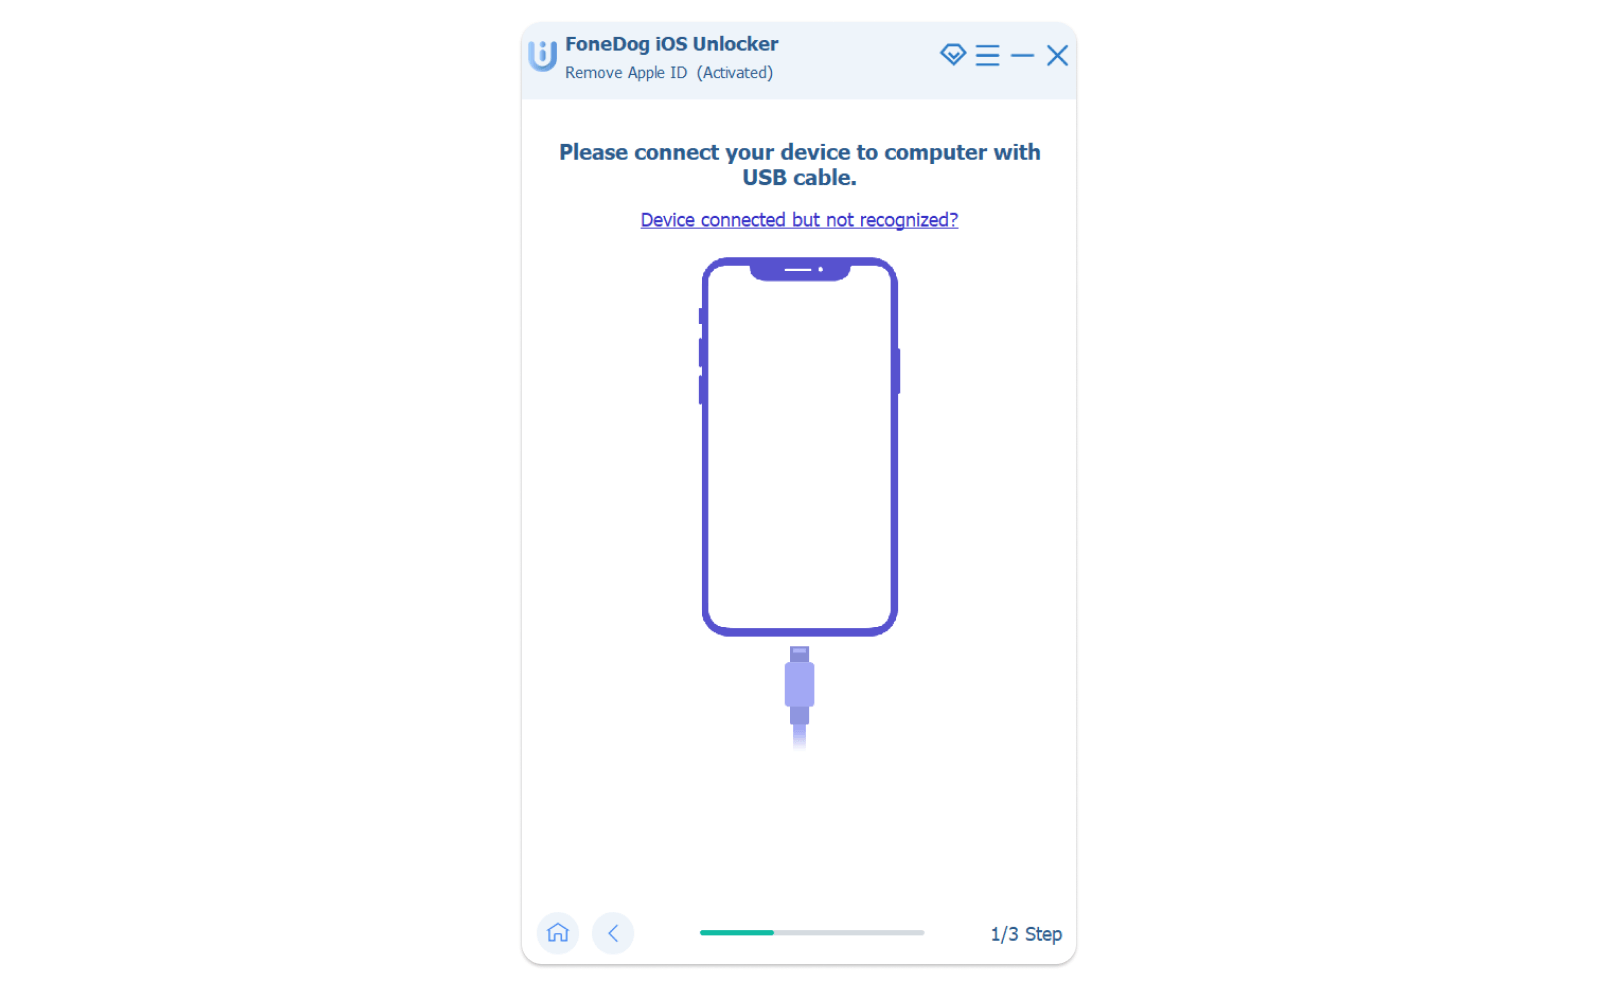
Step 2. Connect your device to the computer with a USB cable. Click the Confiance button on your device to trust the computer.
Étape 3. Appuyez sur le Commencez pour commencer à supprimer l'identifiant Apple.
Note:
#1. There are two different situations when removing the Apple ID, depending on if Find My iPhone/iPad/iPod is disabled on your device.
- If Find My iPhone/iPad/iPod is disabled, the program will start to remove the Apple ID directly.
- If Find My iPhone/iPad/iPod isn’t disabled, then you should reset all settings on your device. Simply go to the Setting on your device: Settings > General > Reset >Reset All Settings. Enter your passcode to confirm Reset All Settings if needed.
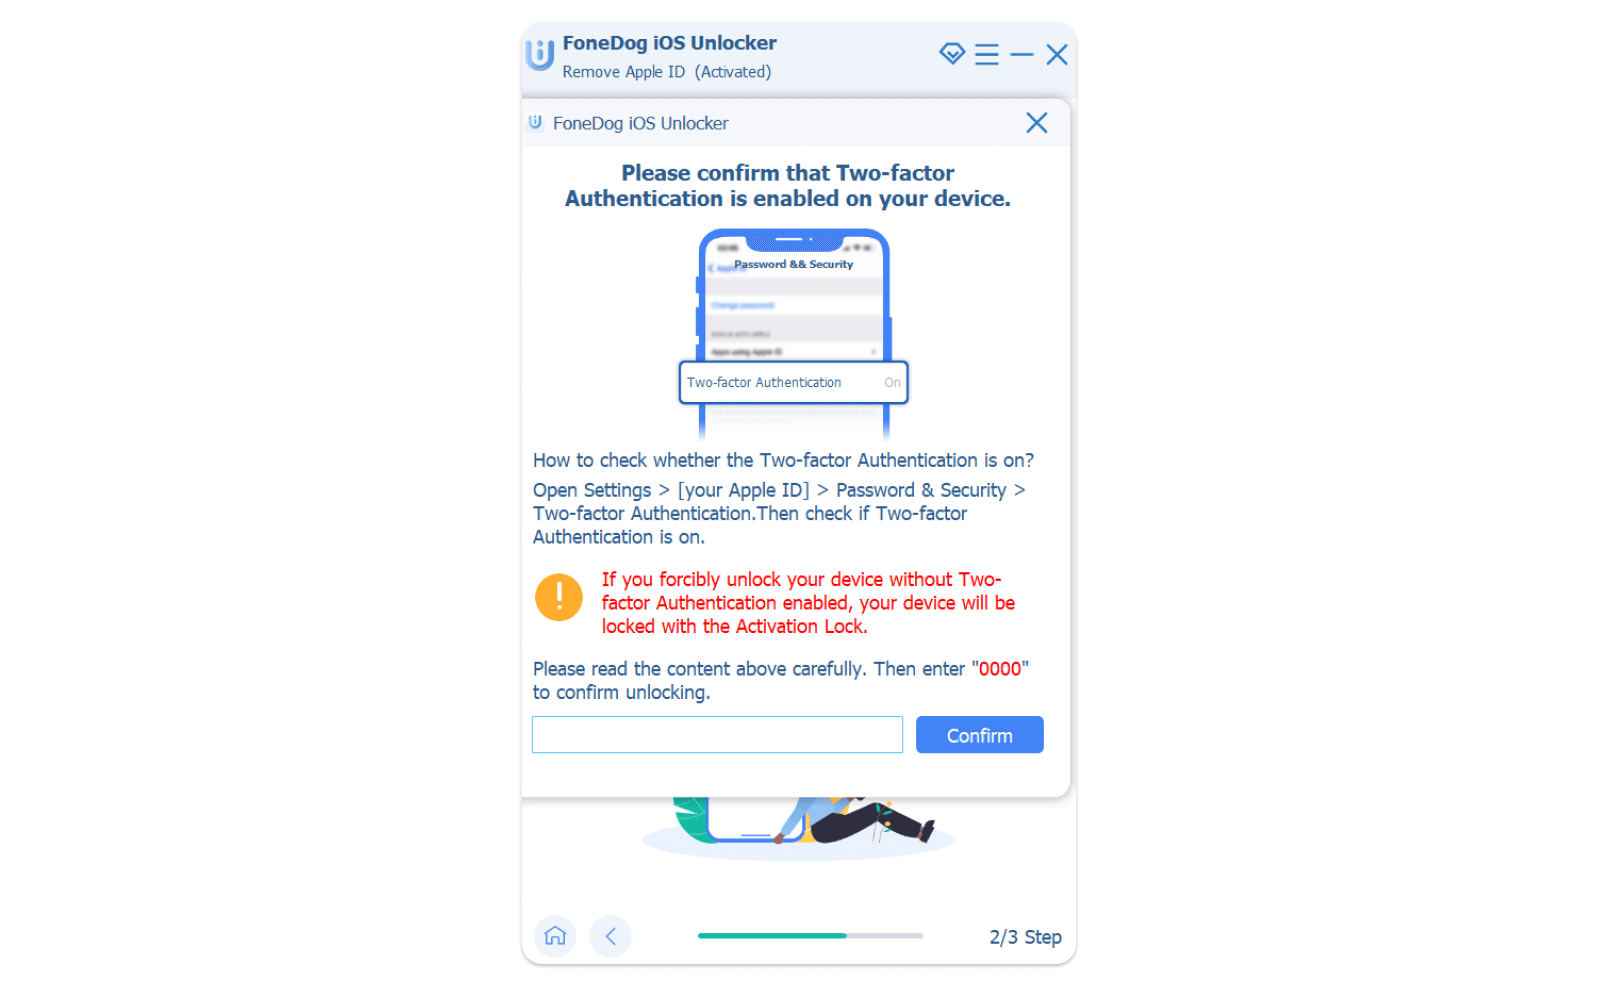
#2. For users whose device is running on the 11.4 iOS version or later versions, the Two-factor Authentication is required to be turned on, which enables your trusted devices and phone numbers to be used to verify your identity when logging in. Simply turn on it in Settings on your device: Settings > Apple ID > Password & Security. Then find the Two-factor Authentication option and toggle it on.
Step 4. After all the checking above, enter “0000 ” to confirm that Two-Factor Authentication is enabled on your device.
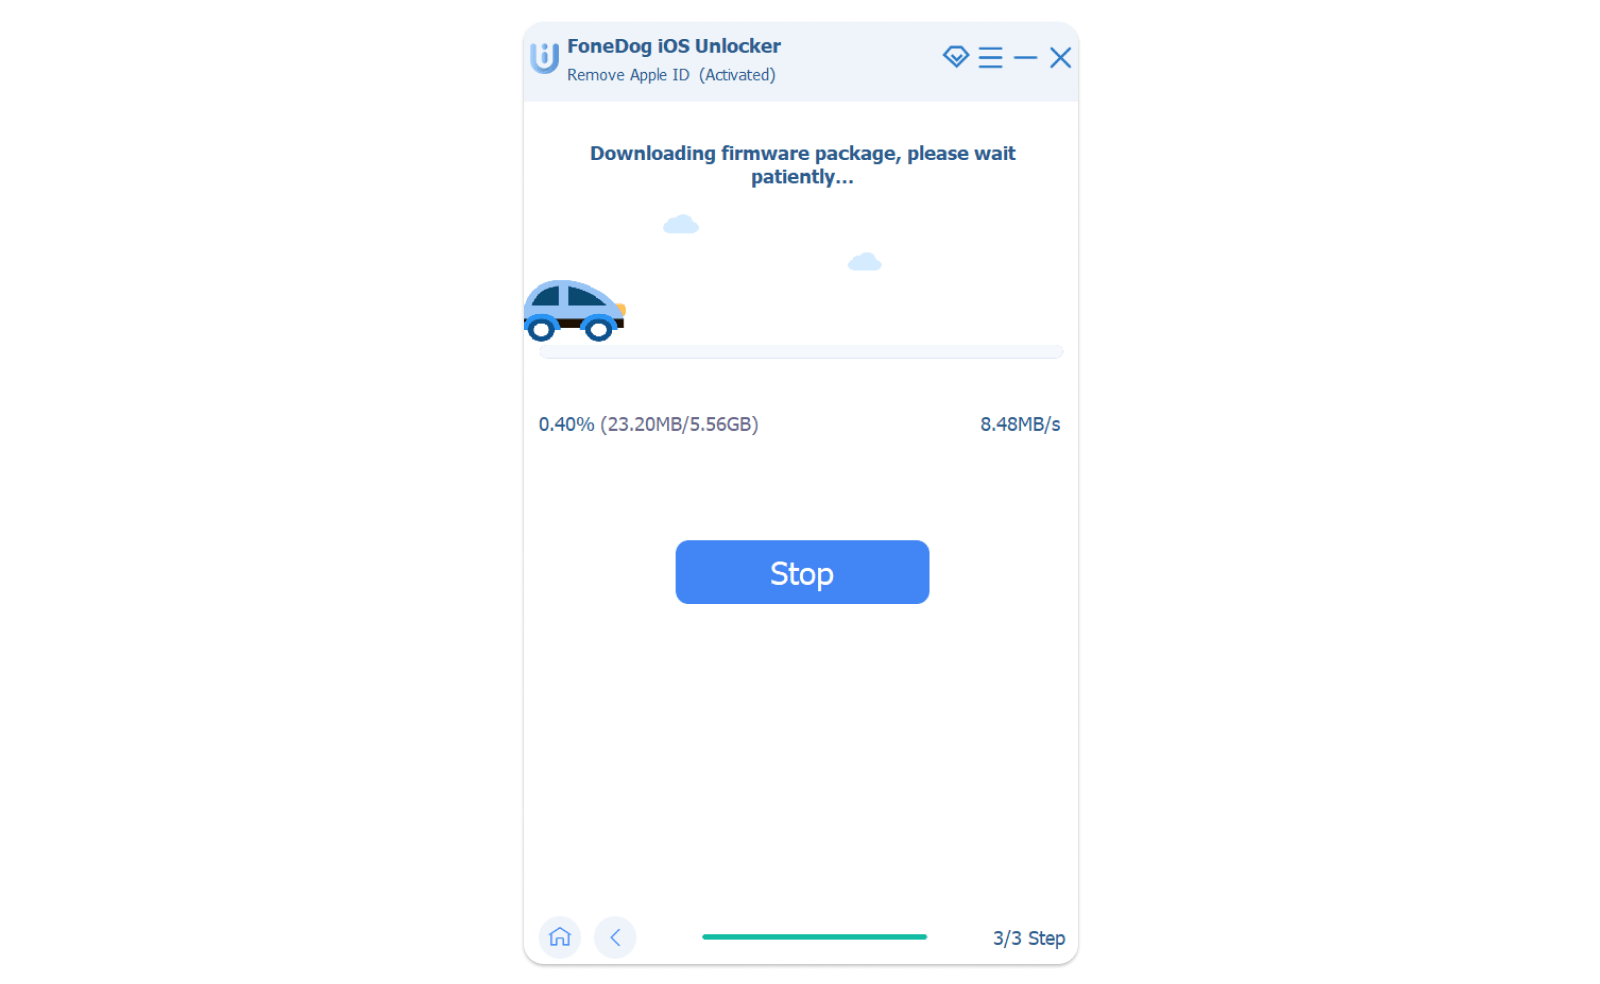
Step 5. Confirm your device information. Then click the Commencez button to download the firmware package. Wait for a few minutes till it is done.
Step 6. When the process is complete, the Apple ID along with the iCloud account will be deleted. Then you are able to set up a new Apple ID on your device or just log in to another Apple ID if you already have one.

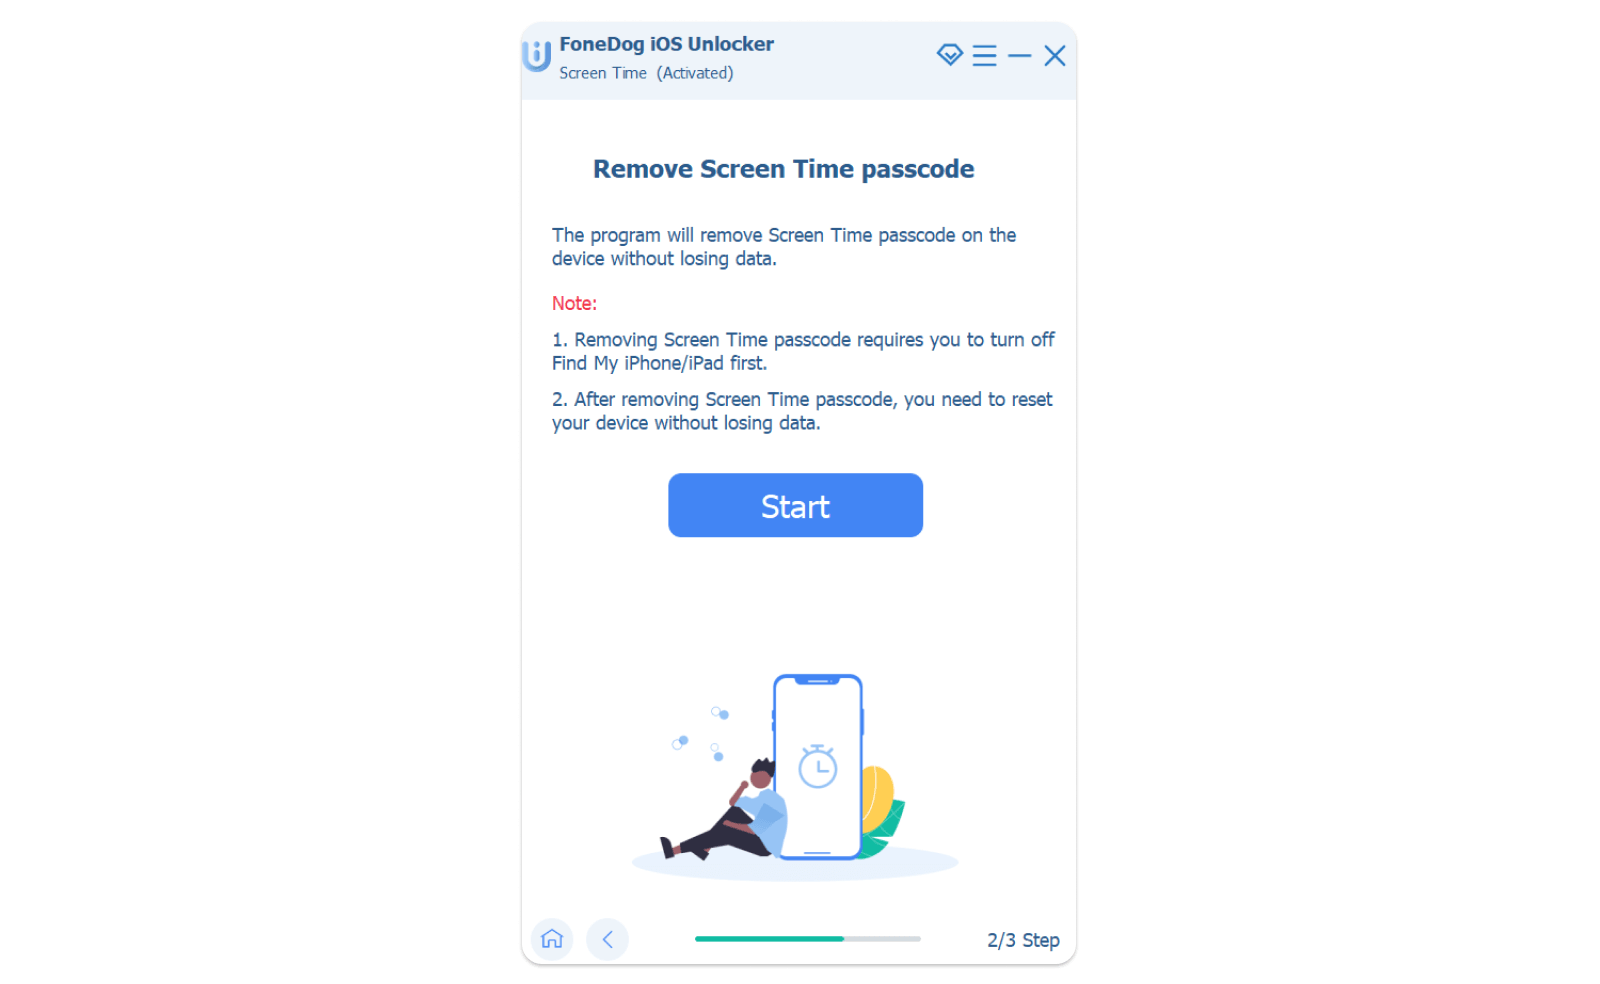
Feature 3. Recover/Remove Screen Time
The mode of Screen Time enables you to recover or remove your Screen Time password with no loss of data.
Note:
- Please disable Find My iPhone/iPad/iPod first to use this feature.
- You need to have iTunes installed on your computer for normally scanning your device. Make sure to have the latest version of iTunes.
- When the unlocking process of the Screen Time passcode is complete, you’re required to reset your device with no loss of data.
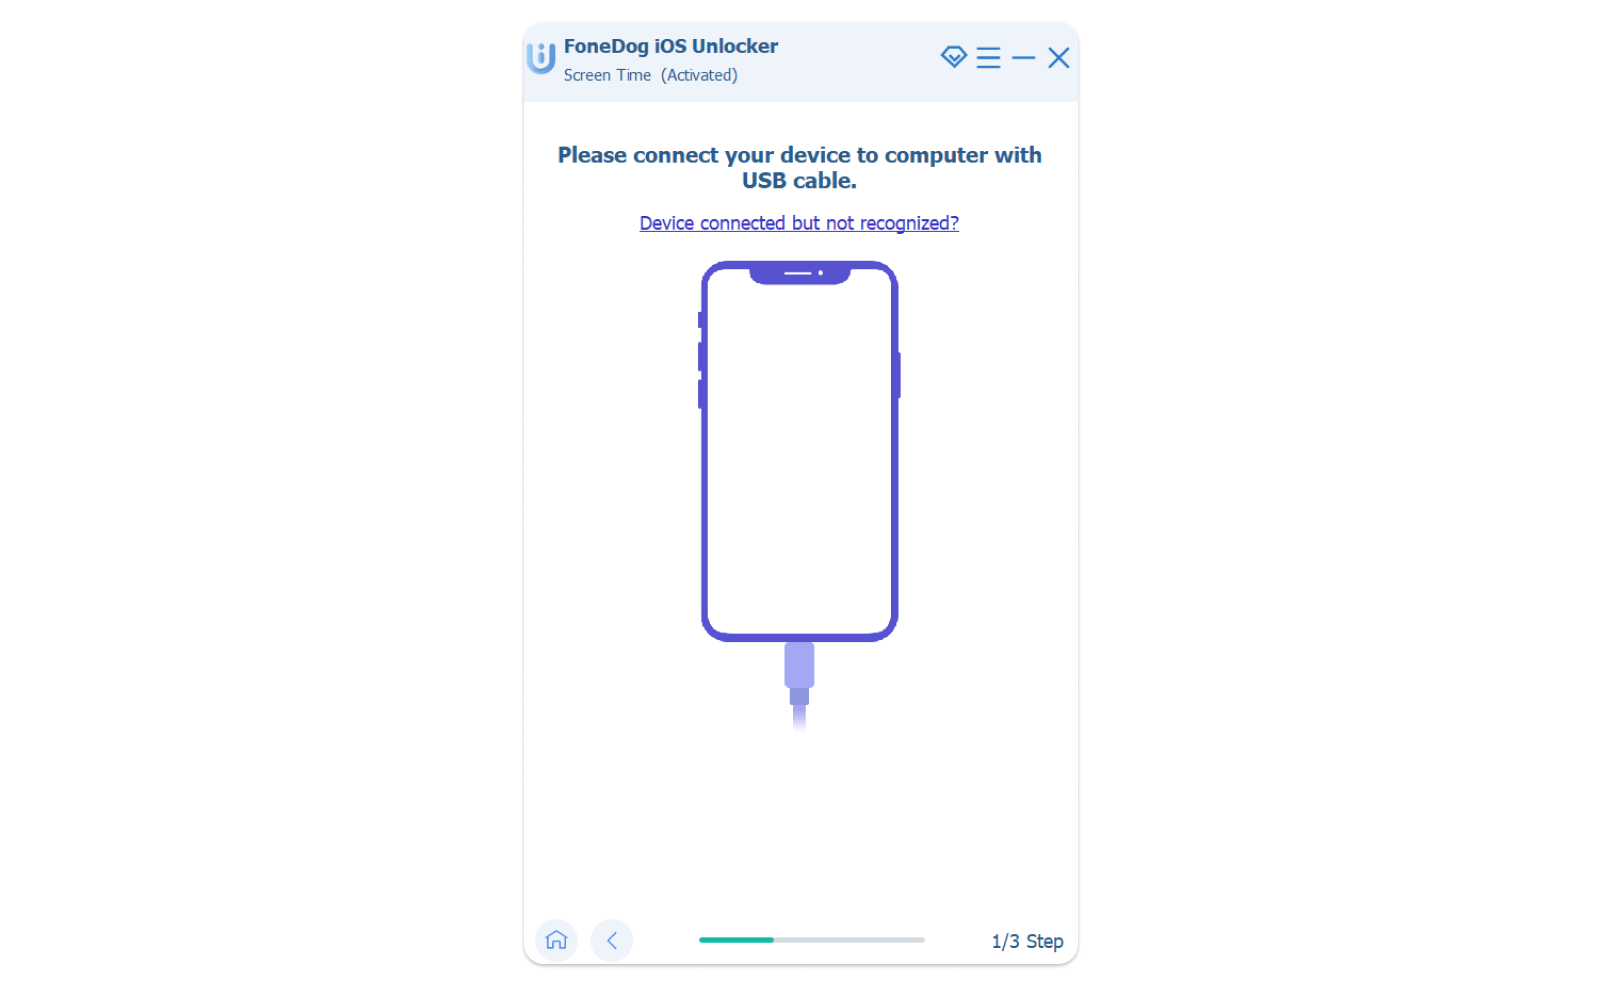
Step 1. Launch iOS Unlocker on your computer, and then choose the "Temps d'écran". .
Step 2. Connect your device to the computer with a USB device. Tap Confiance on your device to trust the computer if necessary.
Étape 3. Appuyez sur le Commencez pour démarrer le processus de suppression.
There are two different situations when removing the Screen Time Passcode, depending on the iOS version that your device is running:
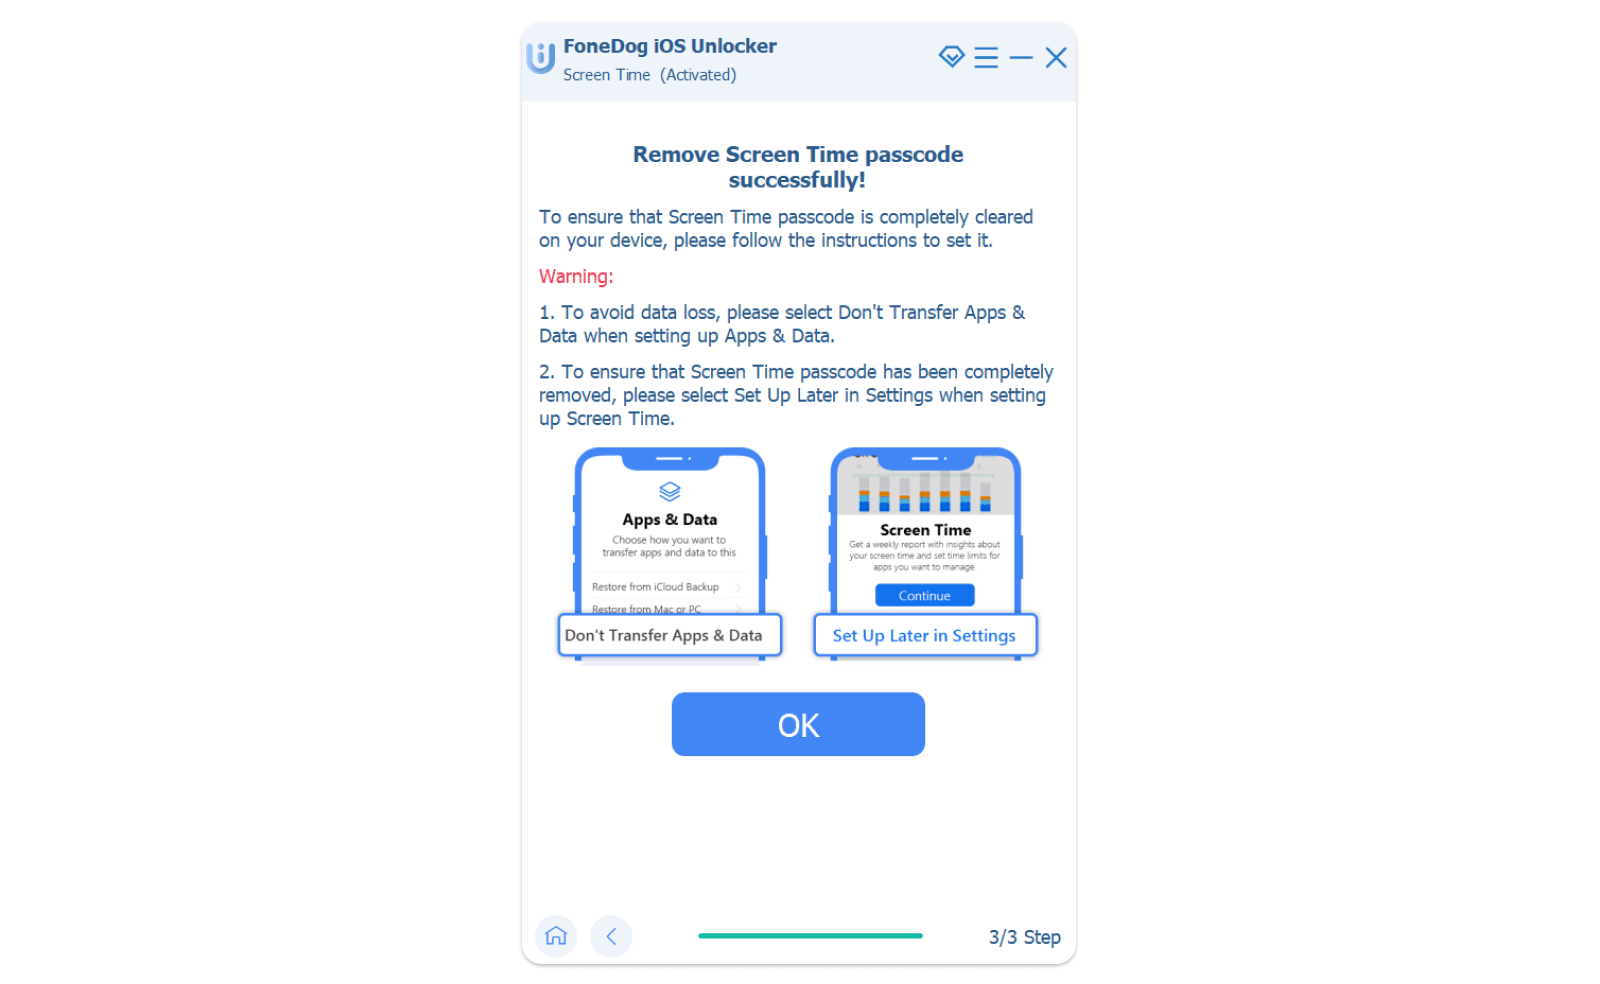
#1. iOS 12 or later versions: Remove Screen Time passcode
For users whose device running on iOS 12 or later versions, if Find My iPhone/iPad/iPod is disabled, the program will directly start removing the Screen Time password.
Note: Follow the below instructions to reset your device for ensuring the Screen Time password is removed from your device completely.
- Choose Don’t Transfer Apps & Data when you are setting up Apps & Data.
- Choose Set Up Later in Settings.
#2. iOS 11 or earlier versions: Recover restrictions password
For users whose devices running on iOS 11 or earlier versions, if the iTunes backup is not encrypted, the program will immediately start to recover the restrictions passcode. If the iTunes backup is encrypted, it will require the users to enter the password for decrypting the iTunes backup.
Step 4. After a few seconds of waiting, the restrictions passcode will be retrieved. Then you are able to reset your restrictions passcode.
D'autres questions ? Contactez-nous dès maintenant.
Nous nous engageons à fournir les meilleures solutions à tous les utilisateurs. Pour toute question, n'hésitez pas à contacter notre équipe d'assistance via support@ios-unlocker.comNotre équipe d'assistance vous répondra dans les 48 heures suivant la vérification de votre courriel.
Écrit par Rosie
Dernière mise à jour: 2023-05-10