


Apple’s products are very popular not only for their features and specifications. It’s very popular because of its security features. One of these is the Activation Lock. This is kept in place so that other people can’t use your device once it’s stolen or lost. Apart from that, the Apple ID isn’t removed from the device even after a restore is done.
Thus, if you have a second-hand device, you may want to learn how to remove Apple ID from iPhone after restore is done. In this way, you can fully control the device without having another ID manage or track it remotely.
Here, we will discuss just that. We will teach you about usuwanie Apple ID from your iOS device after the restoration process. In addition, we will talk about Apple’s security feature which is connected to this safety system of iOS devices.
Part #1: Removing Apple ID by Contacting The Previous OwnerPart #2: How to Remove Apple ID from iPhone after Restore – The Easy WayCzęść #3: Wniosek
Part #1: Removing Apple ID by Contacting The Previous Owner
The Activation Lock was created to avoid theft. Part of this Activation Lock is the so-called Find My Feature. If this is enabled by the previous owner of the iOS device, Apple will intentionally store the serial number of the iPhone (or iPad, etc.), combined with its Apple ID. This will be stored within the database of Apple itself.
This can be removed by the Apple Store itself. Thus, one option would be to go to the technical support team or the Apple Service Store to remove it. However, you still have to prove that you actually own the device and the Apple ID associated with it. Most of the time, the service store will say they won’t have the ability to fix the problem to avoid security issues.
Thus in order to remove Apple ID from iPhone after restore, you must contact the former owner of the iOS device. The previous owner should have the ability to remove the Apple ID from the iPhone. This is done by putting their Activation Lock password or through iCloud.
These are the steps the former owner should implement to implement an iCloud reset and remove the Apple ID and give you full control of the device:
- Visit iCloud And Locate Device. First, they should go to iCloud.com. After that, they should sign into their iCloud account.
- Naciśnij przycisk Znajdź iPhone'a. Within that page, click the label that says Find iPhone. Now at the upper part of the interface, click the label that says “Wszystkie urządzenia”. This will show all the devices such as iPhones, iPads, and iWatches, linked to their iCloud account.
- Lokalizować The iPhone. In this case, you should scroll towards the list of all devices the former owner owns. He or she should locate the iPhone (in question) within it.
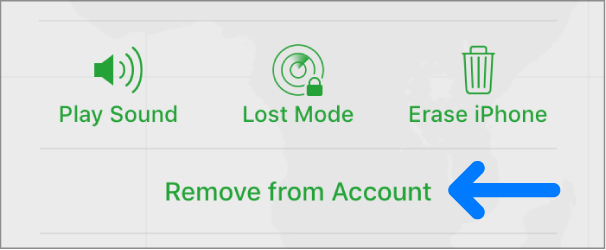
- Remove The Association To That Device. The next step will be to click “Usuń z konta” in order to disassociate the iPhone from the previous owner’s iCloud account.
- Reboot Device. Once that is done, you should shut the iPhone down. After that, you can turn it on the back again. Once it is open, you can set the iPhone up as a new device. After that, you will have full control of the iPhone with your own Apple ID, iCloud account, and passcodes.
But what if the previous owner just died or cannot be contacted? Then, it will definitely be harder for you. However, you can still contact the support team at Apple. You must have the documentation that will prove that the previous owner did sell the iPhone to you.
Once you have the documentation or the proof of sale (or ownership), you can contact Apple’s support page to request the resolution of the Activation Lock.
Part #2: How to Remove Apple ID from iPhone after Restore – The Easy Way
This section will teach you how to restore your iPhone device and how to remove the Apple ID after it. With this method, you will learn a tool that will help you unlock the iPhone by removing passcodes or the Apple ID within it. Now, let’s start with the restoration process.
First of all, there are multiple ways to restore your iPhone. You can restore the device using an iCloud backup. You can also restore it using a particular backup that’s stored within your macOS or Windows computer. Some people even call the restoration process the actual reset process wherein you restore the iPhone back to its factory state (before it was opened).
The iPhone Restore Process
Disclaimer: You must note that if you want to factory reset your iPhone, you won’t be able to use the tool we will state below. Thus, this is not recommended unless you actually own the Apple ID and can remove Apple ID from iPhone after restore process. But if you can’t don’t do this method.
NIEPOLECANE, but here’s how to factory reset the iPhone in a few simple steps:
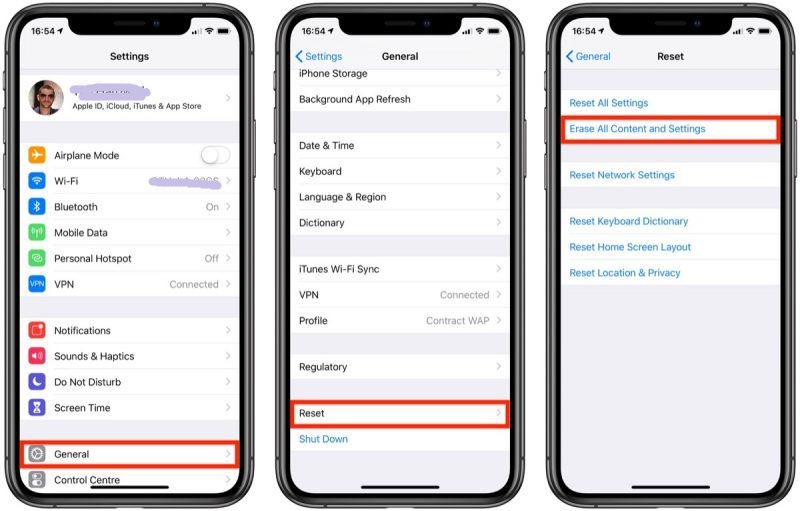
- Odwiedź Ustawienia application and click Ogólne.
- Następnie naciśnij Przenieś lub zresetuj iPhone'a.
- Po wykonaniu tej czynności naciśnij Wymaż całą zawartość i ustawienia.
- When the iPhone is in its factory state, you can restore it from a backup or set up the iPhone as a new device.
On the other hand, here are a few simple steps to help you restore your iPhone from a computer backup. We DO NOT Recommend that you use iTunes because you won’t be able to use the tool we will state in the next section. But for information purposes, here’s how to do it:
- Within your Mac computer, open your Finder. On a PC, you have to launch iTunes.
- Potem musisz connect the iPhone to your computer using its lightning or any USB cable.
- Make sure your iPhone trusts the computer you are linking it to with a USB cable. To do that, follow the steps on your iPhone to trust the computer it’s being connected to.
- Gdy masz zaufany the computer, you have to wybierać the actual iPhone device within Finder. On iTunes, you can also select the device on the left side of the interface.
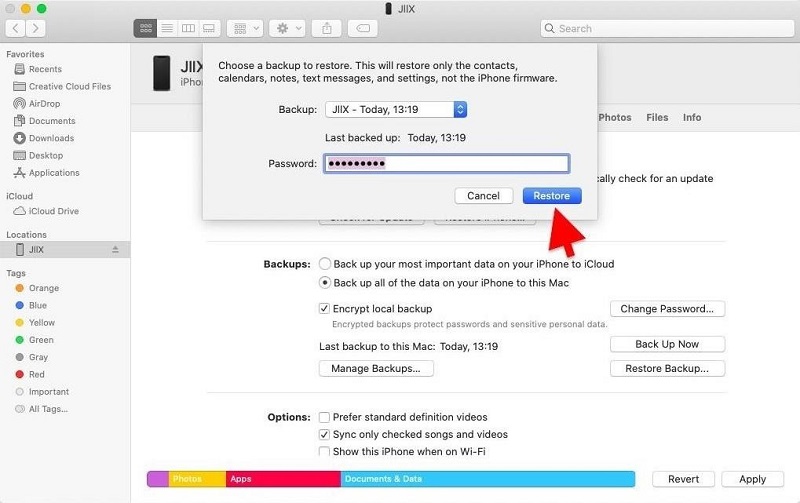
- Choose the option that says Przywracanie kopii zapasowej. Now, select a backup file that you want.
- Naciśnij Przywracać button. If it prompts for a password, just place it in.
- Czekać for the restoration process to be done. Make sure your device is still connected to the computer until the restoration process is complete. After the synchronization process is done, you can unlink the USB cable from the iPhone and computer.
How To Remove Apple ID From iPhone After Restore
Now, in this section, we will actually remove the Apple ID from the iPhone. To do that, you need a tool called Odblokowywanie iOS. This is a powerful Apple device unlocking client that can help you remove Apple ID, wipe the passcode from your iPhone or remove the screen time from your device.
Darmowe pobieranie Darmowe pobieranie
Before we teach you how to remove the Apple ID from your iPhone, you have to take note of the following:
- The Apple ID removal process will delete the entire contents of your device.
- During the entire process, the iPhone must be connected to the computer.
- You must ensure that you don’t przywróć ustawienia fabryczne telefonu iPhone. In this way, the previous owner’s Apple ID won’t be permanently linked to your second-hand iPhone.
- DO NOT use iTunes in order to restore or update the device. There are consequences to doing these. Your iPhone will be permanently blocked from the previous owner’s apple ID.
So, here are the steps on how to remove Apple ID from iPhone after restore:
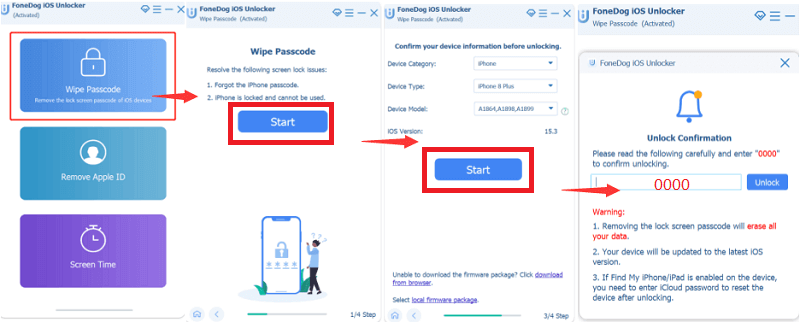
- Premiera the iOS Unlocker within your macOS computer or Windows PC.
- Select the mode that says “Usuń Apple ID".
- Now, connect the iPhone to the computer. Then, make sure the iPhone trusts that computer by following the prompts on the mobile device.
- Kliknij Rozpocznij. It is important to note the following:
- If the feature called Find My iPhone in the device is deactivated, iOS Unlocker will immediately remove the Apple ID after you click Rozpocznij.
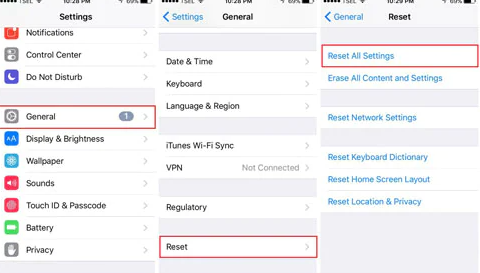
- If the feature called Find My iPhone in the device is activated, use your iPhone again and reset it. Visit the Ustawienia app i przejdź do Ogólne. Następnie naciśnij Zresetuj a następnie kliknij Resetuj wszystkie ustawienia. Input the iPhone’s passcode if necessary.
- If you are running iOS versions 11.40 and later, you have to activate the Two-Factor Authentication mode. To do that, visit Ustawienia, A następnie przejść do apple ID. Once that’s done, visit Hasło i bezpieczeństwo. After that, toggle on Uwierzytelnianie dwuskładnikowe and follow certain prompts if necessary.

- Now, once all of the steps above are complete, input “0000” to make sure you confirm that you have placed Two-Factor Authentication within your iPhone.
- Now, check the information about your device. Make sure it’s correct. Once confirmed, click Rozpocznij.
- After the actual removal process is done, the Apple ID including its associated iCloud account is deleted from the iPhone.
- Finally, you may set your iPhone up as an actual new device that you have full control over.
Ludzie również czytająWskazówki, jak sprawdzić, czy iPhone jest odblokowany bez karty SIMJak odblokować iPhone'a 5S: instrukcje krok po kroku
Część #3: Wniosek
Here, you will learn how to remove Apple ID from iPhone after restore. We recommend that you DO NOT restore the iPhone to its factory settings and DO NOT restore using iTunes. After that, you can simply remove the Apple ID from the iOS device by using iOS Unlocker. You can grab the tool from iOS-Unlocker.com today and take advantage of its benefits!
Napisane przez Rosie
Ostatnia aktualizacja: 2022-03-01