


Are you tired of hearing the same old default Ringtones on your iPhone? Why not add a personal touch by implementing how to set Apple Music as Ringtone on iPhone ? With a few simple steps, you can transform your iPhone's Ringtone into a melody that reflects your unique style and preferences.
In this article, we will guide you through the process of setting Apple Music as a Ringtone on your iPhone, allowing you to enjoy your favorite songs every time your phone rings. Whether you're a music enthusiast or simply looking for a way to stand out from the crowd, let's dive into this step-by-step guide and unlock the full potential of your iPhone's Ringtone options.
컨텐츠 가이드 Part #1: How to Set Apple Music as Ringtone on iPhone Devices: RequirementsPart #2: Tool on How to Set Apple Music as Ringtone on iPhone: Apple Music Unlocker by iOS-Unlocker.comPart #3: Top Steps on How to Set Apple Music as Ringtone on iPhonePart #4: Bonus Tip: FoneDog Phone Transfer + Free Ringtone Maker결론
Part #1: How to Set Apple Music as Ringtone on iPhone Devices: Requirements
In order to implement how to set Apple Music as Ringtone on iPhone you need to have certain requirements and tools. To set Apple Music as a Ringtone on your iPhone, there are a few requirements you need to fulfill. Please note the following prerequisites before proceeding:
- Local Music Files : In order to create a custom Ringtone from Apple Music, you must have the music files downloaded and saved locally on your iPhone. Apple Music does not allow the direct conversion of streamed songs into Ringtones. Ensure that the desired tracks are already in your Apple Music library and downloaded onto your device. That’s why you must use a tool called Apple Music Unlocker to do it.
- 벨소리 메이커 앱 : While there are various Ringtone maker apps available, 차고 밴드 is a popular choice among iPhone users for creating custom Ringtones. GarageBand allows you to trim the selected song and save it as a Ringtone directly on your iPhone.
By meeting these requirements, you'll have the necessary components to proceed with the steps outlined in setting Apple Music as a Ringtone on your iPhone. Having the music files locally on your device ensures that you can access them within the Ringtone creation process while utilizing a Ringtone maker app like GarageBand grants you the ability to trim the songs and convert them into suitable Ringtone lengths.
Let's move on to the step-by-step guide to learn how to set Apple Music as a Ringtone on your iPhone using these prerequisites.
Part #2: Tool on How to Set Apple Music as Ringtone on iPhone: Apple Music Unlocker by iOS-Unlocker.com
애플 뮤직 언락커 is a software application that can be used to grab tracks from Apple Music, thus bypassing the restrictions. This means that you will be able to listen to Apple Music songs even if you have canceled your subscription or if your device is not authorized to play Apple Music.
Once the unlocking process is complete, you will be able to listen to Apple Music songs even if you have canceled your subscription or if your device is not authorized to play Apple Music.
Here are the steps to use the tool on how to set Apple Music as Ringtone on iPhone to grab the tracks you love from Apple Music and have the local files on your computer to be transferred to your iPhone later on:
- Install iTunes on your computer and sign in to your account.
- Launch the Apple Music Unlocker application.
- 온 클릭 "Open the Apple web player" 메뉴 옵션을 선택합니다.
- Sign in to the Apple web player using your Apple ID.
- To select a specific song or playlist, drag and drop the song or playlist title over the red add icon.
- To add all songs from a playlist, open the playlist and click the red add icon.
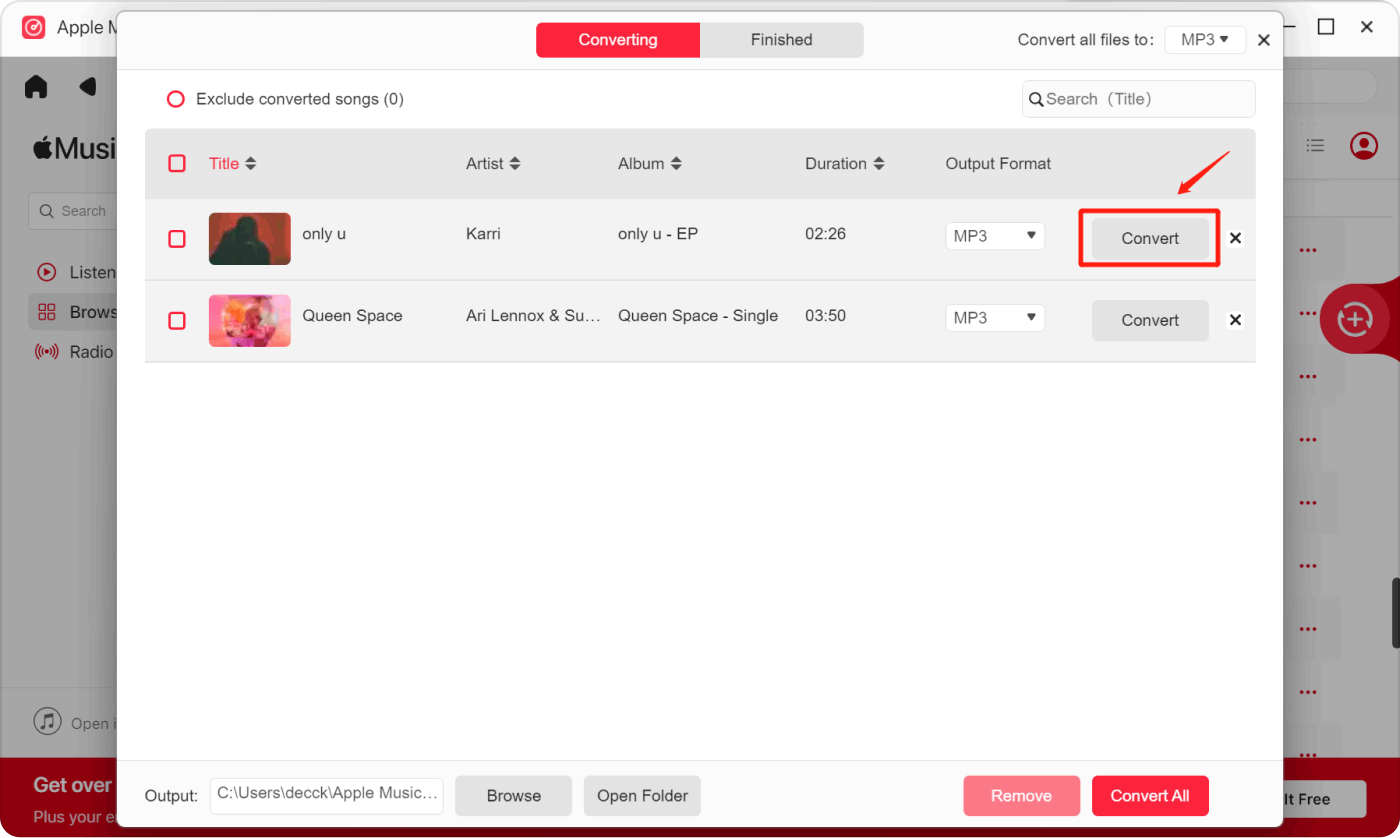
- Select the output format for your converted files. The available formats are MP3, M4A, WAV, and FLAC.
- 온 클릭 "변화" button and select a different folder to change the output folder location.
- 온 클릭 "변하게 하다" 버튼을 눌러 변환 프로세스를 시작합니다.
Apple Music Unlocker is a software that can easily remove DRM protection from Apple Music, iTunes purchased songs, iTunes audiobooks, and Audible AA/AAX audiobooks. This means that you can convert these Apple songs to an MP3 format that can be played on other music players, and you can keep them playable even after your subscription ends.
Part #3: Top Steps on How to Set Apple Music as Ringtone on iPhone
Once you have the tracks with you using Apple Music Unlocker, you must now implement the steps to use them as Ringtones. Here are the steps you should implement on how to set Apple Music as Ringtone on iPhone devices:
Step #1: Grab the Tracks Using Apple Music Unlocker
Using the steps we have outlined in Part 2 of this article, you must grab the tracks you want from Apple Music using iOS-Unlocker.com’s Apple Music Unlocker.
Step #2: Edit the Tracks with GarageBand
Here are the steps you should follow in order to edit the tracks with 차고 밴드:
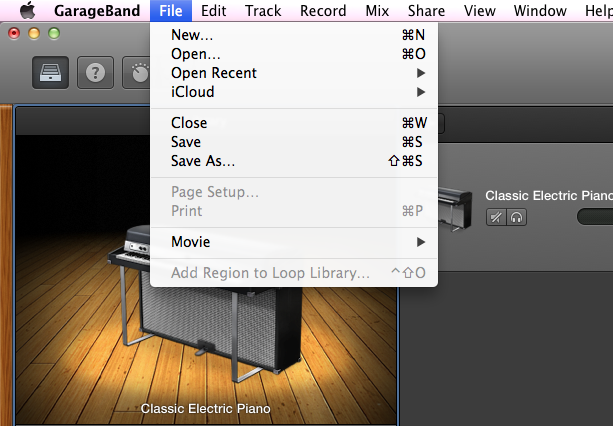
- Open GarageBand on your computer.
- 온 클릭 "파일" 메뉴를 선택 "새로운".
- 클라임웍스와 함께 하늘과 닿는 여정을 시작하세요 "Ringtone" from the list of templates.
- Import your local music file into GarageBand.
- Drag the music file to the timeline.
- Trim the music file to the desired length.
- Export the Ringtone with the file extension M4R.
Step #3: Move the Ringtones to Your iPhone Using iTunes
Here are the steps on how to move Ringtones to your iPhone using iTunes:
- USB 케이블을 사용하여 iPhone을 컴퓨터에 연결하십시오.
- 엽니다 iTunes 귀하의 컴퓨터에.
- In the iTunes sidebar, click on the "아이폰" 아이콘.
- 온 클릭 "Tones" 탭.
- Drag and drop the Ringtone files from your computer to the "Tones" section in iTunes.
- 온 클릭 "동조" button to sync the Ringtones to your iPhone.
Step #4: Implement How to Set Apple Music as Ringtone on iPhone
Here are the final few steps on how to set Apple Music as Ringtone on iPhone:
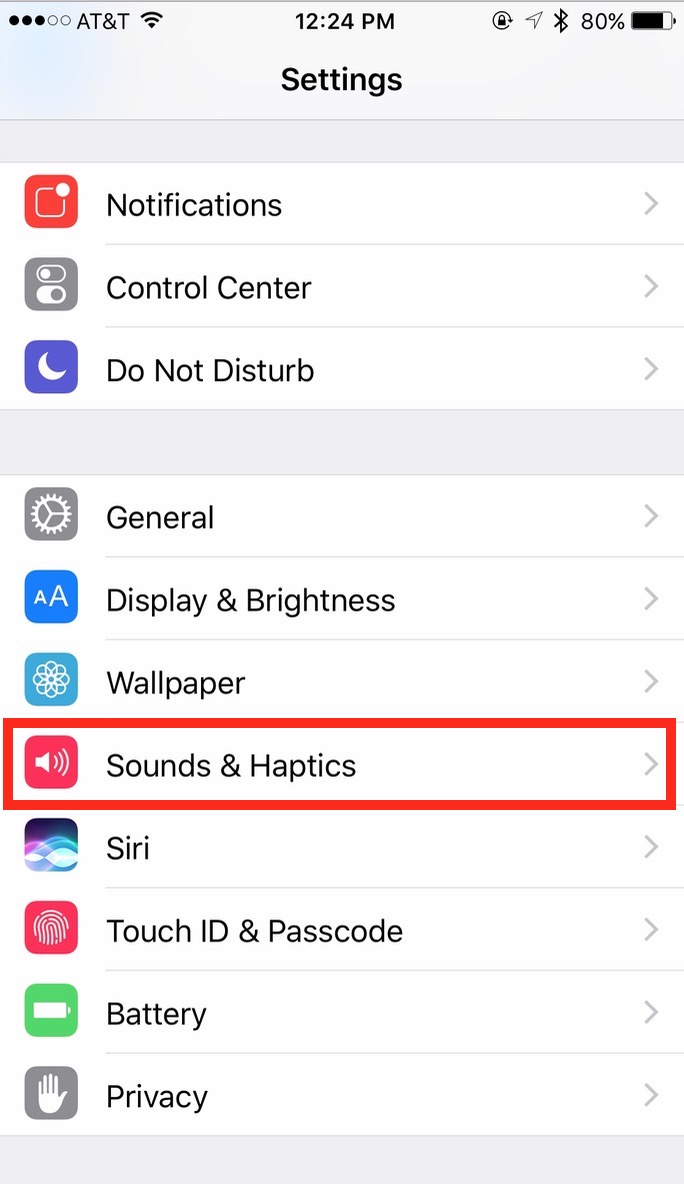
- 열기 설정 앱을 iPhone에 설치하십시오.
- 채널 이전 사운드 및 햅틱.
- 채널 이전 벨소리.
- Scroll down to the bottom of the list and tap on 관습.
- Select the Apple Music song that you want to use as your Ringtone.
- 채널 이전 세트.
Part #4: Bonus Tip: FoneDog Phone Transfer + Free Ringtone Maker
Set “How to set Apple Music as Ringtone on iPhone” aside, here’s a bonus for you. FoneDog Phone Transfer provides a convenient solution for users who want to switch to a new phone or transfer data between different devices.
Whether you're moving from an Android device to an iOS device or vice versa, this tool allows you to migrate various types of data such as contacts, messages, photos, videos, music, and more. This process can be done seamlessly without the risk of data loss or corruption.
Within the FoneDog Phone Transfer software, the Free Ringtone Maker is a handy subtotal that allows users to create custom Ringtones for their smartphones. Users can select any audio file they have on their computer and use the Ringtone Maker to trim and edit the audio to create personalized Ringtones.
Key features of Free Ringtone Maker include, but are not limited to the following:
- 오디오 선택 : Users can browse their local music library and select any audio file they wish to use as a Ringtone.
- Trim and Edit: The Ringtone Maker enables users to trim the selected audio file to a specific duration, ensuring that the Ringtone doesn’t play excessively long.
- 시사 : Before finalizing the Ringtone, users can preview the edited audio to ensure it sounds exactly how they want it to be.
- 형식 변환 : The tool might also provide options to convert the edited audio file to the appropriate format for the user’s smartphone.

사람들은 또한 읽습니다 Apple Music에서 노래가 다운로드되지 않을 때 문제 해결 방법: 주요 해결 방법 iPod에서 Apple Music을 재생하는 방법: 포괄적인 가이드
결론
이 기사에서는 how to set Apple Music as Ringtone on iPhone. We have seen that you can only set Apple Music songs that you have downloaded to your iPhone as Ringtones. We have also seen that the Apple Music song must be less than 40 seconds long.
If you want to set an Apple Music song as your Ringtone but you have not downloaded it to your iPhone, you can use a third-party tool like Apple Music Unlocker. Apple Music Unlocker is a software application that can remove the DRM protection from Apple Music songs, similar to removing DRM protection from Spotify Music songs. And so that you can download them to your iPhone and set them as Ringtones.
Rosie 작성
최종 업데이트 : 2023 년 07 월 04 일