


What if there are several ways to transfer iTunes playlist from iPhone to computer ? You can take it as like exporting iTunes playlists. Would you be delighted? Well, if you intend to move your paid and unpaid music files from your iPhone to your PC, it is possible to do so. There are just a few things that you have to prepare, execute, and follow, and we are going to share with you these things as we go along the article.
We are going to talk about these methods to transfer iTunes playlist from iPhone to your computer alongside the procedures for each of the methods.
컨텐츠 가이드 Part #1: Ways to Transfer Music from iPhone to Your ComputerPart #2: Is There A Convenient Way to Transfer Your Most Loved Music to Any Device You Own?제품 개요
Part #1: Ways to Transfer Music from iPhone to Your Computer
Now, let us discuss some of the methods that we could use to transfer iTunes playlist from iPhone to computer. We are also going to share with you the procedures for how each of the methods must be executed.
Method #1: Transfer Music from iPhone to Computer through the Use of iTunes
If you are going to transfer, music files that you have purchased using the iTunes Store, this method can help you out. If you are about to utilize this method, you need to remember that it is only possible to transfer music files that are downloaded from the iTunes Store or Apple Music.
This method would not be effective if you are going to move music from third-party applications, which means that you cannot use this method for music that you did not purchase using the 애플 스토어. Nevertheless, if the music files fall into the category that we have mentioned above, you need to:
Step #1: To start, install the iTunes app on your computer. Once you have installed it, start launching it.
Step #2: On your iTunes page, proceed to the Account option, and then move to Authorizations, and then go and look for the option that says Authorize This Computer.
3단계: 탭하세요 "승인" option, so that your computer will be authorized to play music files that you have purchased from the iTunes Store.
Step #4: Then in order to connect your iPhone to your computer, use a USB cable.
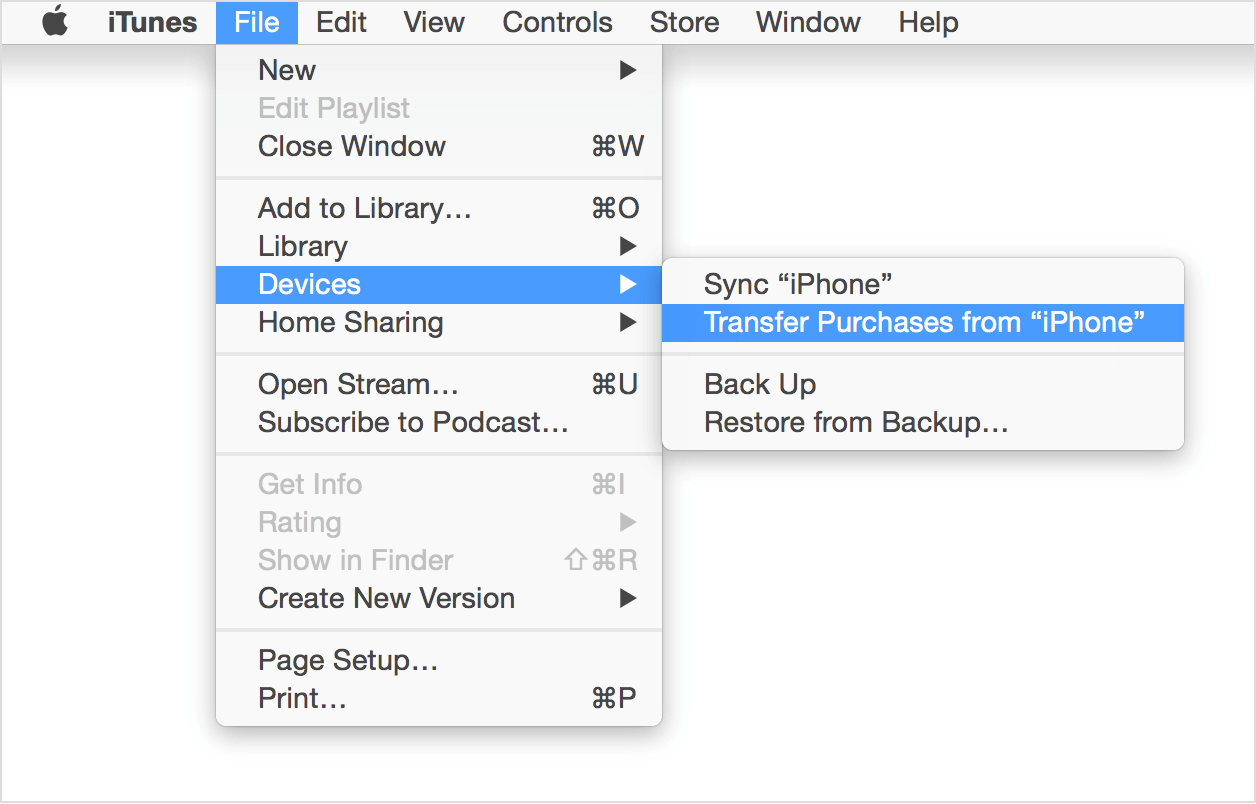
Step #5: You will see a screen, and it will ask you if you want to transfer all the purchases, you have to your computer. Tap the Transfer Purchases option. In case the screen does not pop up, go to 입양 부모로서의 귀하의 적합성을 결정하기 위해 미국 이민국에, 다음으로 진행하세요. 디바이스, and then tap the option to 구매 이체 아이폰에서.
Method #2: Transfer Music from iPhone to Computer through iCloud
One of the easy methods to transfer iTunes playlist from iPhone to computer is with iCloud. It is also simple and convenient. Once all of your songs, playlists, or albums were synced to iTunes and the iCloud music library is turned on, on both your iPhone and computer, and the devices are connected to the Wi-Fi as well, the transfer would be easy.
You just have to remember that in order to proceed, the same 애플 ID must be used on both your iPhone and computer. The process can be slow, and there are instances when there are songs that could be missing, also once you turned off the iCloud Media Library, downloaded content will be deleted. To continue with this method, here are the steps that you have to follow.
Step #1: To begin, hover to the 설정 of your iPhone, and then look for the 음악 옵션을 선택합니다.
Step #2: Toggle On the 스위치 버튼 for iCloud Music Library.
Step #3: You will then be asked if you want to keep the music files of your device, and if you have selected Keep Music, then all the music that you have on your iPhone will be added to the iCloud Music library. And in case you have selected the “Delete and Replace” option, then all the music files that you have on your phone will be replaced by the contents of the iCloud Music Library.
Step #4: Then for the next step, go to your Windows 컴퓨터, and start opening the iTunes 앱. 이동 편집, 다음을 선택하십시오. 환경 설정 at the menu bar, which you will see at the top part of the screen of iTunes.
# 5 단계 : Mac을 사용하는 경우, open the Mac computer, then open iTunes, and then tap Preferences that you will see at the menu bar that you will see at the upper part of your iTunes screen.
6단계: 일반 옵션을 누른 다음 확인란 (in order to turn it on) beside the iCloud Music Library.
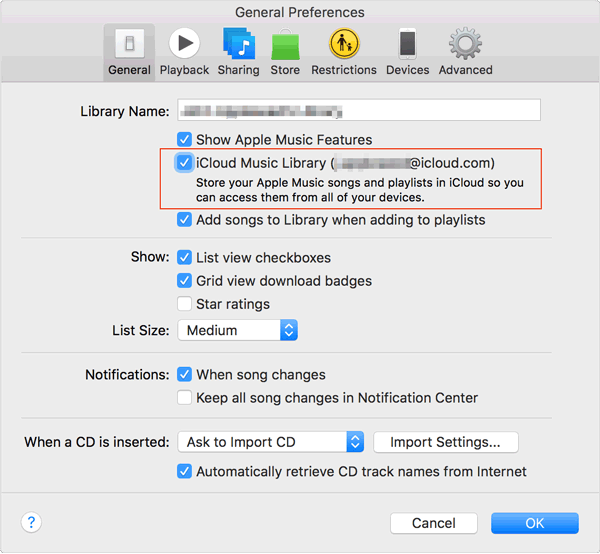
Step #7: Once done, choose the Ok 탭.
These are two of the best ways to transfer music from iPhone to computer. These are also the common ways that you can accomplish the said task; however, there can be more solutions or procedures when you use the web to look for more.
Part #2: Is There A Convenient Way to Transfer Your Most Loved Music to Any Device You Own?
In transferring the music you love from one device to another, especially when these are tracks from Apple Music, a lot of difficulties might be encountered. As we know, music tracks from Apple are protected by DRM encryption, which hinders people from accessing the said music files for illegal selling and distribution, this is why sometimes you find Apple Music does not allow for downloading tracks, and this is also the primary reason why it requires a lot of work to transfer iTunes playlist from iPhone to computer.
But, methods or procedures that we have discussed in the previous parts of the article can be of great use to any music lover. As long as the procedures are followed properly, the transfer would be really simple. But just when you thought that things can’t get any simpler than this, we have a tool to share with you; this will make things simpler and easier to deal with.
In order to make the transfer simple, music files from Apple Music need to be converted. And in order to make it possible we need the 애플 뮤직 언락커. It is a professional tool that you can use to unlock music files from Apple and have them converted to popular formats like MP3, M4A, and many more.
In order to use it, the tool must be downloaded on the computer that you are going to use. There are links that can help you to download this tool, and these are:
For Mac Computers: https://www.ios-unlocker.com/download/apple-music-unlocker.dmg
Windows 컴퓨터용: https://www.ios-unlocker.com/download/apple-music-unlocker.exe
Once you have accessed the links, you will see a download package, and start installing the tool through the use of the instructions that you will see as you click it. Once the installation is successful, you can now start opening the Apple Music Unlocker on your Windows or Mac computers.
Now that we have installed the tool, it is now time to register it. By doing so, we are a step closer to figuring out a better way to transfer iTunes playlist from iPhone to computer. To start with the registration, you need an email with the license key that will be essential for the registration of the software. The steps to follow in order to make it possible are:
Step #1: Begin by running the Apple Music Unlocker on your device and then hit the 비활성화됨 option as you see it.
Step #2: Then you have to type in the email address that you used to purchase the license key, the license key would also be essential in this step.
3단계: 탭하세요 "활성화" option and once you are done, you have finally finished the registration. If you want to go all in and remove all the restrictions, you have to choose the 지금 구매하기 option which you will see on the pop-up window, by doing so, you are able to finally purchase a license key.
Now that we have successfully registered the Apple Music Unlocker, it is now time that we figure out how to utilize this tool. We have listed the steps that we have to follow below.
1단계: Apple Music Unlocker를 엽니다.
On your PC, open your iTunes app, and then your Apple Music Unlocker. Then once you see the “Apple 웹 플레이어를 여세요.” option, you have to click it. You will see the main interface of the tool.
Step #2: Sign In Using Your Apple ID
탭 "로그인" option which you will see at the top right part of the screen, once done you just have to type in your Apple ID.
Step #3: Add the Songs That You Wanted to Convert
Drag the songs or the playlists that you want to convert. Tap the 빨간색 추가 아이콘, you can also alternatively launch a playlist and then tap the red add icon to import the songs from a specific playlist to the list.
Step #4: Select Your Output Settings
Now, you have to select the format that you want to have. You can choose from what the tool offers like MP3, WAV, M4A, and FLAC. You also have to choose the folder where to save the files once converted.
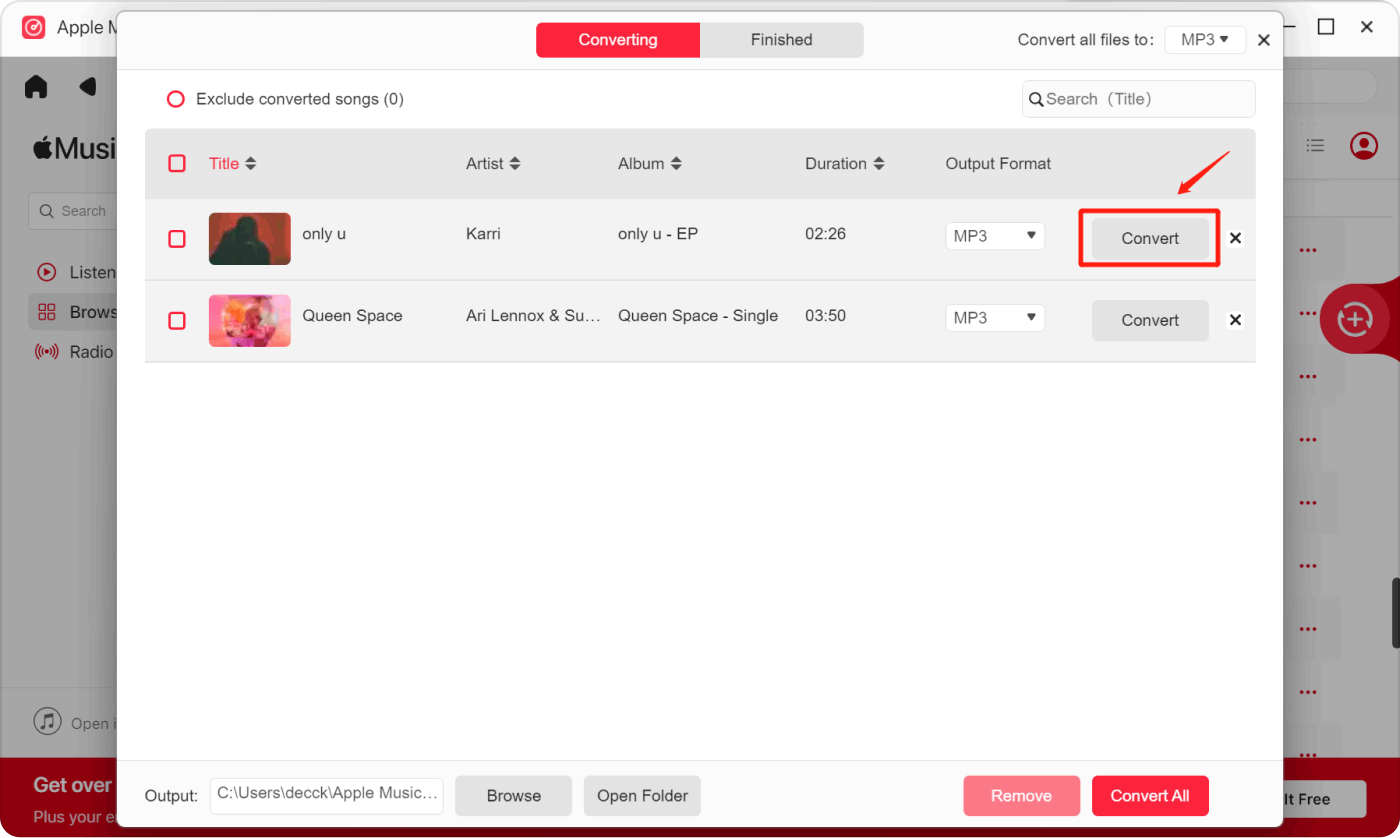
5단계: 변환 탭을 클릭하세요
In order to start the conversion process you need to tap the 개 심자 tab and wait until the conversion has been completely done.
사람들은 또한 읽습니다 iPod에서 Apple Music을 재생하는 방법: 포괄적인 가이드 Spotify를 Apple Watch에 동기화하는 방법: 단계별 가이드
제품 개요
It would be helpful to identify methods on how to transfer iTunes playlist from iPhone to computer, these methods would ease your burden when it comes to worries with file accessibility. On the other hand, having tools like the Apple Music Unlocker would help you fix format compatibilities which can help in file transferring even more.
Rosie 작성
최종 업데이트 : 2023 년 07 월 17 일