


If you've been using iTunes for a while, you probably have a large collection of music, movies, and TV shows saved in your library. But what happens when you upgrade your computer or want to move your iTunes library to a new device?
Luckily, you can easily import your iTunes library from an external hard drive, which is a great way to keep your media files safe and organized. In this article, we'll walk you through the steps on how to import iTunes library from external hard drive with the use of an Apple Music Unlocker. So you can continue to enjoy your favorite music and media on your new device.
Contents Guide Part #1: Prerequisites to Import iTunes Library from External Hard DrivePart #2: How to Import iTunes Library from External Hard DrivePart #3: Troubleshooting Common IssuesPart #4: Bonus Tip: How to Grab Tracks from Apple MusicConclusion
Part #1: Prerequisites to Import iTunes Library from External Hard Drive
Before you import iTunes library from external hard drive, it's important to ensure that your external hard drive is properly formatted and organized. Here's how you can do it:
Formatting Your External Hard Drive:
- Connect your external hard drive to your computer.
- Open Disk Utility on Mac or File Explorer on Windows.
- Select your external hard drive from the list of available drives.
- Click on the "Erase " button and select the appropriate format. For Mac, it's recommended to choose the "Mac OS Extended (Journaled) " format, while for Windows, choose the "NTFS " format.
- Click on the "Erase " button again to confirm.
.jpg)
Organizing Your External Hard Drive:
- Create a new folder on your external hard drive and name it "iTunes Backup" or any other name you prefer.
- Within the iTunes Backup folder, create additional folders for your music, movies, TV shows, and any other media you want to back up.
Backing up Your iTunes Library to the External Hard Drive:
Once your external hard drive is properly formatted and organized, you can now backup your iTunes library by following these steps:
- Open iTunes on your computer.
- Click on "File " from the top menu and select "Library " and then "Organize Library ".
- Check the box that says "Consolidate Files " and click "OK ". This will copy all your media files to the iTunes folder on your computer.
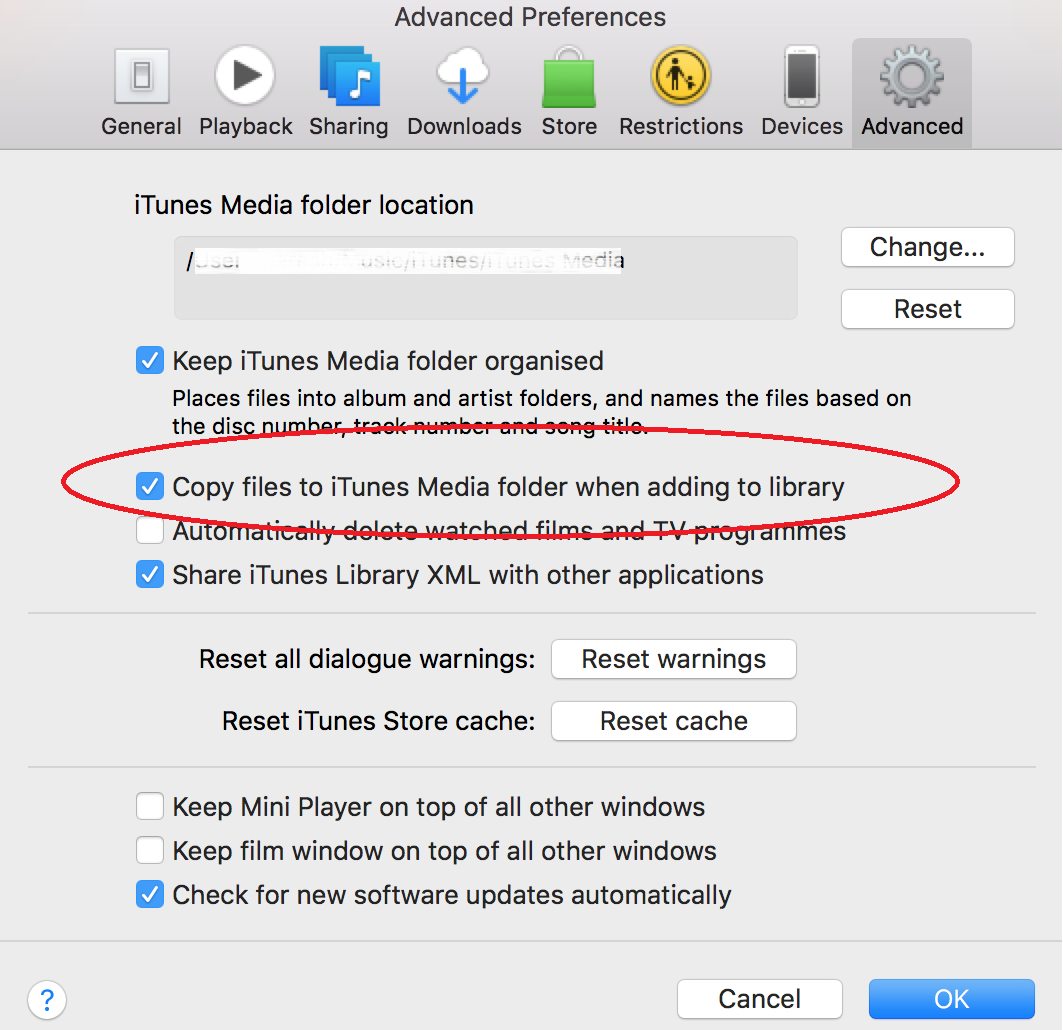
- Go to "Preferences " in iTunes and click on the "Advanced " tab.
- Select the checkbox for "Copy files to iTunes Media folder when adding to library " and click "OK ".
- Click on "File" from the top menu and select "Library" and then "Export Library ".
- Choose the location where you want to save the iTunes library backup and click "Save ". This will create a backup file of your iTunes library.
- Copy the backup file to the "iTunes Backup" folder on your external hard drive.
Congratulations, you have successfully backed up your iTunes library to an external hard drive. In the next section, we'll show you how to import your iTunes library from the external hard drive to your new device.
Part #2: How to Import iTunes Library from External Hard Drive
It’s easy to import iTunes library from external hard drive, you can easily import it to your new computer or device. Here's how you can do it:
1.Connect the External Hard Drive to Your New Computer or Device:
Connect your external hard drive to your new computer or device using a USB cable. Then, wait for your computer or device to detect the external hard drive.
2.Open iTunes on Your New Computer or Device:
Open iTunes on your new computer or device. After that, click on "File " from the top menu and select "Library " and then "Import Playlist ".
3.Select the Backup File on Your External Hard Drive:
Navigate to the "iTunes Backup" folder on your external hard drive. Select the backup file that you created earlier and click "Open ". This will import your iTunes library to your new computer or device.
4.Wait for iTunes to Complete the Import Process:
Depending on the size of your iTunes library, the import process may take some time. Wait for iTunes to complete the import process before using your iTunes library on your new computer or device.
By this time, you have successfully finished the process to import iTunes library from an external hard drive to your new computer or device. You can now enjoy your favorite music and media on your new device. It’s easy, right?
Part #3: Troubleshooting Common Issues
While the process to import iTunes library from external hard drive is a straightforward matter, there are some potential issues that you may encounter. Here are some common issues that you may face during the import process, along with troubleshooting tips and solutions:
Missing Files:
If some of your media files are missing after importing your iTunes library, it's likely that the file path for those files has changed. To fix this issue, you can try the following:
- Navigate to the "iTunes Backup" folder on your external hard drive and locate the missing files.
- Drag and drop the missing files into iTunes to add them back to your library.
Corrupt Data:
If your iTunes library contains corrupt data, you may experience issues with importing your library. To fix this issue, you can try the following:
- Navigate to the "iTunes Backup" folder on your external hard drive and locate the backup file.
- Rename the backup file to a new name and import it into iTunes.
- This will create a new iTunes library based on the backup file, which should not contain any corrupt data.
File Access Permissions:
If you're unable to import your iTunes library due to file access permission issues, you may need to change the permissions for the files. To fix this issue, you can try the following:
- Navigate to the "iTunes Backup" folder on your external hard drive and select all the files in the folder.
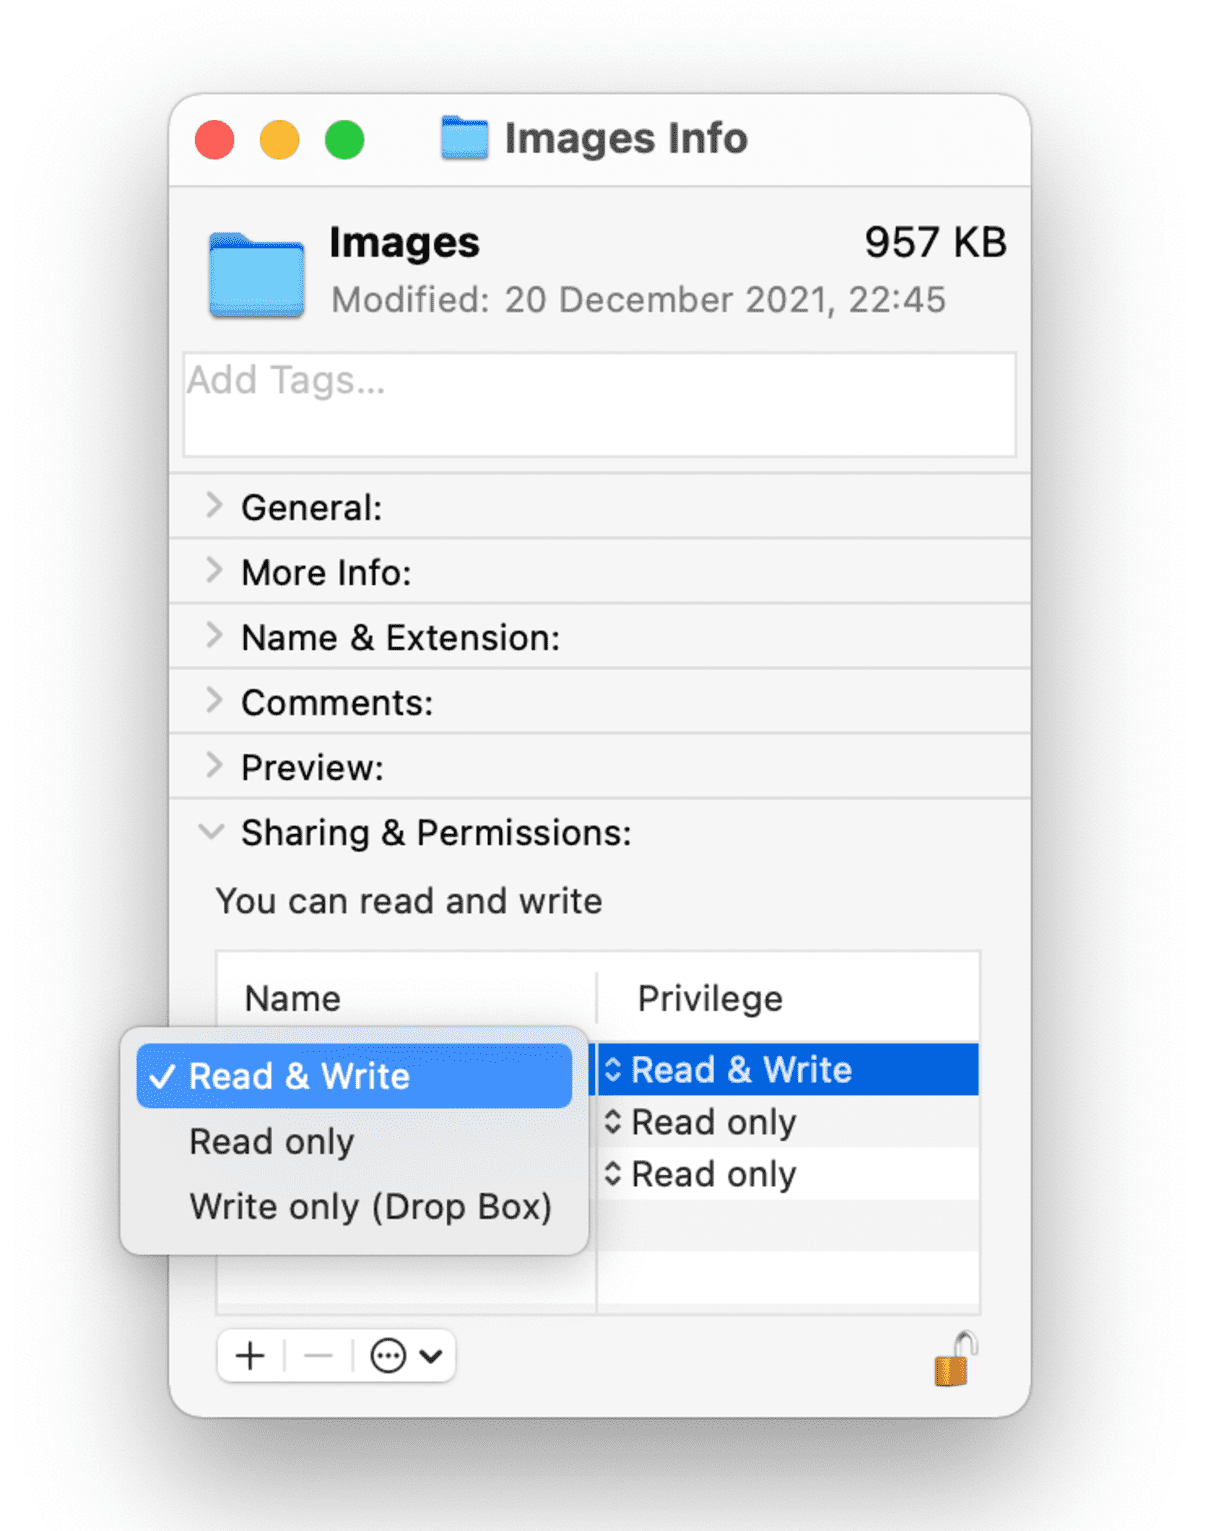
- Right-click on the files and select "Get Info ".
- In the "Sharing & Permissions" section, ensure that your user account has "Read & Write" access to the files.
- If necessary, click on the lock icon to make changes, enter your administrator password, and make the necessary changes.
iTunes Version and Operating System Compatibility:
Another potential issue that users may face while choosing to import iTunes library from external hard drive is the compatibility of the iTunes version and the operating system of the new computer or device.
- Make sure that the version of iTunes installed on your new computer or device is compatible with the version used to create the backup on your external hard drive.
- To check the compatibility, visit the Apple support website and review the system requirements for the iTunes version you're using.
- If you're using a different version of iTunes on your new computer or device, you may need to update or downgrade the version to ensure compatibility.
- Additionally, make sure that the operating system of your new computer or device is compatible with the version of iTunes you're using.
Available Storage Space:
Another issue that users may encounter while importing their iTunes library from an external hard drive is the size of the library and the available storage space on the new computer or device.
- Check the available storage space on your new computer or device before importing your iTunes library.
- If the storage space is not sufficient to accommodate the entire library, you may need to consider removing some of the media files or applications from your new computer or device to free up space.
- Alternatively, you can consider using an external hard drive to store your iTunes library on your new computer or device.
- To do this, you can connect the external hard drive to your new computer or device and set it up as the default location for your iTunes library.
- This will allow you to access your iTunes library from the external hard drive without taking up valuable storage space on your new computer or device.
Part #4: Bonus Tip: How to Grab Tracks from Apple Music
Now that you have learned how to import iTunes library from external hard drive, we will give a bonus tip. Apple Music Unlocker is a software that can be used to remove DRM protection from Apple Music songs. This means that you can then transfer the songs to any device or media player that you want, without being limited by Apple's DRM restrictions.
Apple Music songs are protected by DRM, which stands for Digital Rights Management. DRM is a technology that is used to restrict the use of digital content, such as music, movies, and e-books. DRM can be used to prevent users from copying, sharing, or transferring digital content without permission.
The tool works by removing the DRM protection from Apple Music songs. This allows you to then transfer iTunes audiobooks to your iPhone or any other media player that you want, without being limited by Apple's DRM restrictions.
Apple Music Unlocker is a free and easy-to-use software. It is available for Windows and Mac computers. To use Apple Music Unlocker, simply follow these steps:
- Ensure that iTunes is installed on your computer.
- Click "Open the Apple web player " after launching Apple Music Unlocker.
- If you don't already have an account, click "Sign up " to get one by entering your Apple ID.
- Drag the song or playlist title to the red add icon to choose a certain song or playlist. As an alternative, you may add every song from a playlist to the list by opening the playlist and then clicking the red add symbol.
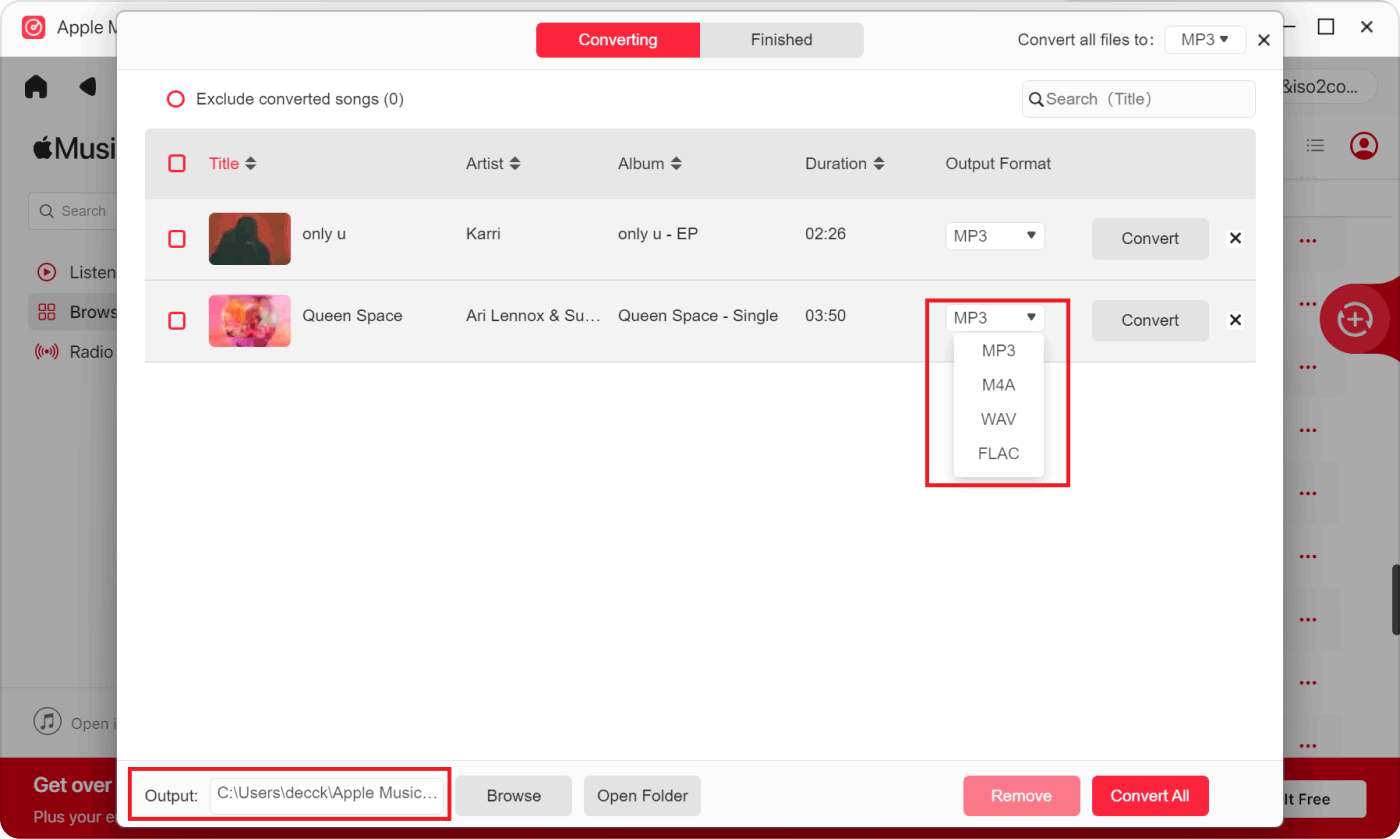
- Select the output format you want, such as MP3, M4A, WAV, or FLAC. The output folder can then be changed if you'd want to decide where to save the converted files.
- To convert one or more tracks, click "Convert " or "Convert All ".
Here are some of the benefits of using Apple Music Unlocker:
- You can transfer your Apple Music songs to any device or media player that you want.
- You can listen to your Apple Music songs without being connected to the internet.
- You can burn your Apple Music songs to CDs.
- You can share your Apple Music songs with others.
The songs that you have removed DRM protection from will now be in a DRM-free format. You can then transfer these songs to any device or media player that you want.
People Also Read Detailed Tutorials: Convert iTunes Audiobooks to MP3 Unlocking Flexibility: Convert Amazon Prime Music to MP3
Conclusion
Apple Music Unlocker, as the sub-product of general iOS Unlocker which offers the top iPhone unlock service is a great way to get around Apple's DRM restrictions, lets you import iTunes library from external hard drive and enjoy your Apple Music songs on any device or media player that you want. If you are looking for a way to remove DRM protection from your Apple Music songs, then Apple Music Unlocker is a great option. It is free, easy to use, and effective.
Written By Rosie
Last updated: 2023-05-11