


“I love streaming my favorite music via my Apple Music subscription. My music listening experience has been so seamless until the time I encountered the “Apple Music item cannot be played ” display error. What has caused this? Can I still be able to remove, fix, or perhaps avoid it from happening again?”
Apple Music is definitely the epitome when it comes to providing a great music streaming experience to every music enthusiast around the globe. By subscribing to its affordable premium plans, one would enjoy the perks that are exclusively offered by the platform. Though there isn’t a free version available, a user can take advantage of the free trial offer that’s good for 30 days.
![]()
However, what if, upon getting a premium account on Apple Music, you suddenly faced issues like an Apple Music item cannot be played? How would you feel?
Surely, you’ll be disappointed and annoyed, especially if you have not done or changed anything with the default listening settings. You'll probably also be curious about the reasons behind the error message, aside from being eager to know what you can do to finally remove and address it.
Without much ado, let’s begin the discussion by presenting the probable causes of the “Apple Music item cannot be played” error in the first part of this post. As we head over to the second section, basic solutions to this dilemma will be enumerated.
Contents Guide Part 1: Reasons Behind the “Apple Music Item Cannot be Played” IssuePart 2: Basic Solutions to the “Apple Music Item Cannot be Played” IssuePart 3: How to Avoid the “Apple Music Item Cannot be Played” Issue from Happening AgainPart 4: Summary
Part 1: Reasons Behind the “Apple Music Item Cannot be Played” Issue
Paying a monthly subscription fee to enjoy listening to good music and taking advantage of exclusive offers isn’t a joke. Thus, if a user suddenly encounters an error, such as when an Apple Music item cannot be played, it is definitely something that must be fixed right away.
As mentioned in the introduction part, aside from being knowledgeable enough on how the “Apple Music item cannot be played” problem will be resolved, it is also equally important to know what the reasons behind the issue are. Doing so can also help prevent the problem from happening again. You may refer to the list below that we have compiled in this section.
- The issue could be due to an incorrectly updated or installed Apple driver.
- Your device is probably connected to an unstable Wi-Fi network / data connection.
- The device could be faulty or unstable.
- There could be an issue with the iCloud server that’s causing music streaming problems.
- There could also be an error that occurred during the syncing process from iTunes to iOS devices.
- The problem could be due to bugs.
- The downloading wasn’t completed properly, and so it resulted to having incomplete songs.
The items in the above list are only some of the many possible causes of the “Apple Music item cannot be played” error. Since we now have a background of such probable causes, it is now good to go ahead and check out what actions we can take to get the problem finally addressed. We have some basic solutions presented in the next part.
Part 2: Basic Solutions to the “Apple Music Item Cannot be Played” Issue
Of course, we won’t end this post by just enumerating the causes of the “Apple Music item cannot be played” display error. The main goal of this article is to help you solve the problem with ease. Thus, we have collated some basic fixes in this section for your easy reference.
Solution #1. Double Check if the “iCloud Music Library” has been Enabled Properly
- On your iOS device, open the “Settings” menu.
- Scroll down until you see the “Music” option. Tap it to arrive at the “Music Settings” view.
- You will immediately see the “iCloud Music Library” option. If it has been enabled already, try turning it off.
- Wait for some more minutes before toggling the slider to “on” mode again.
Once the above process is done, try to check if you’ll still encounter the “Apple Music item cannot be played” display message.

Solution #2. Update the Music Library on your iTunes App
Sometimes, trying to update the music library on your iTunes app on PC also helps resolve the “Apple Music item cannot be played” problem. Doing so will help you ensure that your previously purchased content will be synced and shown on your devices. To do it, just follow the below steps.
- On your PC, fire up your iTunes app.
- Upon doing so, right away, hit the “File” menu. Tap the “Library” option and then the “Update iCloud Music Library” button next.
You just have to wait a few minutes while the app does the update.
Solution #3. Try Turning Off the “Show Apple Music” Option and Turn it Back on Again
- Go to your “Settings” menu.
- Scroll to see the “Music” option, and click it once found.
- Under the “Music” section, the “Show Apple Music” menu will be seen right away. Toggle the slider to turn the option off.
- Head back to your iTunes app, and then try accessing your music content.
- Go back to the “Show Apple Music” option on your iPhone’s “Settings” and make sure to turn it back on.
Upon completing the above, try accessing the previously unavailable item via the Music app and see if it can now be played.
Solution #4. Try Re-adding the Songs to your Music App
Some users are saying that re-adding or re-downloading the songs is also an effective fix to the “Apple Music item cannot be played” problem. You can also try doing that by following the below guide.
- On your iPhone, open the Music app.
- Start browsing and looking for tracks that can’t be played.
- Press the “cloud” icon next to those tracks to download them to your iPhone.
Now, you should be able to access these newly downloaded tracks.
Solution #5. Review the Country That’s Defined on Your Account
There are some Apple Music songs that can only be played in specific regions or countries. Thus, the “Apple Music item cannot be played” issue could happen when you make changes to your geographic information. To get this addressed, you can go ahead and modify the defined country to what it was before time you purchased the songs. You can do this by heading over to your account settings.
Solution #6. Remove the Album Containing the Songs and Add it Back to Your Library
If there have been changes to the albums or music tracks that were done by the authors, it would help to remove the album first and then add it back again to address the "Apple Music item cannot be played" problem. To do it, the steps below must be followed.
- Open the Music app.
- Look for the album that contains the songs that you can’t access or play. Press and hold it until new options are displayed on the screen.
- From the list, you have to choose the "Remove" option.
Now that you have already successfully removed the album, you just have to download it again from the catalog so that you’ll get the content that was already updated.
Solution #7. Disable the Restrictions Set on Your Device
If you have forgotten about the restrictions you set up before on your device, it is now time to review them, as they could probably be causing the “Apple Music item cannot be played” dilemma. Disabling them could be the key to getting the problem addressed. Removing the previously set restrictions can be easily done by just following the steps below.
- Open the “Settings” menu. Press the “Screen Time” option next.
- On the next screen, select the “Content & Privacy Restrictions” menu, then tap “Content Restrictions”.
- You just have to disable all the restrictions.
Solution #8. Perform De-authorization and Authorization on Your PC
There are cases when iTunes cannot seem to recognize your devices, thus causing issues like the “Apple Music item cannot be played” error. You may also resort to de-authorizing and re-authorizing your PC to finally play the tracks. Here is how you can do it:
- Open the iTunes app on your PC.
- At the top, press the “Account” option and then choose “Authorizations”. Choose the “De-Authorize This Computer” option next.
- Upon de-authorizing your PC, press the “Account” menu again. This time, you have to choose the “Authorize This Computer” button.
Solution #9. Check if There are Issues with Apple Music Servers
Sometimes, you might have missed out of the fact that Apple Music servers are down. Thus, you are hardly thinking about why errors keep showing up while you’re trying to listen to Apple Music songs. To verify, you can go to the webpage that was put up by Apple Inc., which shows if the servers are currently down. Using any web browser should be fine. In this case, if the server is confirmed to be down, the only option left is to wait until it is already up and running as usual.
Part 3: How to Avoid the “Apple Music Item Cannot be Played” Issue from Happening Again
It is true that most of the solutions presented in the second part to address the “Apple Music item cannot be played” problem seem to be effective for most users.
However, applying them won’t guarantee that the dilemma won’t happen again in the future. In this instance, we will be sharing a technique to help you keep your Apple Music favorites forever accessible, even without a premium subscription (including family plan and student plan).
Though known to be protected with DRM, this should not be a hindrance for a user to download and access Apple Music tracks anywhere. In fact, there are tools like the Apple Music Unlocker that can unlock the songs from this protection and even aid in their transformation to formats like MP3.
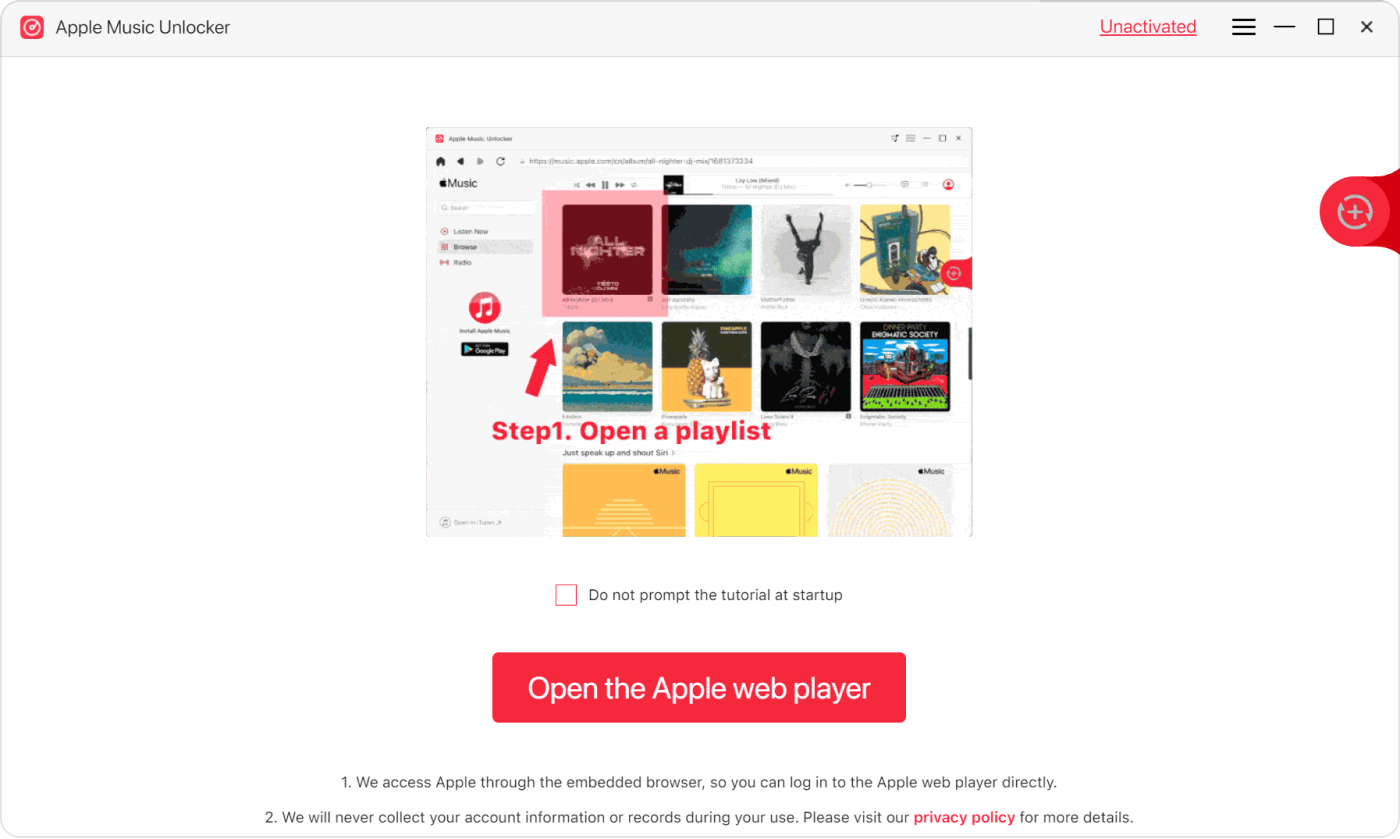
Of course, to use it, you have to download it first and install it on your computer. Afterward, you can launch it and begin the process. Shown below is a guide for your easy reference as well.
Step #1. Go to Apple web player by just clicking the “Open the Apple web player” button that’s displayed on the main screen of Apple Music Unlocker the moment it’s opened.
Step #2. By tapping the “Sign in” menu at the top, one can add his credentials to access his Apple Music account.
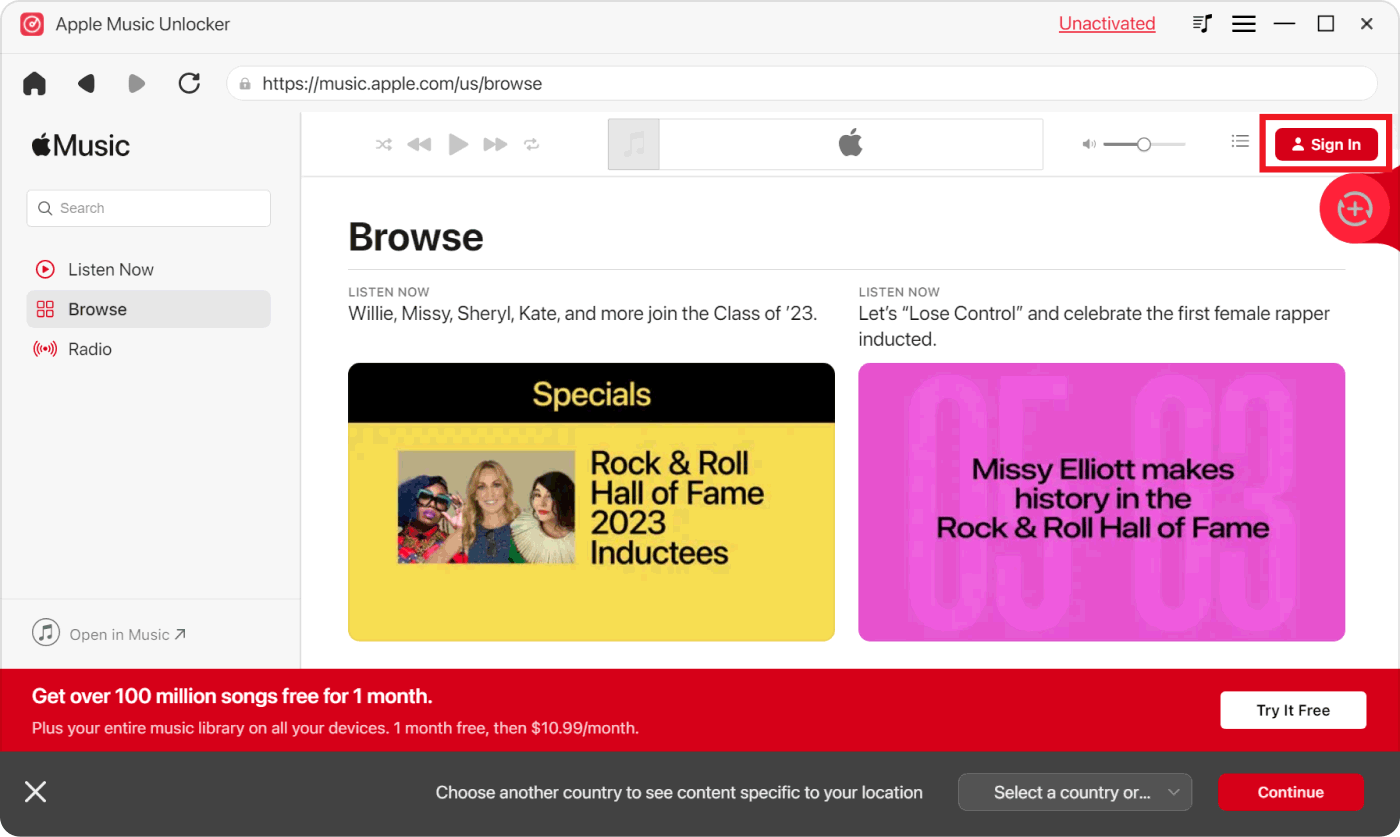
Step #3. Upon logging in, adding the songs and playlists to be processed is the next step that must be completed. This can be done either by opening the playlist and then tapping the red “add” icon or by simply dragging and dropping the playlist to the red “add” icon. Duplicate songs will automatically be detected.

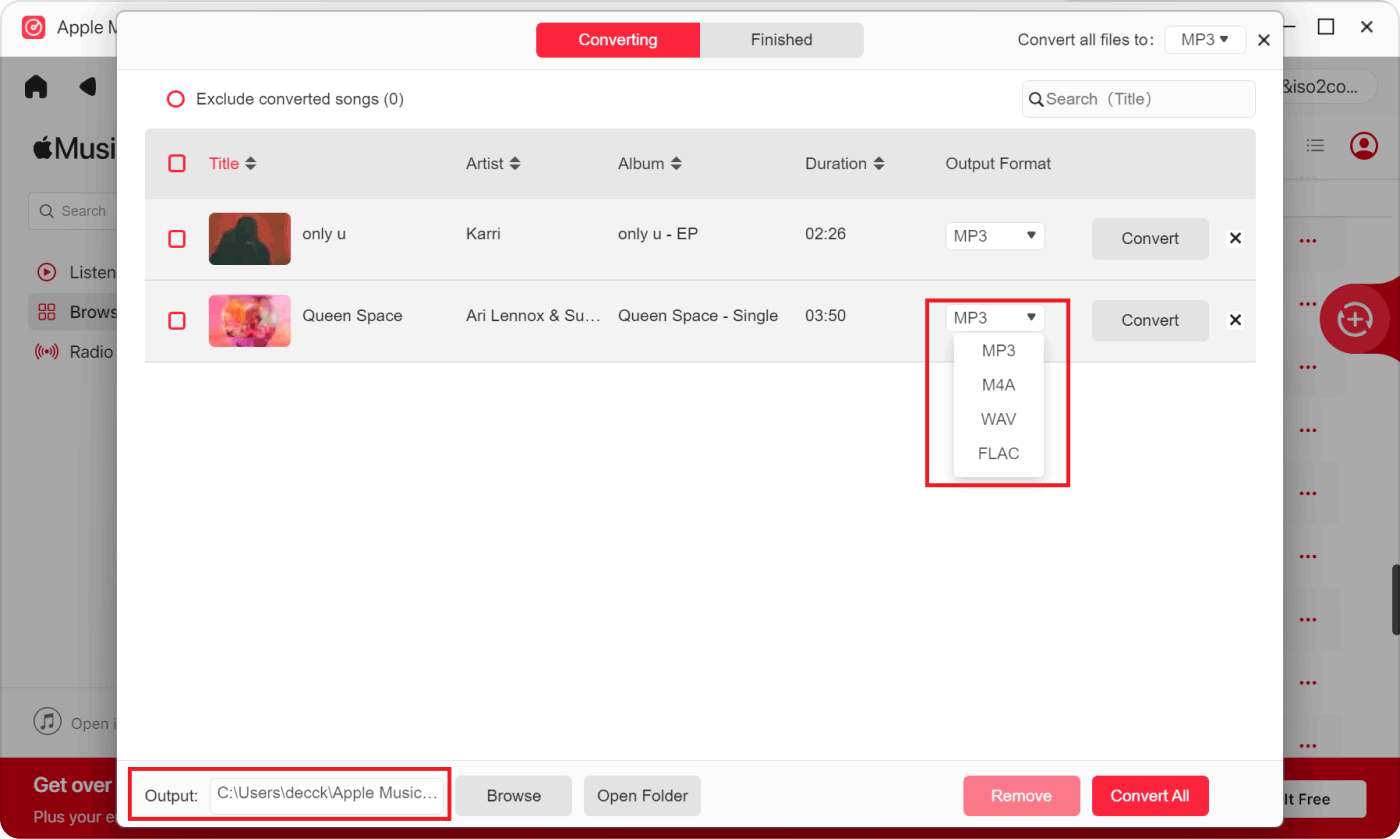
Step #4. From the available output formats, choose the one you prefer using. You can also set up (the output folder) where the output files will be saved afterward.
Step #5. The conversion of the added Apple Music songs will begin once the “Convert” or “Convert All” button is tapped.
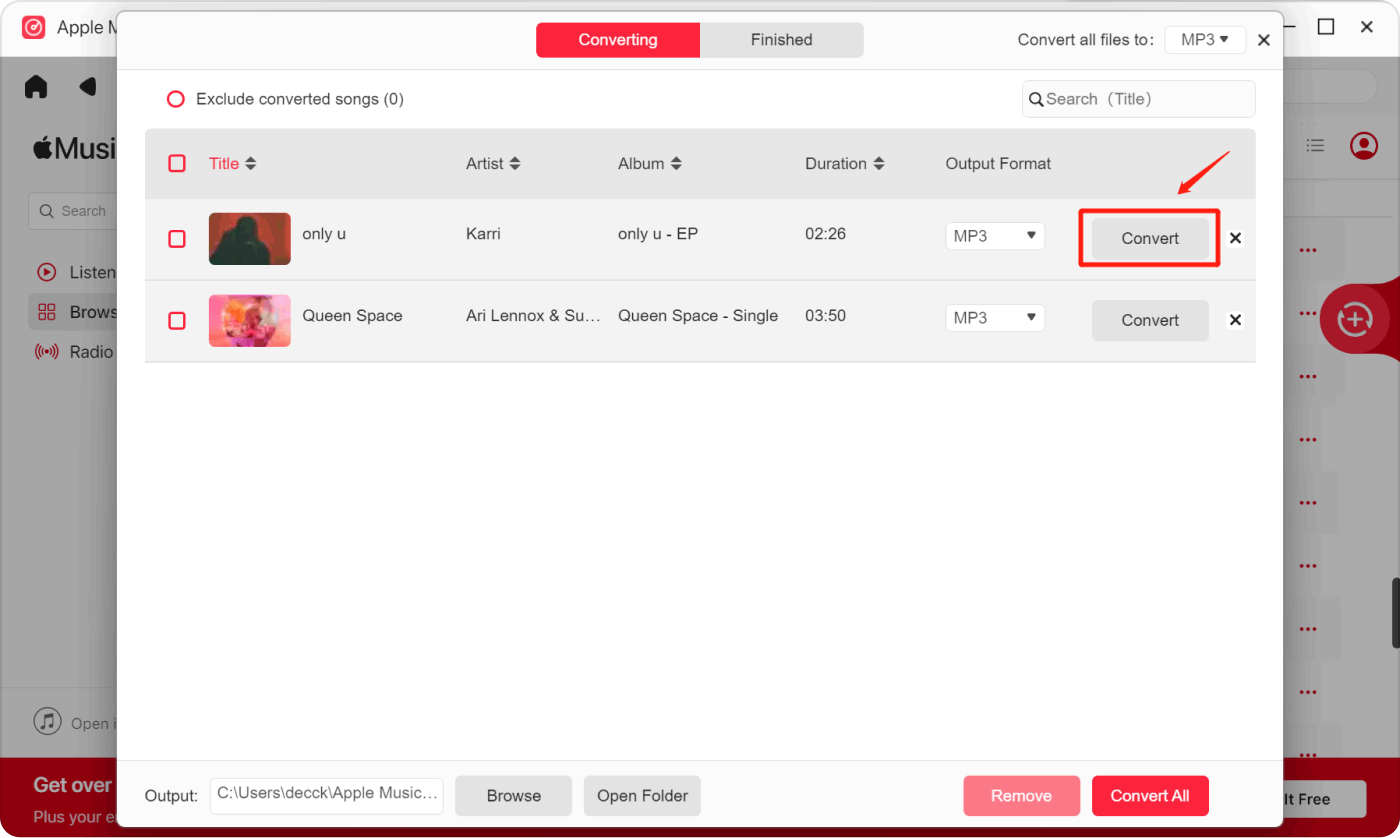
In a few minutes, the unlocked and converted Apple Music songs will be available in the output folder that was previously defined. Now, when playing the songs, regardless of whether an active subscription is present or not, there should not be any errors or issues!
Part 4: Summary
At first, most users would probably find it problematic when issues like an Apple Music item that cannot be played are encountered. Thankfully, specific to this dilemma, there are lots of workarounds one can apply to fix it. Moreover, in order to prevent such issues from happening again, one can also resort to downloading tracks for permanent storage and offline streaming. This is totally achievable with the right tools, like Apple Music Unlocker.
People Also Read Seamless Music Migration: Transfer Apple Music to Spotify The Top Guide: Convert iTunes to MP3 And Enjoy Them Anywhere
Written By Rosie
Last updated: 2023-08-10