There can be many situations where you will be thankful that you have learned to download Amazon Music for offline listening. Whether you are up in the mountains or taking the subway most of the time, it is possible to bring your most loved music with you, and we are going to teach you how.
In this article, we are going to figure out procedures about downloading Amazon Music for offline listening. Before we finally come up with the needed steps, it must be remembered that the Amazon Music app must be downloaded on the devices that you are about to use, so let us start figuring out these ways with the discussion that we are about to have in the body of the article.
Contents Guide Part 1. Listen To Amazon Music Offline [Download Music & Enable the Offline Mode]Part. 2 Enjoy Amazon Music Offline [Via Trusted Third-party App]Part 3. Summary
Part 1. Listen To Amazon Music Offline [Download Music & Enable the Offline Mode]
How to Download Songs in Amazon Music App?
There are actually lots of ways to proceed with the offline downloading of Amazon Music. It is easy to hit the “Download” button so you can start downloading songs from Amazon Music Unlimited offline using your devices like tablets, desktop computers, iPhones, or Android. To do it, you have to:
Step 1. Launch the Amazon Music app on your computer, iPhone, or Android device.
Step 2. Open the album, playlist, or specific track that you desire to download, and tap the three-dot icon menu that is next to any of the initially mentioned items. Then hit the “Download” tab.
Step 3. Hover over the “Library” tab, and you will find all your collected Amazon Music tunes here. You can distinguish the downloaded songs by the checkmark before them.
On the desktop of Amazon Music, to match the downloaded music, you can also use the “Filter” option.
How to Enable the Offline Mode on your Amazon Music App?
Now that you have finally downloaded Amazon Music, it is also essential that we learn about how to enable the offline mode on our Amazon Music app to finally get to listen to our most wanted Amazon titles while we are offline. In order to get to offline mode, we have to:
Step 1. Proceed to the Library option, and then hit Settings. You will see it as the gear-like icon at the upper-right part of the screen. Then start to enable the “Offline Mode” option, which you will see in the list. This will help you listen to your downloaded music files or podcasts.
Step 2. Hover over the Library tab once more, hit the dropdown option, which is located at the top section of the page, and hit the “Offline Music” option. Once done, you are finally able to listen to tracks from Amazon Music offline without using any data or internet connection.
It must be noted that once you have updated the Amazon Music application, it is possible that the music files that you have downloaded will be grayed out or gone. If this situation happens to you, you can immediately re-download your music files to enjoy them while you are offline.
These are only some of the methodologies that anyone can try to use to download Amazon Music for offline listening, and if you have tried executing these steps, you might have wondered if there is any better alternative that you can try to use. So, let us try to look as we go on with the article below.
Part. 2 Enjoy Amazon Music Offline [Via Trusted Third-party App]
Being a music enthusiast, it is a huge help that we get to know the procedures about how to download Amazon Music for offline listening. These procedures are key factors in achieving the goal of listening to Amazon Music in an easy way. And while we think things are already convenient, we have an easier way to access Amazon Music forever while making sure that issues are resolved and addressed.
Yes, you read it just right! Professional tools are all over the place, but there is nothing like Amazon Music Unlocker. This tool is really useful and reliable when it comes to music file unlocking and conversion. In order to begin with the conversion process, the said professional tool must be downloaded and installed on the computer.
When downloading the Amazon Music Unlocker, you need to use specified links intended for Mac or Windows computers. This link comes with an installation guide that will guide you through the process of installing the professional tool. Once done, you need to buy a license key, which will be essential if you want to get the tool's full version.
Then, you can now start converting the Amazon Music files that you want, anytime or anywhere you need. The steps are also comprehensive and straightforward, so file conversion can be executed as fast as possible. The steps are as follows.
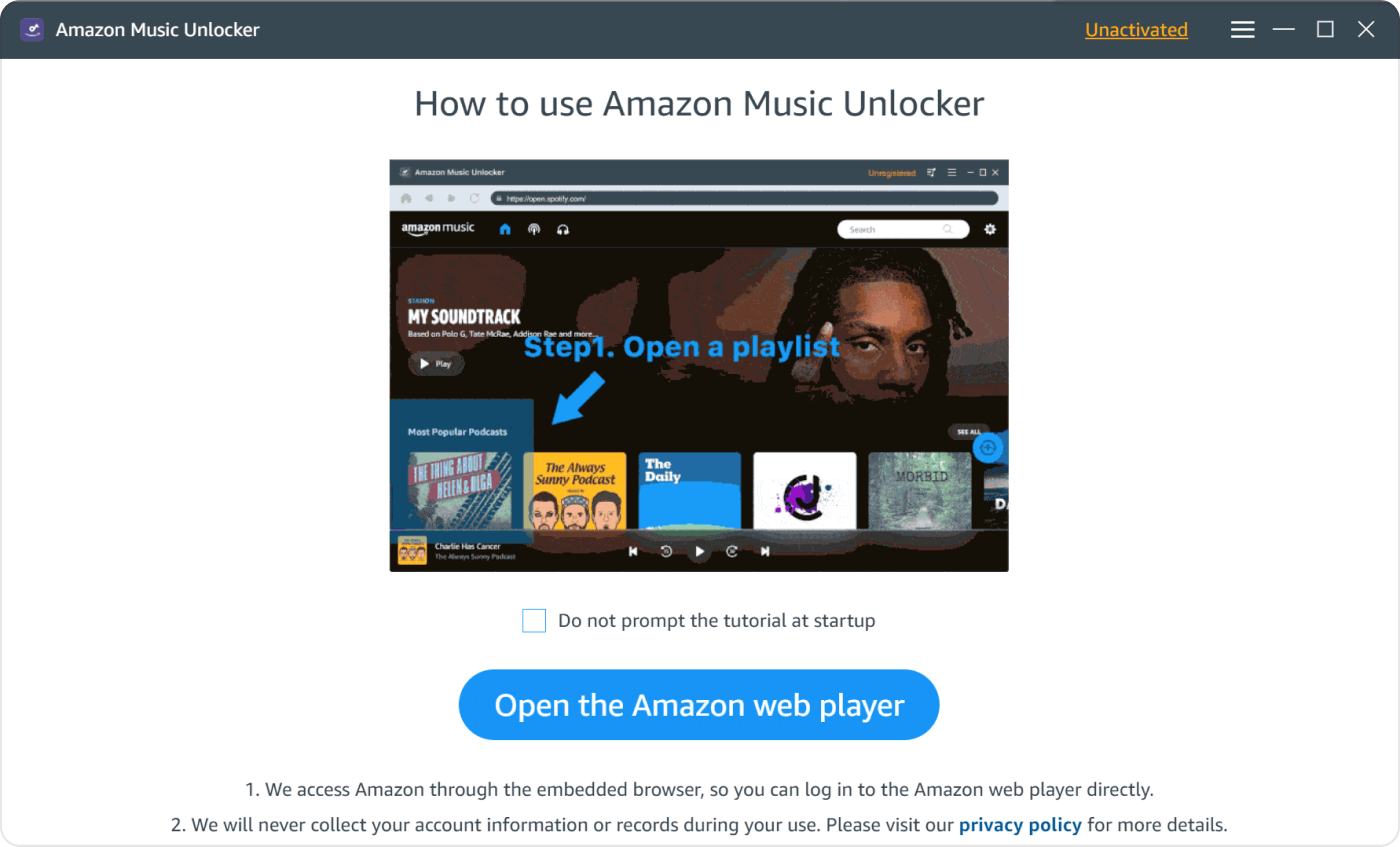
Step 1. Open the Amazon Web Player
Launch the Amazon Music Unlocker and hover over the main screen of the tool. Then, when you see the “Open the Amazon web player” option, click it.
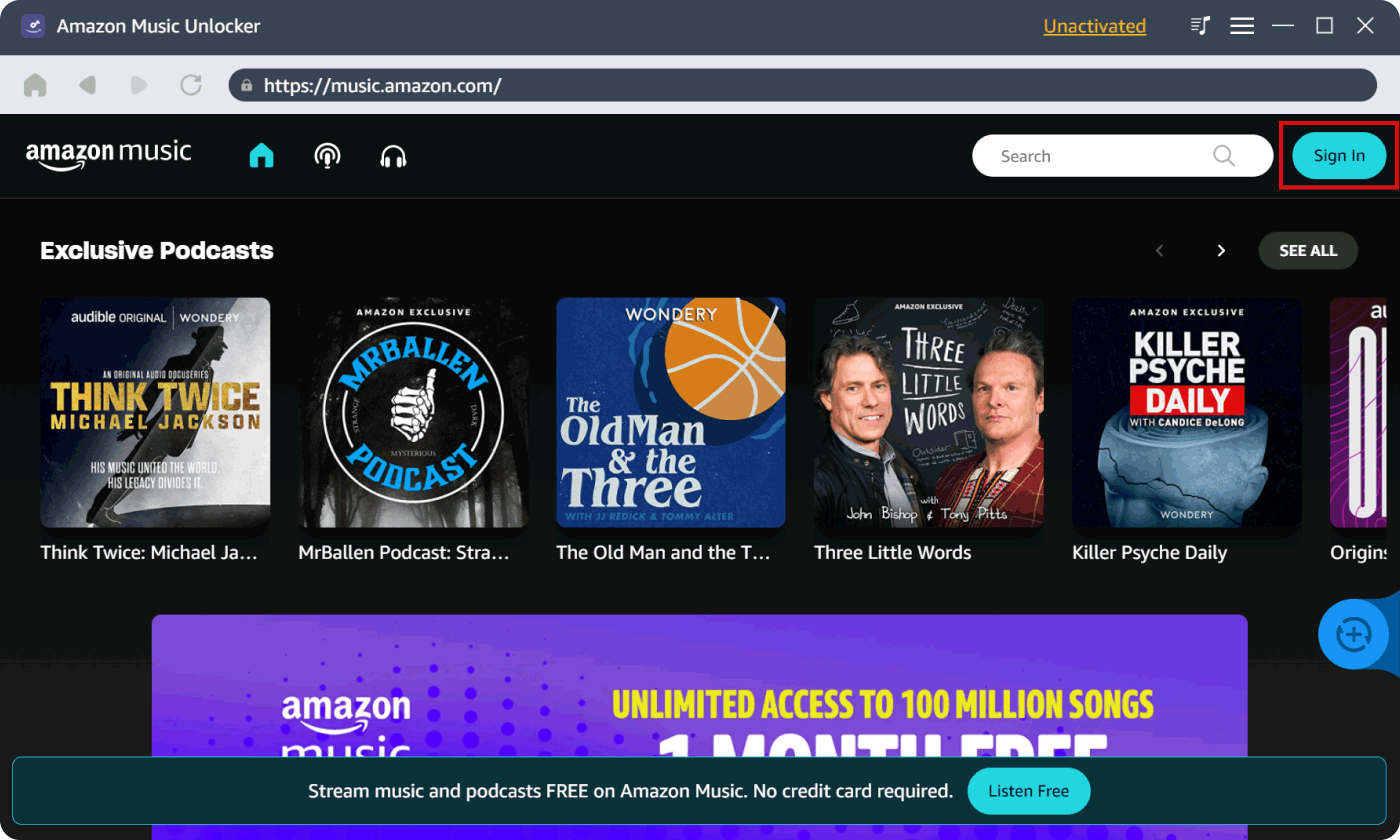
Step 2. Start Signing in to your Amazon Personal Account
Press the option to Sign In, which you can see in the upper-right part of the screen of the web player. You will then be asked to type in your personal account credentials to proceed. There is no need to worry about the misuse of your personal information; the Amazon Music Unlocker will not use it for any other purpose that may harm you.
Step 3. Import Amazon Music for Conversion
Thirdly, you can now launch the Amazon playlist and then tap the blue add icon; once tapped, you will finally see tracks on your playlist added to the list for conversion. You can also drag the titles as an alternative option. If there is a single track that you want to convert, select it and drag it to the blue icon to also add it to the list.
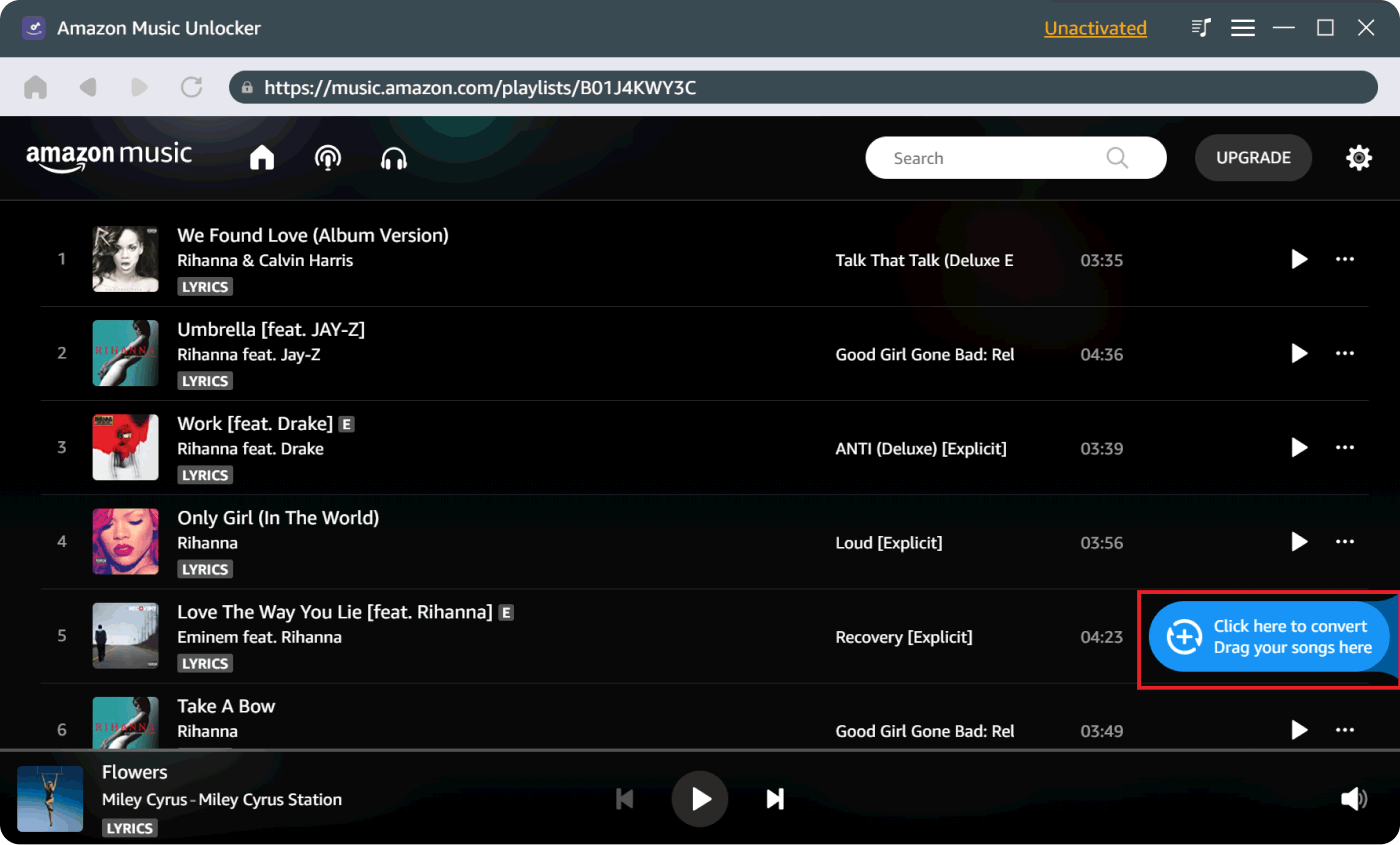
Amazon Music Unlocker will automatically determine any file duplicates, so you can be confident enough that said files will be taken care of.
Step 4. Set the File Formats for your Outputs
In the fourth step, you can now set the file formats of the outputs for the downloaded music from Amazon, like MP3, M4A, WAV, or FLAC. You also have to choose a folder where the output files will be saved. Or if you want, you can create a new folder to save as home to all your converted music files. You can also rename the folder to easily identify its location whenever you need it.
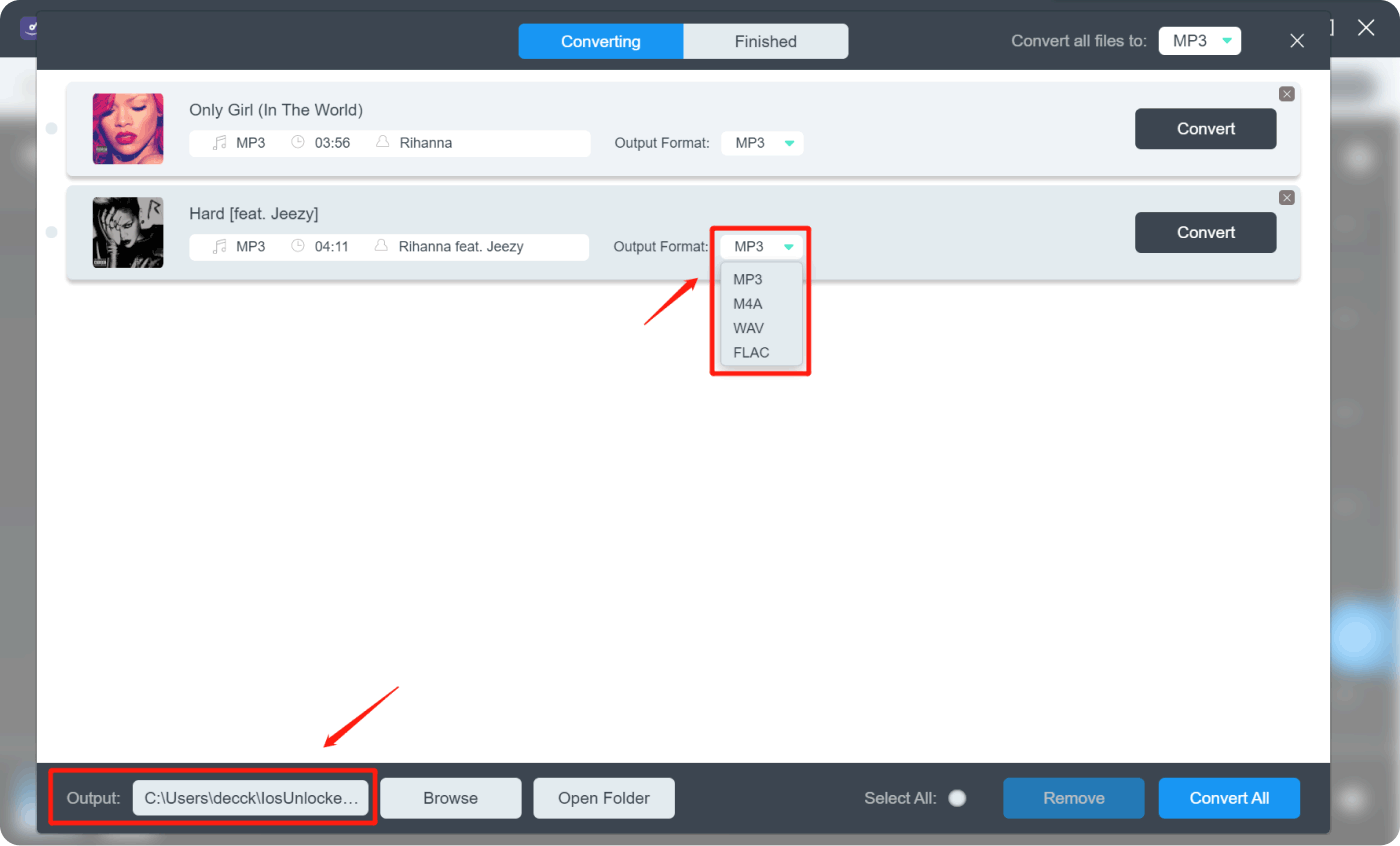
Step 5. Start the Conversion Process
And to finally enjoy the music files, tap the "Convert" button if you only have a single track to convert. If you have multiple files for conversion, then hit the "Convert All" button; the process will only take you a few minutes!
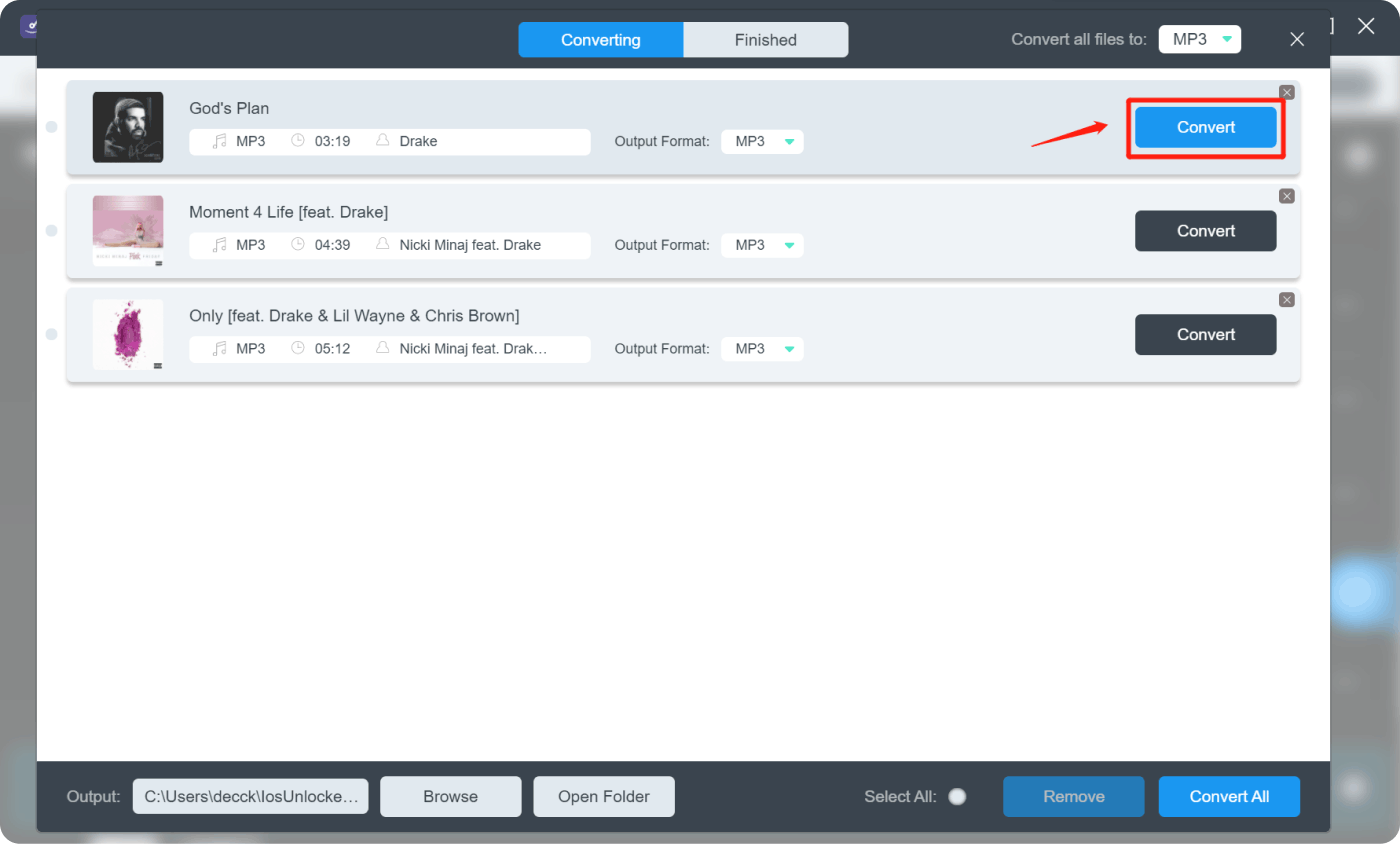
Step 6. View All your Output Files
Now that the unlocking and conversion processes have been finalized, you can now see or view all your output files! To start viewing them, hit the "View Output File" option from the module, which is called Finished. And once you tap it, you will finally see all the products of the conversion process achieved with the help of the Amazon Music Unlocker.
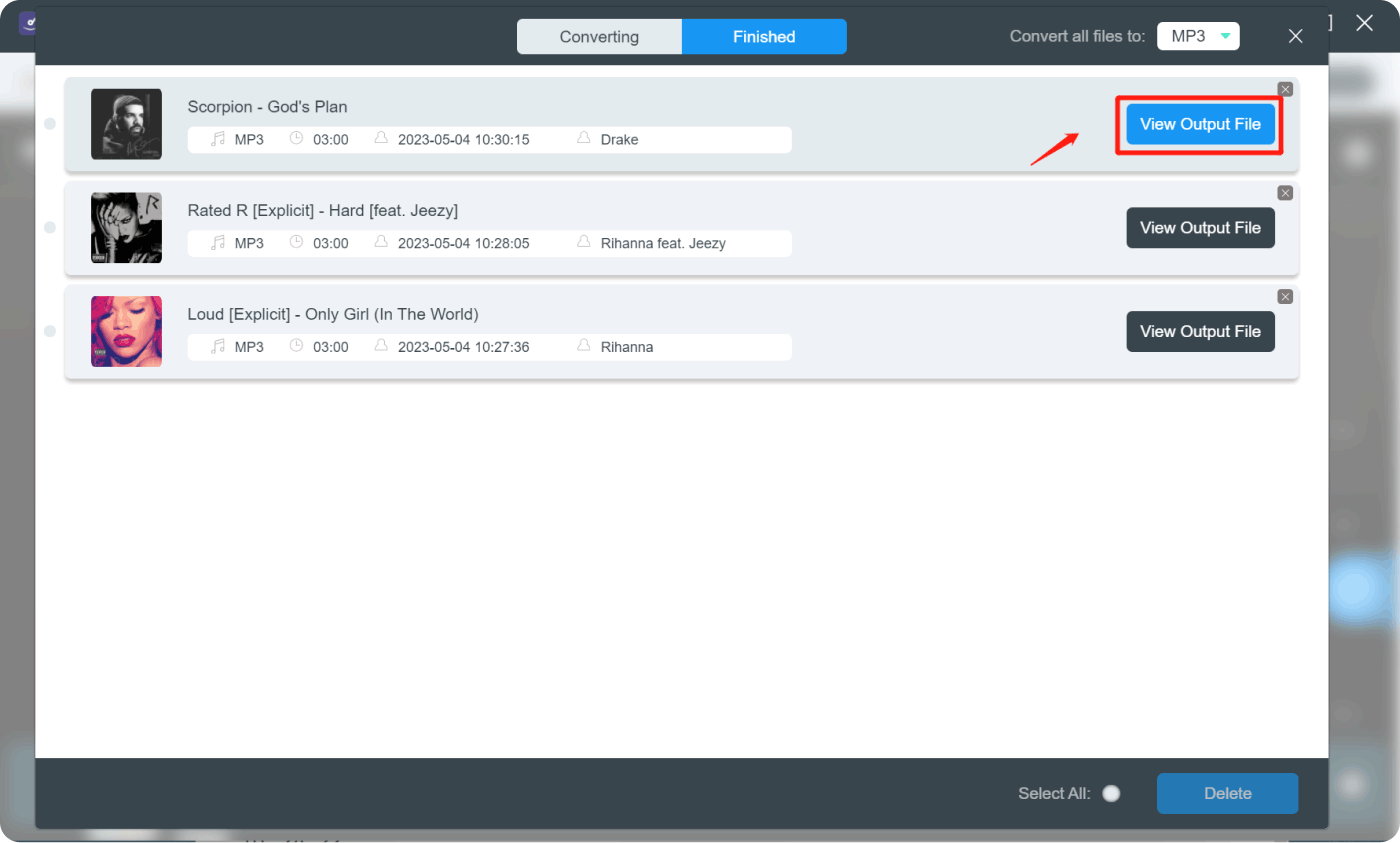
Now, you are finally done! It should not be too difficult to attain the type of music you deserve. With the help of the Amazon Music Unlocker, everything that you wanted to do with your music files can be addressed, and this time, easily!
Part 3. Summary
It is really nice to enjoy listening to music you love offline, so learn how to download Amazon Music for offline listening. You can go anywhere with music, and an internet connection would not be an issue anymore. And it is also really costly to use your data connection to access music. So, the choice usually taken by many people is to deprive themselves of listening to offline music.
However, it is a good thing that professional converters were created to help many music lovers enjoy music, this time more conveniently, more affordably, and in a more efficient way. Amazon Music Unlocker is a huge opportunity for many lovers of music who want to enjoy the luxury of listening to it offline!
People Also Read Top Tools to Download Amazon Music to MP3: A Complete Guide Top Workarounds to Download Amazon Music to iPod Devices
Written By Rosie
Last updated: 2023-07-27