


Spotify and Apple Music are two leading platforms that offer an extensive collection of songs, personalized recommendations, and curated playlists. However, if you're considering switching from Spotify to Apple Music, you may worry about leaving behind your meticulously crafted playlists. Almost the same concern when you thinking of transferring Spotify Music to an SD Card.
Fortunately, transferring playlists is not only possible but also surprisingly easy. In this article, we will explore various methods, including manual processes and automated tools, to help you seamlessly transfer playlists from Spotify to Apple Music. Whether you're an avid music lover or a casual listener, this comprehensive guide will empower you to make a smooth transition without losing your carefully curated musical collections.
Contents Guide Part #1: Challenges When You Transfer Playlists from Spotify to Apple MusicPart #2: Process to Transfer Playlists from Spotify to Apple MusicPart #3: 3 Automated Tools to Transfer Playlists from Spotify to Apple MusicPart #4: How to Transfer Playlists from Spotify to Apple Music on iPhone/AndroidPart #5: The Best Way to Convert Spotify Playlists to Apple MusicConclusion
Part #1: Challenges When You Transfer Playlists from Spotify to Apple Music
Platform-Specific Restrictions
When it comes to the process to transfer playlists from Spotify to Apple Music, one of the main challenges is the platform-specific restrictions imposed by each service. Both platforms have their unique file formats and data structures, making direct playlist compatibility a challenge. Spotify uses a proprietary format for playlist files, while Apple Music relies on its own format as well. These differences can create obstacles when attempting to transfer playlists seamlessly.
Compatibility Issues
Compatibility issues between Spotify and Apple Music can further complicate the playlist transfer process. Since the two platforms operate independently, they may not have direct integration or support for importing/exporting playlists from one to the other. This lack of interoperability means that manual transfer methods may require extra steps or workarounds to ensure a successful migration.
Manual Transferring vs. Automated Tools
Transferring playlists manually involves exporting the playlist from Spotify, obtaining the song information, and then importing the songs to Apple Music. This method requires more time and effort, especially if you have numerous playlists or a large collection of songs. On the other hand, using automated tools can simplify the process by automating the transfer and reducing the risk of errors or missing songs. However, relying on third-party tools may raise concerns about data privacy and security.
Navigating these challenges requires careful consideration of the available options and understanding their pros and cons. In the following sections, we will explore both manual methods and automated tools to transfer playlists from Spotify to Apple, empowering you to choose the approach that best suits your needs and preferences.
Part #2: Process to Transfer Playlists from Spotify to Apple Music
The process to transfer playlists from Spotify to Apple Music involves exporting the playlist from Spotify and then importing it to Apple Music. Check out the steps below.
Step #1: Export playlists from Spotify
- Open Spotify on your computer or mobile device and log in to your account.
- Navigate to the playlist you want to transfer.
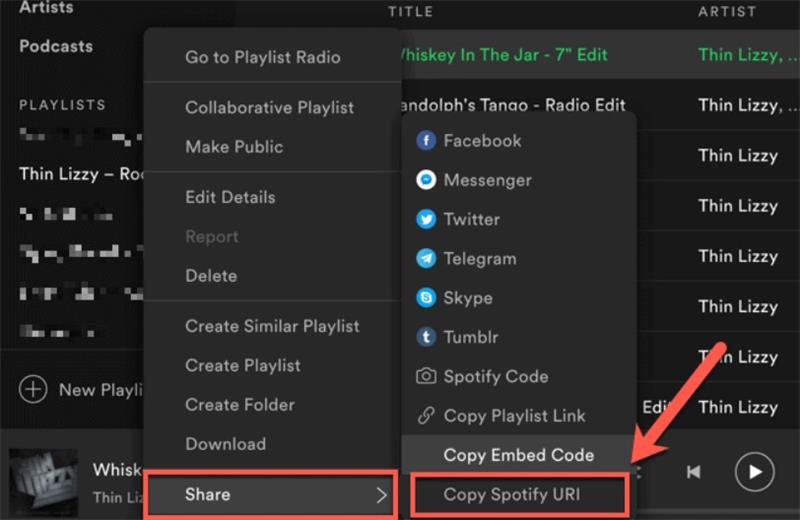
- Click on the three-dot menu icon next to the playlist's name.
- In the dropdown menu, select "Share " and then choose "Copy Playlist Link " or "Copy Spotify URI ".
- Open a web browser and go to a Spotify playlist converter website or application.
- Paste the copied playlist link or Spotify URI into the provided field.
- Select the export format for the playlist (e.g., CSV, TXT, XML).
- Follow the instructions on the website or application to export the playlist to your computer.
Spotify playlist converters offer various export formats to choose from, depending on the converter tool you use. Common export formats include CSV (Comma-Separated Values), TXT (Plain Text), and XML (eXtensible Markup Language). These formats contain information such as song titles, artists, albums, and Spotify track IDs.
Step #2: Import playlists to Apple Music
- Open iTunes or the Apple Music app on your computer.
- Ensure you are signed in to your Apple Music account.
- Click on "File " in the top menu and select "Library " or "Add File to Library ".
- Navigate to the location where you saved the exported playlist file from Spotify.
- Select the playlist file and click "Open ".
- Apple Music will automatically import the playlist and attempt to match the songs with its library.
- Wait for the import process to complete, and your Spotify playlist should now be available in Apple Music.
Apple Music supports the importing of playlists in various formats, including M3U, M3U8, PLS, and XSPF. These formats are commonly used for playlist files and are compatible with Apple Music's import functionality. Ensure that your exported playlist from Spotify is in one of these supported formats for a successful import.
Part #3: 3 Automated Tools to Transfer Playlists from Spotify to Apple Music
When it comes to the process to transfer playlists from Spotify to Apple Music seamlessly, there are third-party services and tools available that can automate the process for you. These tools are specifically designed to handle the differences in file formats and data structures between the two platforms, making playlist migration more efficient and hassle-free.
TuneMyMusic:
TuneMyMusic is another popular playlist transfer tool that supports transferring playlists between Spotify and Apple Music. It allows you to transfer multiple playlists simultaneously and maintains song metadata, including titles, artists, albums, and playlists' order. TuneMyMusic offers a user-friendly interface and provides both free and premium subscription options.
Houdini Playlist Transfer:
Houdini is a web-based playlist transfer tool that supports transferring playlists between Spotify and Apple Music. It provides a simple and straightforward interface for seamless migration. Houdini allows you to transfer multiple playlists at once and maintains song metadata during the process. It offers both free and premium plans.
Stamp:
The stamp is a playlist transfer tool available for multiple platforms, including Windows, macOS, iOS, and Android. It supports transferring playlists between Spotify and Apple Music, along with other music streaming services. Stamp offers a straightforward and intuitive interface, automatic song matching, and the ability to transfer large playlists efficiently. It provides a free trial with limitations and a premium version for full access to all features.
Part #4: How to Transfer Playlists from Spotify to Apple Music on iPhone/Android
3 tools that can transfer Spotify playlist to apple music was introduced in Part 3. But in this part, we focus on the detailed steps to transfer Spotify playlists to Apple Music on different phone systems like iOS and android.
How to Move Playlists from Spotify to Apple Music on iPhone [Using SongShift]
SongShift is a popular playlist transfer app available for iOS devices. It allows you to transfer playlists between various music streaming platforms, including Spotify and Apple Music. The app offers a user-friendly interface, automatic song matching, and the ability to customize the transfer process. SongShift offers a free version with limited features and a premium version for additional functionality.
Follow the steps below to know how to transfer Spotify playlists to Apple Music using SongShift:
- Install the app from the App Store on your iPhone. Launch the app and select Get Started.
- Select Spotify and Apple Music in the Available Services tab.
- Tap Spotify, sign in, and agree to let SongShift access your library. Tap Continue once you've connected all of the services. Select Get Started.
- Tap the + icon at the bottom of the screen. Setup Source should be selected. Continue after tapping the Spotify logo.
- Select the playlists to be transferred. If you want to transfer several playlists, you'll need to purchase SongShift.
- Wait for the playlist to transfer before tapping on the completed playlist in the Ready for Review section.
- Check to see if the playlist matches the prior results. If everything seems good, tap Confirm Matches.
- The app will take a few moments to convert your music. Tap Continue, and the playlist is now accessible via Apple Music.
How to Transfer Playlists from Spotify to Apple Music on Android [Using Soundiiz]
Soundiiz is a widely recognized playlist transfer service that supports transferring playlists between various music streaming platforms, including Spotify and Apple Music. It offers an intuitive interface, and batch transfer options, and preserves metadata during the transfer process. Soundiiz provides both free and premium plans, with additional features available for paid subscribers.
Here's a step-by-step guide on how to transfer playlists from Spotify to Apple Music using Soundiiz:
- Visit the Soundiiz website: Open your web browser and go to the Soundiiz website.
- Create an account or log in: If you don’t have a Soundiiz account, sign up for a free account. If you already have an account, log in using your credentials.
- Connect your Spotify and Apple Music accounts: On the Soundiiz dashboard, click on “Platform to Platform ” in the left sidebar. Then, find the Spotify and Apple Music icons and click on “Connect ” for both platforms. Follow the on-screen instructions to authorize Soundiiz to access your Spotify and Apple Music accounts.
- Choose the playlists to transfer: After connecting your accounts, you will see a list of your Spotify playlists on the left side of the screen. Select the playlists you want to transfer to Apple Music by checking the boxes next to their names.
- Start the transfer process: Once you’ve selected the playlists, click on “Convert tools ” in the top menu and select “Spotify to Apple Music ” from the dropdown menu.
- Confirm the transfer: Soundiiz will display a confirmation screen showing the selected playlists and the number of tracks to be transferred. Review the information to ensure accuracy.
- Initiate the transfer: Click on the “Start ” button to begin the playlist transfer process. Soundiiz will then start transferring the selected playlists from Spotify to Apple Music. The transfer time will depend on the number of tracks and playlists being transferred.
- Verify the transferred playlists: Once the transfer is complete, open your Apple Music app and check your playlists to confirm that they have been successfully transferred. Soundiiz aims to match the songs as closely as possible, but some tracks may not be available in Apple Music’s library, resulting in potential replacements.
It's important to note that Soundiiz offers both free and premium plans. While the free version allows you to transfer a limited number of tracks per month, upgrading to a premium plan provides unlimited transfers and access to additional features.
Part #5: The Best Way to Convert Spotify Playlists to Apple Music
Now that you've discovered the process to transfer playlists from Spotify to Apple Music, we have a valuable bonus tip for you. Spotify Music Unlocker is a robust and user-friendly software specifically designed to simplify the conversion and downloading of music from Spotify.
This dedicated tool empowers users to overcome the limitations imposed by Spotify's DRM (Digital Rights Management) protection, granting them the freedom to enjoy their favorite tracks on any device without any restrictions.
Here's a step-by-step guide on how to utilize this Spotify Music unlocking tool effectively:
- Launch Spotify Music Unlocker and click on the button labeled "Open The Spotify Web Player ".
- Sign in to your Spotify account. If you don't have an account yet, simply click on the "Sign up " button to create one.
- Choose an album or playlist from Spotify. To include all the songs from the album or playlist in the conversion list, click the green "add " button. Alternatively, you can drag the album or playlist title onto the green "add" icon.
- For converting a single song, simply drag its title to the blue icon.
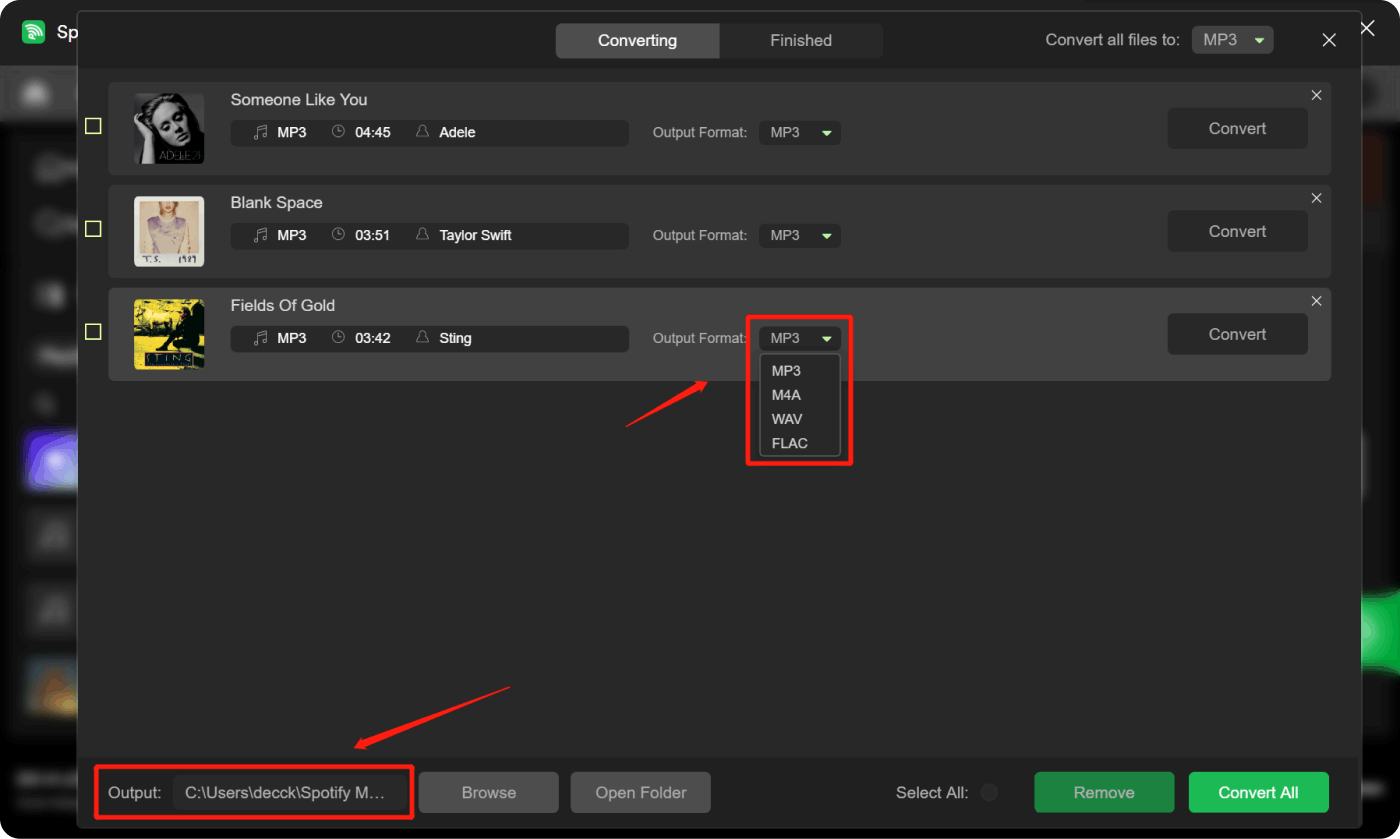
- Select your desired output format, such as MP3, M4A, WAV, or FLAC. You also have the option to choose the output folder where the converted files will be saved.
- Initiate the conversion process by clicking the "Convert " button.
People Also Read The Top Paid And Free Spotify to MP3 Converter Tools How to Play Apple Music on iPod: A Comprehensive Guide
Conclusion
After discovering the way to transfer playlists from Spotify to Apple Music. We met Spotify Music Unlocker. Spotify Music Unlocker facilitates the conversion of multiple Spotify tracks simultaneously, thanks to its convenient batch conversion feature. This time-saving functionality allows users to convert entire playlists or albums in one go. Moreover, the software leverages advanced technology to ensure fast conversion speed without compromising the audio quality.
Written By Rosie
Last updated: 2023-05-18