


“Do I have a way to add Apple Music to GarageBand ?”
Lots of content creators are surely familiar with GarageBand. Initially launched in 2004, this app has already gained tons of users around the world. It is a powerful tool that can be used to record audio, mix rhythms, edit tracks, add sound effects, and more. What is even better is that this can be installed on iOS devices such as iPads, iPhones, and Mac computers.
Of course, when creating content, one of the vital “must-haves” is a source of good music to be used on projects. Actually, GarageBand allows the use of purchased tracks from iTunes, but, of course, doing so every time you create mixes would be pricey and not economical.
If you are an Apple Music enthusiast, you have probably thought of trying to add Apple Music to GarageBand. Perhaps if you tried doing so, you weren’t able to successfully do it directly. Well, that is because the Apple Music tracks are protected with DRM encryption.
In this article, we will be sharing with you how you can bypass the DRM protection contained in Apple Music tracks as a key to completing the process of adding Apple Music to GarageBand. In fact, details relative to this will be presented immediately in the first section.
Contents Guide Part 1: How to Download Apple Music Songs to be Used on GarageBand?Part 2: How to Add Converted Apple Music Songs to GarageBand?Part 3: Summary
Part 1: How to Download Apple Music Songs to be Used on GarageBand?
Most users would probably think that getting rid of Apple Music songs’ DRM encryption is a difficult task to fulfill. Well, that is, if one does not have the proper tool to use. In the case of learning how to add Apple Music to GarageBand, it is important to know how this protection can be removed, as this will be the deciding factor in making the songs playable and accessible anywhere.
Fortunately, there are trusted software apps like Apple Music Unlocker that can aid in the process of downloading and converting Apple Music songs while unlocking them from DRM protection. It performs lossless conversion, which assures high-quality output files.
First and foremost, Apple Music Unlocker must be downloaded and installed on a PC. Once this has been successfully done, just launch it to begin. Additionally, ensure that the iTunes app has also been installed on the PC. You must log in to your account as well.
The steps mentioned below are what must be performed next in order to fully utilize this tool’s features.
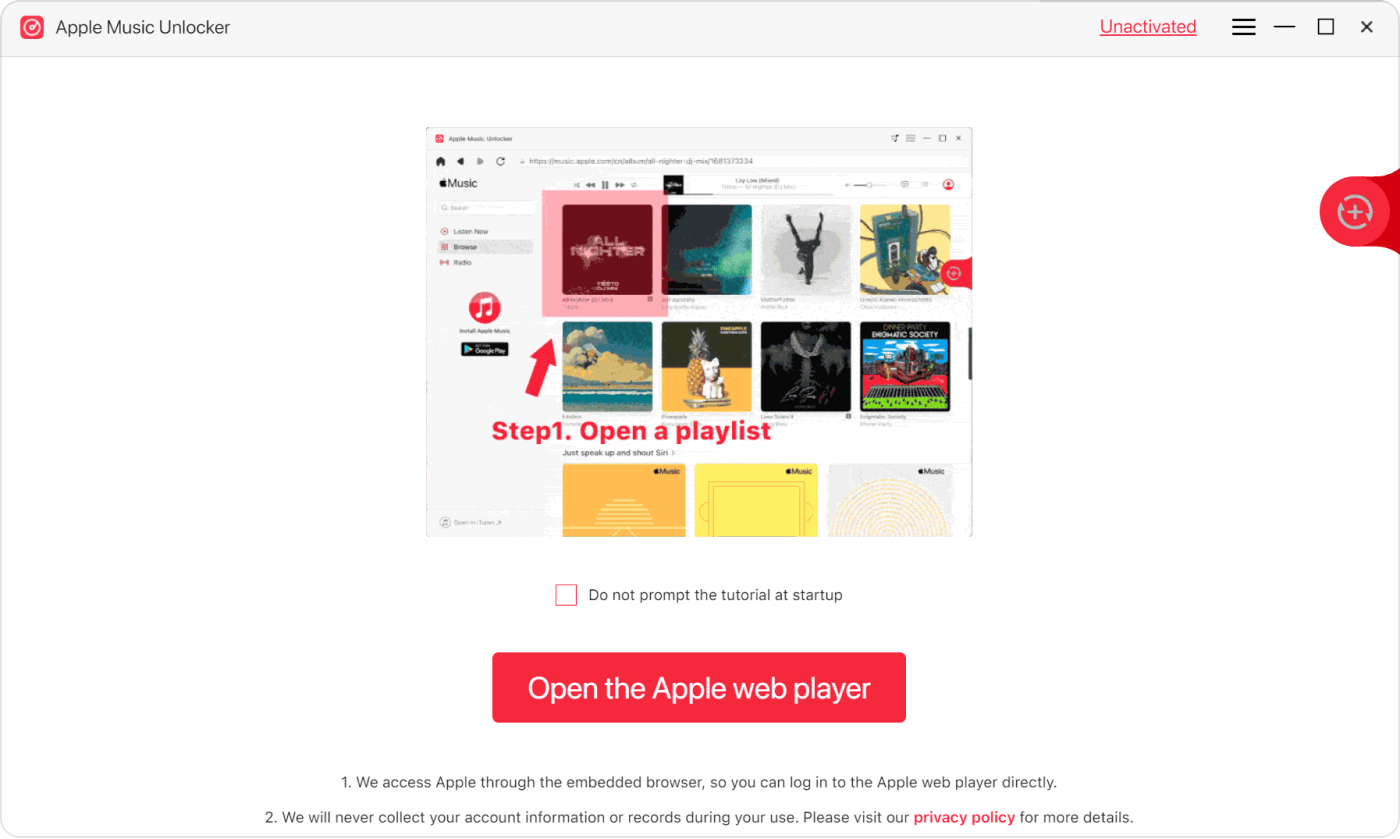
Step #1. Once Apple Music Unlocker is launched, immediately press the “Open the Apple web player” button on the screen.
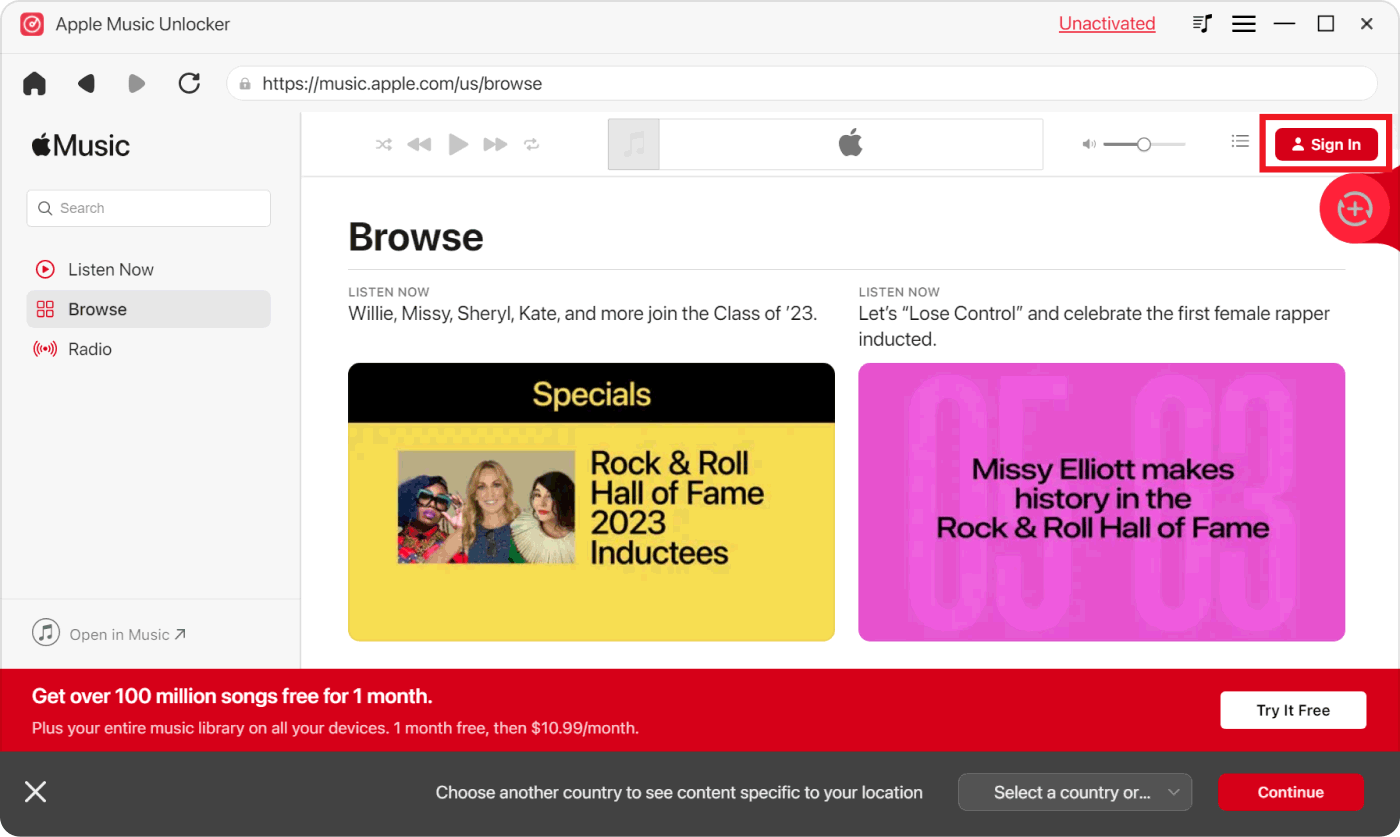
Step #2. Doing the first step shall lead you to a new window wherein you have to press the “Sign in” button to log into your Apple ID account.
Step #3. Upon logging in, choose the songs or playlists that you’d like to be processed. They just need to be dragged and dropped onto the red “add” icon. Alternatively, opening the playlist and pressing the red “add” icon afterward will also work and will let you add all the songs in it onto the platform.

If you are worried about possible duplication of songs, rest assured that it won’t happen given that Apple Music Unlocker can detect doubled-up tracks.
Step #4. After importing the songs, you may now choose the output format that you’d like to use from the available selections. Just make sure that it is supported by GarageBand. Setting up the output folder can also be done as you like.
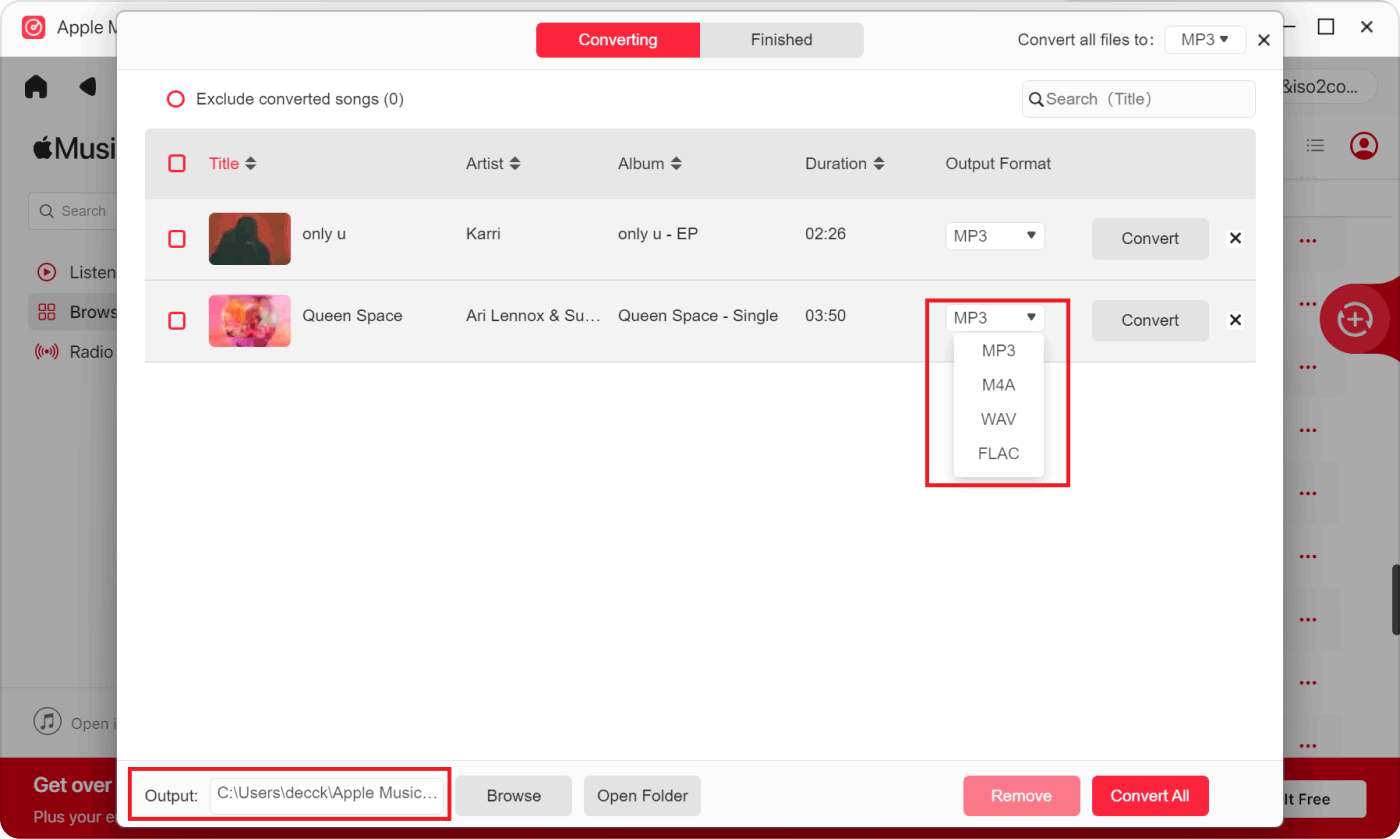
Note: GarageBand can support audio files in MP3, AIFF, AAC, CAF, WAV, and Apple Lossless (unprotected).
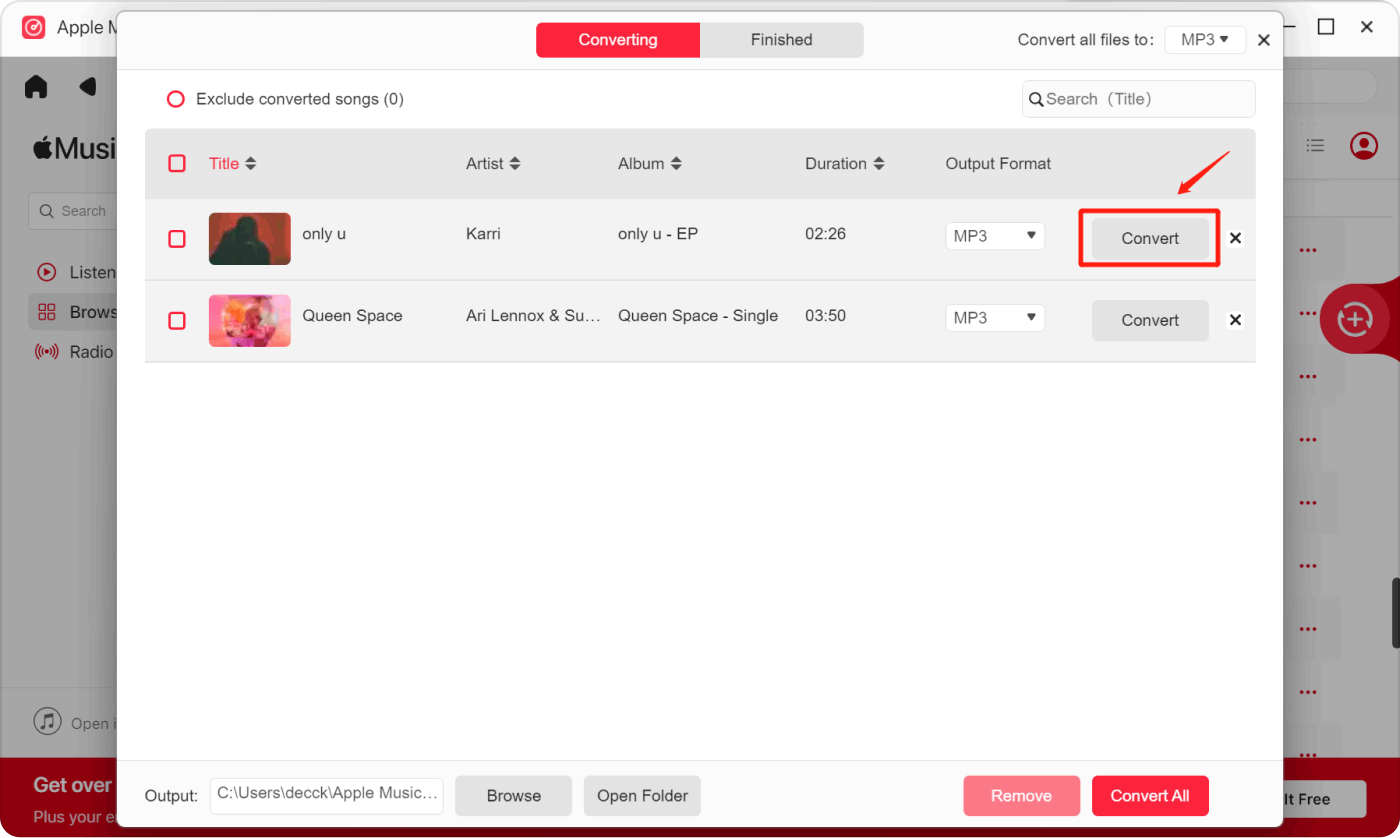
Step #5. The transformation of the uploaded Apple Music tracks shall begin right away once the “Convert” or “Convert All” option is clicked.
The whole process will only last for a few minutes. In no time, you should have the converted Apple Music tracks, which are now ready to be added to GarageBand. Additionally, the songs can also be saved on other devices that you own or on external drives like USBs.
In the next section, we will finally explain the details of how to finally add Apple Music to GarageBand (converted and DRM-free tracks).
Part 2: How to Add Converted Apple Music Songs to GarageBand?
Since we have already downloaded and converted Apple Music songs through the Apple Music Unlocker app, it is now time to complete the process of adding Apple Music to GarageBand. We have the full tutorials here if you are using an iPhone, an iPad, or a Mac computer.
Adding Converted Apple Music Songs to GarageBand Using a Mac Computer
On your Mac computer, you may choose to use Finder or the Music app.
#1. Using Finder
Just open the GarageBand app on your Mac. From Finder, just simply drag the converted Apple Music audio file to the audio track or to the empty area below the current tracks under the “Tracks” section.
If this has been done successfully, the audio file should appear on the track.
#2. Using the Music App
Step #1. Using the Music app on your Mac, head over to “Apple Music”, and then choose “Import/Import Music”. This will let you upload the converted Apple Music tracks to GarageBand.
Step #2. Open the GarageBand app on Mac and simply drag the audio file that is in the Music app list.
Adding Converted Apple Music Songs to GarageBand Using an iPhone or iPad
When using an iPhone or iPad to add Apple Music to GarageBand, you can take advantage of either the iTunes app or the Files app. Both will be explained in detail here as well.
#1. Using the iTunes App
Since you are looking to use your portable devices – iPhone and iPad, to add Apple Music to GarageBand, the converted Apple Music tracks need to be first synced into your iTunes music library. Since the songs are initially saved on your computer, syncing them on iTunes would let you access them on your portable gadgets.
Step #1. Open the iTunes app on your PC. Proceed to add the transformed Apple Music songs to your iTunes library. To do so, just press the “File” option from the menu bar and then click the “Add Library” option.
Step #2. Fire up the GarageBand app on your iPad or iPhone. Open the “Tracks” view. Afterward, look for the “Loop Browser” icon and click it next. Finally, hit the “Music” tab to see a preview of the transformed Apple Music songs to be imported.
Step #3. From the list presented, just find and select those that you’d like to use. Confirm to add the ones you have chosen to proceed. Alternatively, directly dragging and dropping the tracks to the “Tracks” view will also work.
#2. Using the Files App
If you don’t feel like using the iTunes app to add Apple Music to GarageBand, you may also resort to using the Files app. Here are the steps that you must take.
Step #1. To be able to upload the entire song, the length of the song must be set to “Automatic”. To see the list of tracks, press the “Tracks View” option.
Step #2. In the control bar, select the “Loop Browser” option. Choose the “File” app next.
Step #3. Under the Files app, click the “Browse” menu in order to see the transformed Apple Music song that you’d want to add to GarageBand. Previewing the selected audio can also be done by tapping it from the list.
If you’d like to modify the converted Apple Music song on GarageBand, you can easily do that as well. After importing the track, just tap it. To select the “Time” option, the blue box that is at the bottom of GarageBand’s main interface must be checked. You just have to move your mouse’s cursor to point out where you want the tracks to be cut. Once confirmed, press the “Edit” menu and then choose “Split”.
Part 3: Summary
At first, you will probably wonder and think that using Apple Music songs on devices as well as on media players and apps like GarageBand would be hard to do. That is, if you have no clear idea of how removing the DRM protection from tracks can be done.
Thankfully, unlocking the songs from protection can easily be achieved via trusted and reliable apps like Apple Music Unlocker. To finally be able to add Apple Music to GarageBand, the songs need to be processed through the mentioned app first to make them unprotected and compatible with the GarageBand app. Importing the converted songs can be done easily on iOS devices and on Mac.
People Also Read The Top Guide: Convert iTunes to MP3 And Enjoy Them Anywhere A Comprehensive Guide to Apple Music Student Plan 2024
Written By Rosie
Last updated: 2023-08-10