


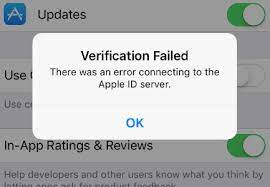
Once you get the notice about erase iPhone verification failed, then everything is just really unpleasant. You really would like to erase your iPhone prior to actually leaving it, but somehow it won't let you. Almost all of the cause of such issue has less to deal with the Apple ID, and more to do with various factors that prohibit your phone from interacting with Apple's database.
In truth, you could verify Apple's System Condition Site to ensure the issue was never on Apple's end. Whether it indicates iCloud was operational, you may attempt the succeeding steps to resolve the problem.

Part #1: Erase iPhone Verification Failed Error Using FoneDog iPhone UnlockerPart #2: Common Options to Erase iPhone Verification Failed ErrorPart #3: Conclusion
Part #1: Erase iPhone Verification Failed Error Using FoneDog iPhone Unlocker
Utilizing iOS Unlocker could completely wipe your iPhone without linking to the Apple ID service seems to be an excellent solution to avoid that erase iPhone verification failed error. iOS Unlocker has always been a sophisticated program designed by pros which was made to use in permanently erasing anything within the iPhone including your Apple ID and contents without the need for a password.
iOS Unlocker has indeed so many features you could rely on. The whole tool seems to have a function that allows you to simply erase your Apple ID as well as iCloud accounts across your apple devices. Just simply, follow the preceding steps below, in order for this error to be fixed at.
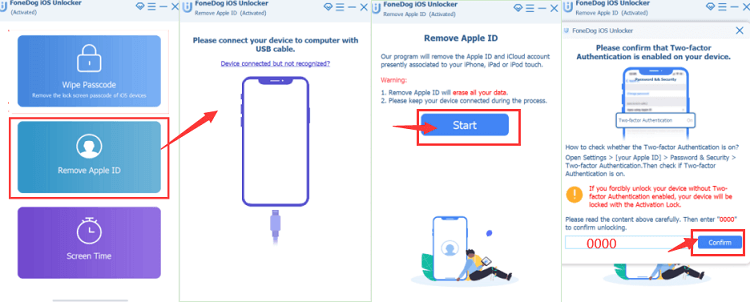
- Start by launching first the iOS Unlocker onto your PC as well after which select the “RemoveApple ID ” mode option.
- After that, make sure that you make use of a USB cord or wire that you could connect your own gadget to your own computer. And for this part make sure that your PC is trusting your device, and after which you should now press that “Trust ” tab right on your own device.
- To begin deleting the Apple ID, you must hit the button that indicates “Start ”. Note: There are two scenarios for erasing the Apple ID, depending on whether Find My iPhone has been disabled off your devices. Even during the removal procedure, rest assured your device stays linked to that of the pc.
- When you've already completed all of the preceding steps, incorporate this code "0000 " to authenticate that Two-Factor Authentication option that has so far been activated on your phone.
- Verify the validity using your smartphone. Subsequently, to begin downloading the baseband upgrade, tap on the button that indicates “Start ”. Allow a few moments for it all to finish.
- But once the processing has been finished, the Apple ID and iCloud accounts will then be erased. Otherwise, you may establish an innovative Apple ID using your gadget or perhaps just join into yet existing Apple ID provided you get one.
Part #2: Common Options to Erase iPhone Verification Failed Error
Even when you've tried validating your iPhone as well as continue to see failure notifications such as erase iPhone verification failed, then might have to perform the preceding to resolve the issue as quickly as feasible.
Maintain A Steady Network
For instance, a bad network system would be the cause of "Verification failed that there would be a problem linking with Apple ID servers." Experiment including both Wi-Fi as well as cellular service. You might even place your iPhone throughout the Airplane state and afterward switch it over to renew the internet connectivity. Afterward just repeat the information deletion procedure.
Change Network Configuration
Unless you've already linked your iPhone to many of these Wi-Fi networks, then it might find it difficult to access another Wi-Fi network. To perform such debugging, head over to Settings, after which tap on option General, whereupon choose on Reset option, as well as finally select on the Reset Network Settings option. Sync your iPhone with the Wi-Fi after it has finished.
Reboot Your iPhone Device
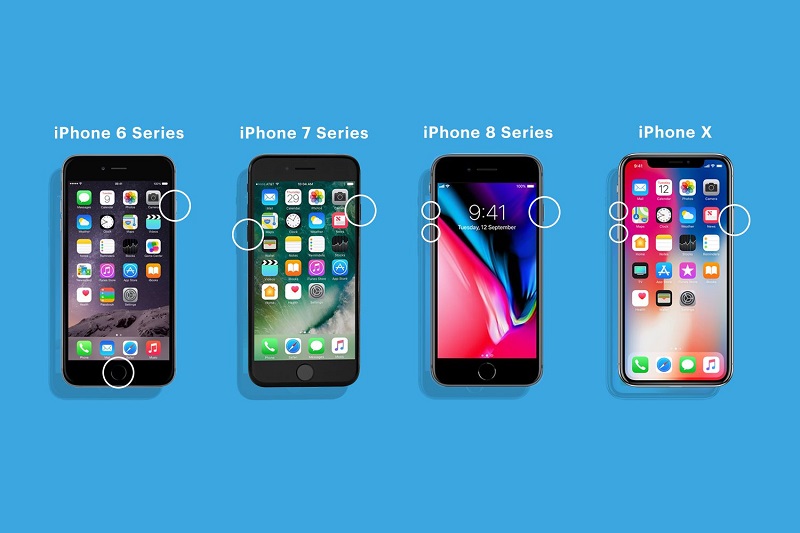
A quick reboot could sometimes solve problems. You may also forcibly reboot your iPhone to erase iPhone verification failed errror.
- Power reboot iPhone 8 & above, as well as iPad using Face ID: Immediately push and released that Volume Up key, then the Volume Down toggle, then finally the Side/Top toggle until you've seen the Apple emblem.
- Power restarting the iPhone 7 & 7 Plus: Keep the Power as well as Volume Down keys together before the Apple symbol displays, after which discharge both keys.
- Power reboot iPhone 6s, SE, & previous, as well as iPad using the Home toggle: Hold it down both Home as well as Power keys at the very same moment, and after that let go whenever the Apple symbol displays.
Use iCloud.com to Delete iPhone
If none of the other previous techniques could erase iPhone verification failed error, you should consider erasing your iPhone upon that other device.
- Navigate into iCloud.com from a laptop or perhaps any digital device. And after that, use the Apple ID as well as the password to log in.
- And after that, select “Find My iPhone ”, select “All Devices ” option, as well as finally tap on “Find Your iPhone ” again within the device list.
- Select your iPhone, after which tap Erase iPhone and begin wiping your iPhone into factory default. After that, you may erase your iPhone from your iCloud profile by clicking "Remove from Account " option.
People Also Read[2024 Solved] How to Operate Apple Watch Unlocked CarrierLearning How to Erase iPad without Passcode in 2024
Part #3: Conclusion
Overall, once you have noticed or you got a notification regarding this error to erase iPhone verification failed you must take a look and solve this problem immediately. The mentioned alternatives as well as those manually procedures might help you in fixing the error.
By just simply and taking it nicely those procedures you have hope to fix the error. I f ever you don’t want to rely on any of those manual options you could indeed use the FoneDog iPhone Unlocker which has been amazing in so many ways. We hope that this will help you, have a nice day!
Written By Rosie
Last updated: 2022-06-06