


It’s common nowadays to own not just one device. These devices play vital roles in our lives depending on how big and functional they are. All of which can be capable of playing music, which is why it’s important to know how to sync Spotify songs from computer to iPhone. It will be useful to use multiple of your devices to enjoy music and bring the best out of them.
There can be issues or dilemmas along the way, but this article will help you know a way out and solve such hassles. We are going to discuss the point-by-point procedures on how we make the syncing possible. So, if you are interested in knowing how to sync Spotify songs from a computer to iPhone, and some of the common procedures and tools to use, you have to finish reading this post until the very end, you will definitely learn lots of stuff!
Contents Guide Part #1: Procedures for Syncing Spotify Songs from Computer to iPhonePart #2: The Easiest Way to Download Spotify Music TracksSummary
Part #1: Procedures for Syncing Spotify Songs from Computer to iPhone
Now that you are ready with the essentials, it is time to start learning how to sync Spotify songs from computer to iPhone. The steps that we will be discussing are actually easy to do, so if you are a lover of music and you also happen to own many devices, this one’s for you!
Step #1: Gather All the Songs That You Want to Sync on Your Computer
The initial thing that you have to do is be ready with all the music files that you want to sync to your iPhone. You need to get ready with your computer where the Spotify app is also installed since you will have the local files of music files.
So, you can get your USB and start transferring all of your files to your computer. It is basically letting Spotify what songs you like, save songs from Spotify initially, and start syncing them into the system. If you have owned an iPhone ever since, you would also know that it can’t do the syncing since files are in MP3, MP4, and other format types.
So, here are some steps on how can you organize the songs that you want to be present on your computer:
- Start transferring the audio files to the hard drive of your computer.
- Create a specific folder where you will be storing the files you need.
- Start organizing the files and then begin to transfer them to your folder. It would be helpful to use common names in your folder, so it will be easier to find them.
Step #2: Turn On the Local File Discovery on the Spotify Desktop App You Are Using
Once you are done with the organization of the music files that you want to sync to Spotify, you need to prepare the app as the next step.
We initially have to work with the Spotify Desktop app, it would be nice to know that it is capable of detecting the audio files that you have on your file storage system. The execution of this step would also be easier since you can navigate to your saved folder faster. In order to switch on the local file discovery on your Spotify desktop app, here’s what you have to do:
- On your computer, you should open the Spotify app.
- At the upper right corner of the screen, click on your Profile Name.
- Choose the Settings option.
- You need to scroll down until you are able to see the Local Files Section.
- Then start to toggle the switch to On for the option that says Show Local Files.
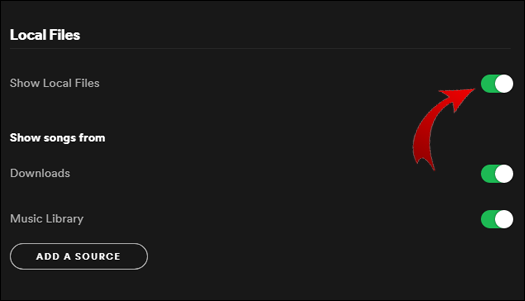
Things can also get easier if you know that your local files are saved on Spotify, you need to turn off the “Show songs” from Downloads, and the Music Library options as well.
Step #3: The Source Directory Must Be Specified on Your Spotify Desktop App
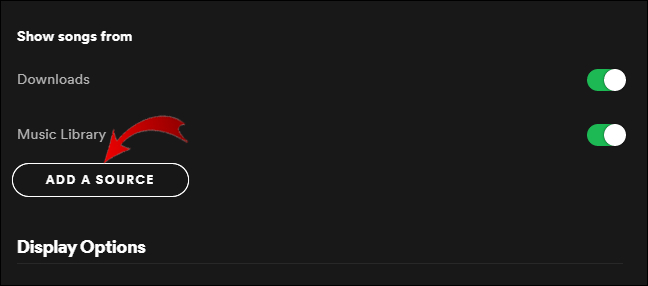
In order to start telling the Spotify desktop app where can you see all your audio files, you have to add a source. It is possible to add multiple sources which can come from different folders if you prefer when it comes to organizing your files.
And when you do so, you have to make sure that you are going to choose the correct folder path so that the Spotify app can locate your files. To add your saved folders as a source on Spotify, you need to:
- Open the Spotify app, and then tap your Profile Name, and then go to Settings.
- You need to look for the Local Files section.
- Then click the Add a Source tab.
- Then you need to find the folder where you have your audio files.
- Then click Ok.
Step #4: Add the Local Files You Have to A Playlist
If you see a new item in your library, then you could say that the syncing of files to Spotify is successful. You will see a folder icon instead of an album thumbnail. You will also see it named Local Files instead of a playlist. When you are able to see it on your Spotify library, then it means that all your files are successfully imported, and syncing the music files to your iPhone should come next.
Step #5: On the Spotify App, the Local File Settings Must Be Turned On
As we have now completed the first phase of how to sync Spotify songs from computer to iPhone, let us now proceed with the second phase, this time, we have to deal with the Spotify app on your iPhone. Since we have turned on the local file discovery on the desktop app, it is also needed that we do the same with our iPhones.
It is needed to make sure that the phone is able to detect the files from the computer that you are about to use. In order to execute this on your iPhone, you need to:
- Start launching the Spotify app on your iPhone.
- Look for the gear icon and open Settings.
- Go and scroll down to local files.
- Toggle the switch to “On”.
It is needed that your iPhone and computer are on the same network so the two apps from two different devices can sync all your imported files.
Step #6: Hit the Download Icon on the Spotify App
Now, we are at the final step of how to sync Spotify songs from computer to iPhone. When you open your Spotify account, you should see your new playlist on it, and you should also have access to the said songs. To download all the imported songs to your iPhone, you have to:
- On your iPhone, start opening the Spotify app.
- Then proceed to My Library.
- You need to scroll down through your playlists and then look for the one with all of your files.
- Hit on the playlist.
- Then click on the Arrow Down icon in order to start downloading the songs to your iPhone.
![]()
In case you have encountered issues while going through the procedures on how to sync Spotify songs from the computer to iPhone, it is always possible to contact customer support for queries and clarifications.
Part #2: The Easiest Way to Download Spotify Music Tracks
There are lots of ideas that we have learned about how to sync Spotify songs from computer to iPhone as shared in the previous parts of the article, above. And while such steps can really be useful in the syncing process, it is long and tedious.
Most people prefer the easier way to do it, saving time, energy, and resources is what matters to most of us. So we look for alternative ways to do it, and we are about to share with you one of them, here.
The tool that we are about to share with you is called the Spotify Music Unlocker. It is a professional tool that you can use to unlock and convert Spotify music tracks to formats that are easier to use and handle like MP3, FLAC, WAV, and M4A.
This tool can be downloaded using links that already come with a download package, with instructions that you can also refer to. You can enjoy a free trial once you have set your mind on trying this professional tool, and once decided, you can now proceed with registering it by using the license key that you will buy.
Once you are done with the registration of the tool, you can now use it to unlock and convert your Spotify Music tracks.
Step #1: Open the Spotify Music Unlocker
Launch the Spotify Music Unlocker and go to its main interface. As you open it, you will see the “Open the Spotify web player” option, click it.
Step #2: Log In to Spotify
Secondly, at the top right part of the page, tap the “Log In” option and enter your credentials to log into your Spotify account. In case you still do not have your own account, tap “Sign Up” in order to create one.
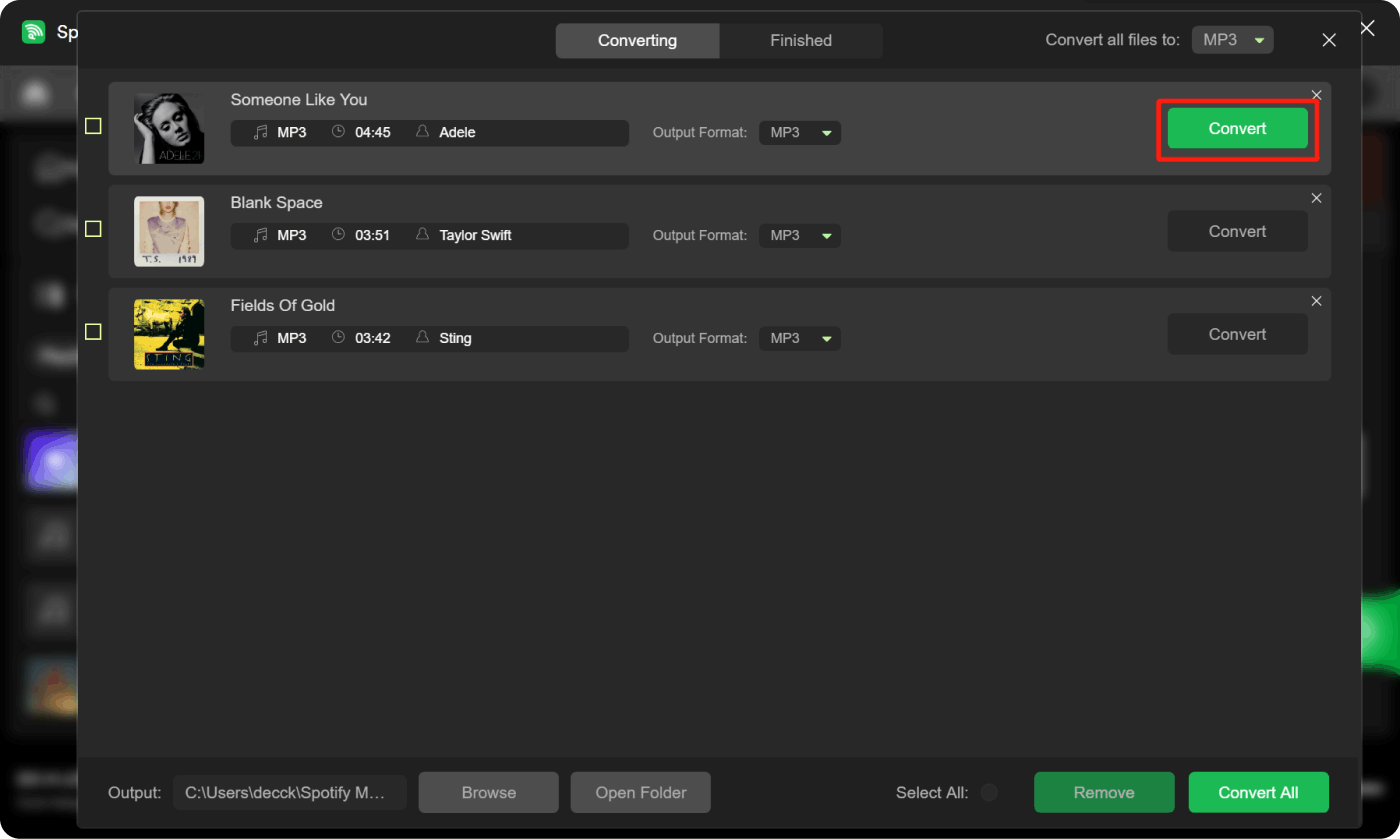
Step #3: Import the Songs, Albums, And Playlists That You Want to Convert
Now is your time to choose the songs, playlists, or albums that you want to convert. Tap the green add icon, and then all the songs will be added to the list. You can also try to drag the songs to the green add icon. If you only want to convert a single song, you have to drag the specific song to the blue icon.
Step #4: Select Your Desired Formats
Set the file formats that you want to have as your outputs! You can choose from what the tool offers such as M4A, MP3, FLAC, and WAV. Then select the folder where the converted songs will be saved once the process is completed. You can also create your own folder in case you want to have it separated, you must make sure that you rename the folder so you can easily identify and locate it whenever you need it.
Step #5: Hit the Convert Tab
And for the final step, tap the “Convert” button to start the conversion process, and if you have multiple files hit the “Convert All” tab. By conversion of as many files as you can, you have the chance to save time and effort which can be used to accomplish other tasks that you have to.
And there you are! This is how you utilized this free-to-use Spotify to MP3 converter! The steps are easy, and you will surely accomplish and get the outputs that you want as fast as you ever thought it is possible. And another nice thing about it is, you will finally get to listen to any song you love from Spotify without thinking about anything that might hinder you, from doing so!
People Also Read How to Move Spotify Music to SD Card: Only Guide You Need! How to Sync Spotify to Apple Watch: A Step-by-Step Guide
Summary
As we have learned, it is not that simple to execute the procedures about how to sync Spotify songs from computer to iPhone. But, if you will follow the procedures, and as long as you have the tools, the syncing would be easier than you have ever thought it is. Moreover, in order to make things less complicated, faster, and more efficient as well, we have professional tools to help us like the Spotify Music Unlocker.
The tool is really capable of making sure that Spotify music files are downloaded and saved on your device of choice, so that transfer will be easier as the files have been transformed into formats that are more flexible. Through this, the time used can be shortened, and the files can be enjoyed with the best quality ever.
Written By Rosie
Last updated: 2023-07-17