


“Is the process of how to remove DRM from Apple Music tracks easy enough for beginners like me? Are there several options for me to do it?”
Alongside Spotify, Apple Music has already made its name in the music streaming industry. With its huge catalog and collections, as well as the perks offered via its paid plans, we can’t doubt why many keep on subscribing and using the platform. A free trial offer is even available for new users so they can check out the app before getting a premium plan.
Though good enough, most Apple Music enthusiasts are bothered by the tracks being protected with DRM. Such encryption makes it impossible to access the songs outside the Apple Music app itself and on unauthorized devices. It is being utilized to protect content from unauthorized distribution and use, which, somehow, is fair enough. However, other users’ views are different when it comes to this topic. Thus, they are continuously looking for ways to remove the DRM from Apple Music.
You are probably on this page to find out more about the same—the ways to remove DRM from Apple Music and make it accessible on almost all devices and media players. Don’t worry; this dilemma is simple and solvable.
Let’s review the several methods that you can apply to Apple Music DRM removal by reading each section of this post.
Contents Guide Part 1: Best Apple Music DRM Removal [Via Trusted App]Part 2: Remove DRM from Apple Music Using iTunes MatchPart 3: How to Remove DRM from Apple Music for Free [Via Recording Tool]Part 4: Apple Music DRM Removal [By Burning the Songs to CDs]Part 5: Summary
Part 1: Best Apple Music DRM Removal [Via Trusted App]
You will surely be delighted to know that there is an amazing professional tool that can help you easily remove DRM from Apple Music songs. You may try using the Apple Music Unlocker. It has the ability to unlock Apple Music tracks and make them DRM-free as well. In fact, it even supports the processing of Audible audiobooks. It can convert the Apple Music tracks to MP3 or other common formats.
In order to start using Apple Music Unlocker as the best tool to remove DRM from Apple Music, it must first be downloaded and installed on your computer. This is supported by both Windows and Mac OS, so there should not be any issues with installation. Once installed successfully, you may proceed to launch it and begin using it by following the below-presented guide.
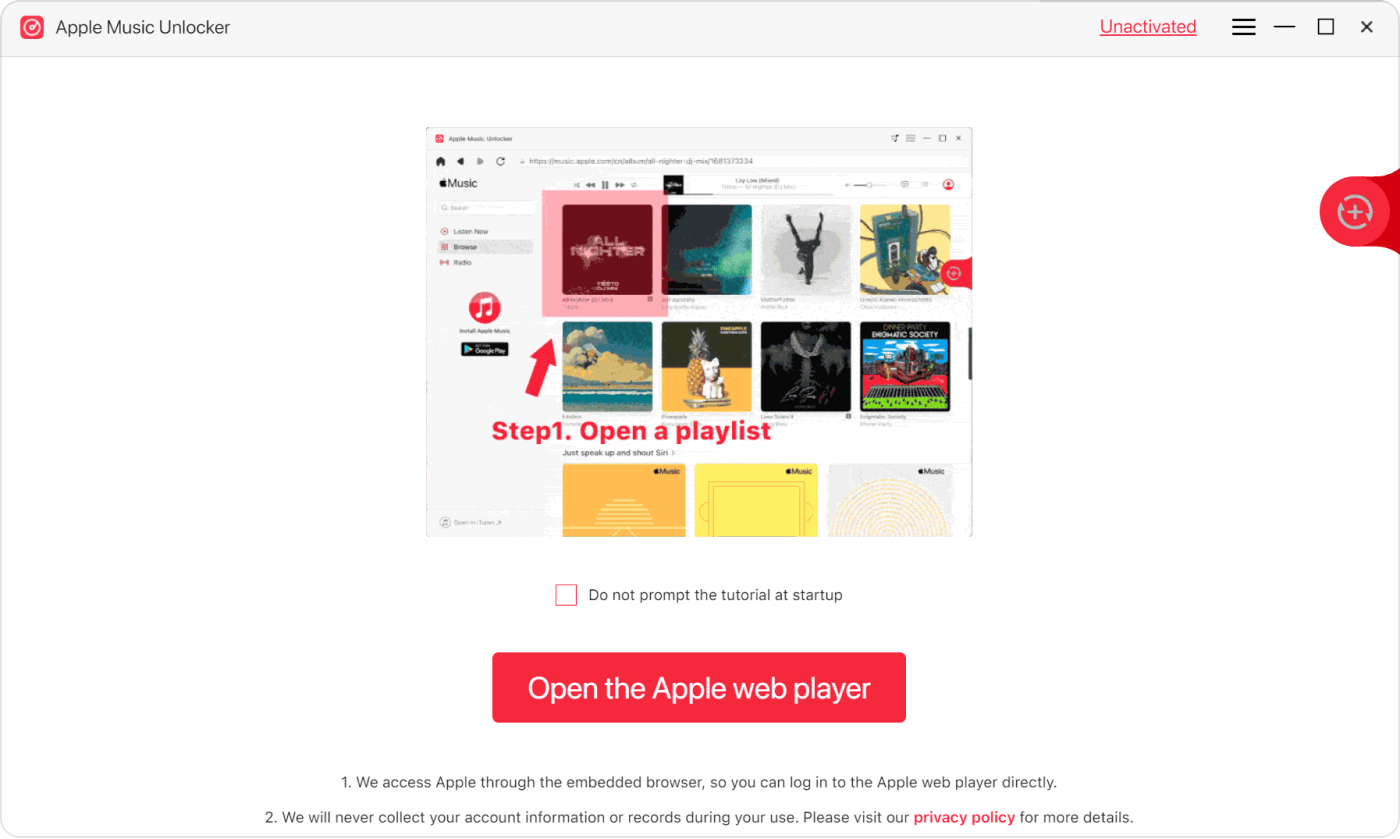
Step #1. Make sure that you also have the iTunes app installed on your computer. Upon opening the Apple Music Unlocker app, you should be able to see the “Open the Apple web player” button on the screen. Press it.
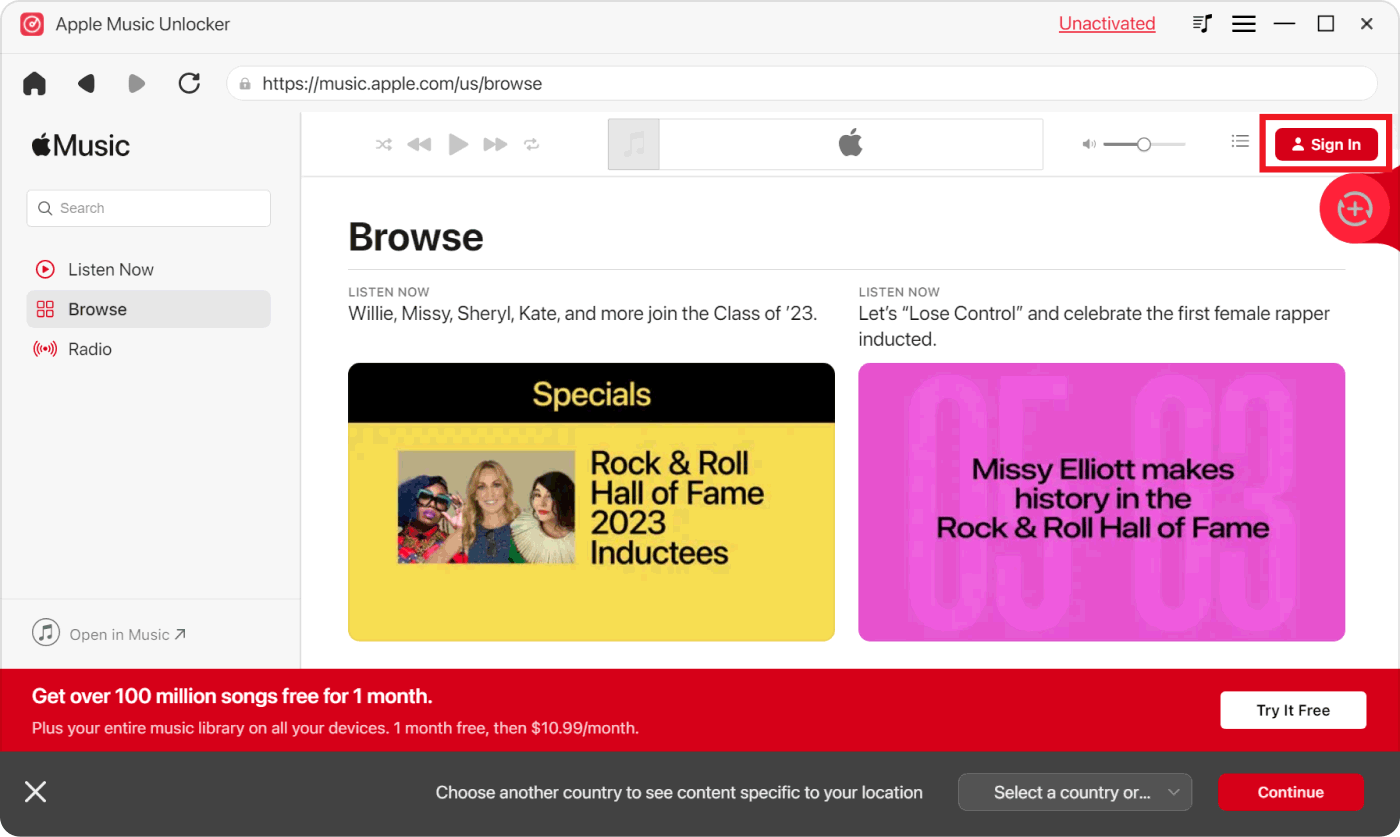
Step #2. You need to log into your Apple ID account. Do this by tapping the “Sign in” menu that’s at the top right section of the page. Don’t worry about sharing details, as Apple Music Unlocker will keep your information private.
Step #3. You may now begin to choose the songs or playlists that you’d like to be processed through the app. Once selected, just drag and drop them to the "add" icon that’s at the side of the screen. You may also use the conventional method of choosing a playlist and then tapping the red "add" icon afterward to add all the songs in it.

For possible duplicated songs, you don’t have to think about it, as it won’t surely happen. Apple Music Unlocker has the ability to detect them, so it would be avoided.
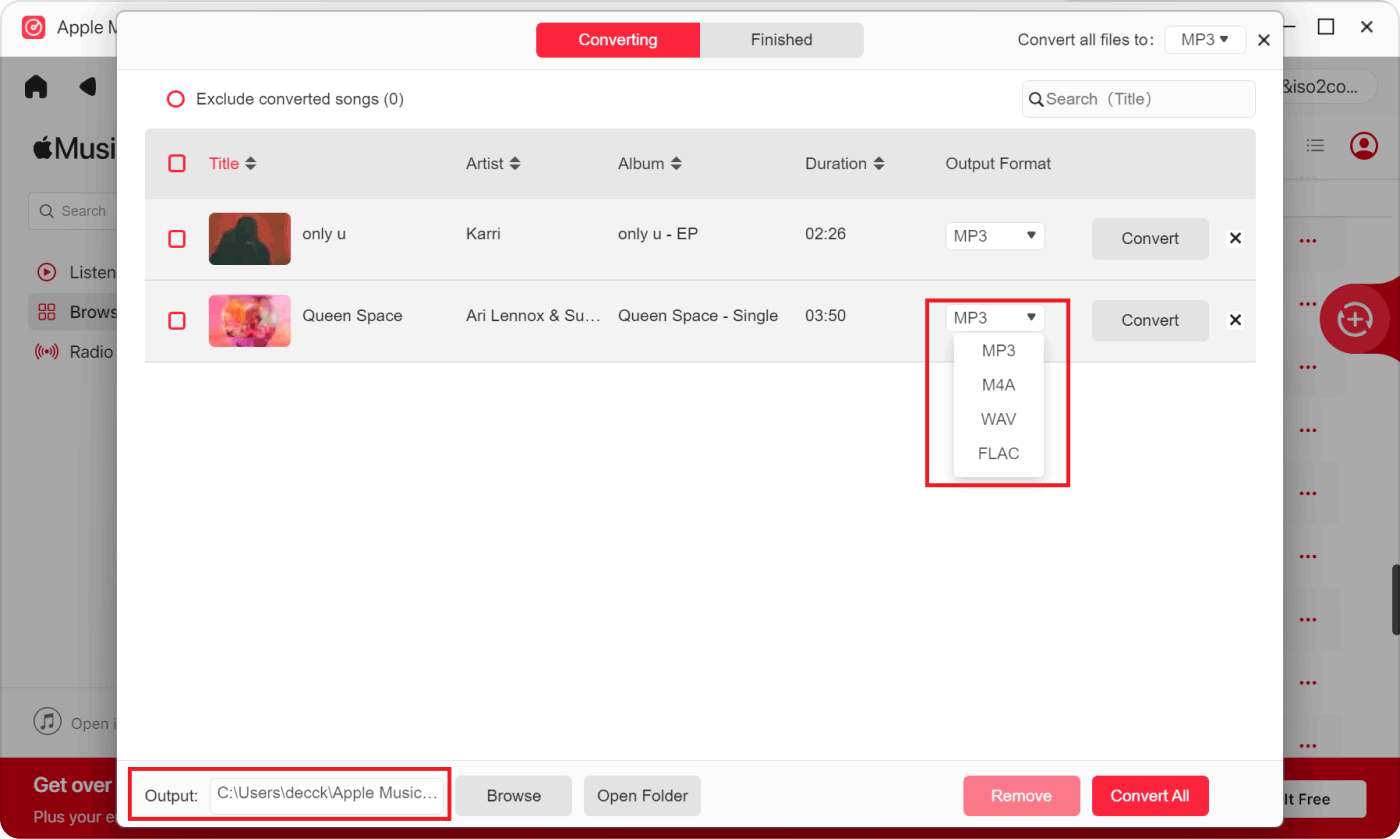
Step #4. As previously mentioned, aside from the ability to remove DRM from Apple Music, Apple Music Unlocker can also help transform the songs to popular formats like MP3, FLAC, WAV, and M4A. In this step, you may select which format you’d like to use. Changing the output folder can also be done as you wish.
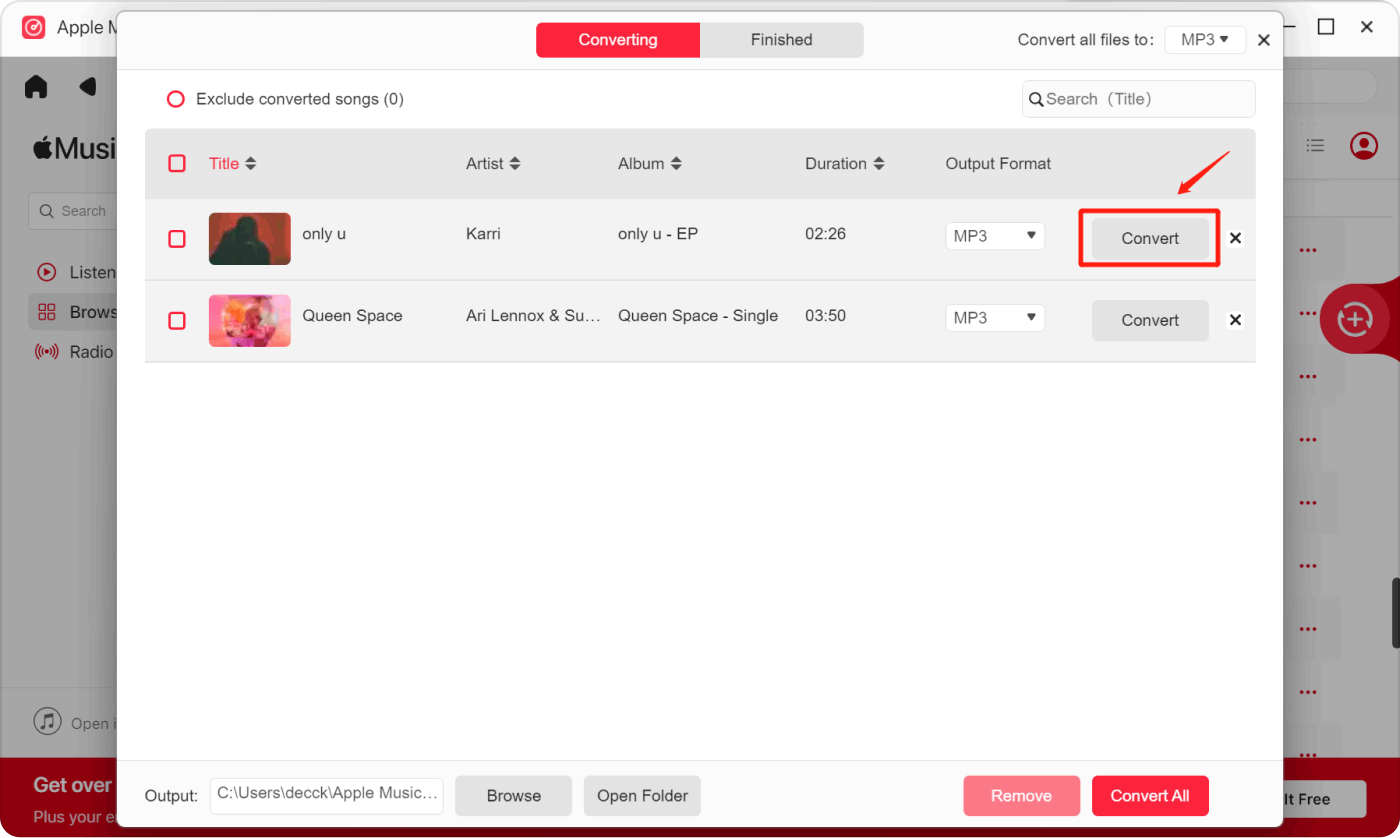
Step #5. The conversion of the added tracks shall commence once the “Convert” or “Convert All” menu has been clicked.
Once the above process ended, you will now have the transformed Apple Music tracks that are already unlocked and free from DRM protection! Moving them to other devices that you own and listening to them as you like (on any speaker or media player) can now be done without worrying about any limitations!
Part 2: Remove DRM from Apple Music Using iTunes Match
Apple Music songs purchased before 2009 are DRM-protected, preventing infringement and restricting access on non-iDevices. To remove DRM from Apple Music, use iTunes Match, which stores your music library in iCloud and allows access to all purchased songs on all devices.
You can upload up to 100,000 tracks from your iTunes library to iCloud with this subscription, stream or download DRM-free iTunes music to up to 10 devices, and enjoy iTunes songs on more devices. Before the steps on DRM removal, you should subscribe the iTunes Match first.
For Mac Users
- Step #1. Launch Apple Music app.
- Step #2. Click the "iTunes Store" on the sidebar.
- Step #3. Scroll to the bottom and click "iTunes Match".
- Step #4. Click "Subscribe" button and sign in with your Apple ID details.
- Step #5. Click "Subscribe" after confirming your billing information.
For Windows Users
- Step #1. Launch iTunes app.
- Step #2. Click the "Store" on the top of the windows.
- Step #3. Scroll to the bottom and click "iTunes Match".
- Step #4. Click "Subscribe" after confirming your billing information.
How to Remove DRM from Apple Music
After subscribing to iTunes Match, you can remove the DRM from Apple Music by following the steps below.
Step #1. Check if the songs are DRM-protected. View>>Show View Options>>File>>Kind. The DRM-protected songs will show "Apple Music AAC audio file".
Step #2. Click "Library", Select and delete the protected songs.
Step #3. Click the "cloud icon" to download the DRM-free songs to your device.
Part 3: How to Remove DRM from Apple Music for Free [Via Recording Tool]
Indeed, using professional DRM removal tools such as Apple Music Unlocker is definitely handy. Plus, the outputs are guaranteed to be great.
In this section, we will be highlighting another method to remove DRM from Apple Music that you can also try as you like. You may also resort to using free tools that can help you record Apple Music songs. A good example of such would be Audacity. It’s open-source and totally free. Recording can be done using it, and afterward, one can have MP3 versions of the recorded tracks.
Aside from being a recorder, Audacity also has a built-in editing feature that a user can utilize to further enhance the output files. It’s just that some are saying that the complex interface it has isn’t suited to beginners or first-time users. But since this is free, it could be worth giving it a try, right?
In case you’d like to try Audacity, below are the steps that you must follow.
Step #1. Once you have installed Audacity on your PC, begin by launching it.
Step #2. Under “Audio Host”, there is a dropdown menu wherein you have to select Windows WASAPI.
Step #3. You may now select the loopback device (headphones or speakers).
Step #4. Head back to your Apple Music library and then just play a song that you like. On Audacity, you have to tap the “Record” button to start recording the track that’s being played.
Step #5. Once the recording is done, you just have to tap the “Stop” option. The recorded file will be saved to your PC in MP3 format.
Just remember that using this tool to remove DRM from Apple Music can’t guarantee great outputs as the audio quality of the original songs can’t be maintained. Plus, if you are looking at saving multiple songs, it would be tedious to do the process over and over again. It would take you some time to complete as well.
Part 4: Apple Music DRM Removal [By Burning the Songs to CDs]
Aside from the most recommended method of how to remove DRM from Apple Music, the use of Apple Music Unlocker, and a free tool for recording, you still have another option of removing DRM from Apple Music. We will be discussing here how you can burn Apple Music songs to CDs to make them playable on other devices.
For some users, this option could be a bit complex. Plus, the speed of completion could be a bit slower compared to when using professional apps. Additionally, a blank CD must be prepared in advance for this method. If you are fine with these drawbacks, then keep reading to learn the whole process of how to remove DRM from Apple Music by burning the tracks to CDs.
Step #1. On your computer, launch your iTunes app. Make sure to insert the blank CD into the drive. Proceed to create a new playlist by tapping the “File” menu and then choosing the “New Playlist” option.
Step #2. Select the Apple Music songs from which you’d like the DRM protection to be removed. Drag and drop them into the newly created playlist.
Step #3. Once all songs have been added to the playlist, press the “File” menu at the top and then click the “Burn Playlist to Disc” button. Mark the “Audio CD” option as well. Don’t forget to press the “Burn” button to ensure that iTunes will burn the songs to the inserted CD.
Upon burning the Apple Music songs to CD, you will have copies available. To import them onto another device, just click the “Edit” menu, choose “Preferences”, then the “General” option. Tap “Import Settings” next.
Part 5: Summary
At first, many users would probably be bothered by the DRM protection that Apple Music songs contain. Indeed, for those who aren’t aware of how to remove DRM from Apple Music, this is a dilemma that must be looked into. Fortunately, there are now various options or methods one can resort to in order to address this issue.
It is always recommended to use professional tools such as the Apple Music Unlocker when trying to deal with both the removal of Apple Music songs’ protection and their conversion to other formats like MP3, M4A, FLAC, ect.. Some options, such as the use of free tools like Audacity or burning the songs to CDs, are good enough as well. However, drawbacks could be encountered along the way as well as when outputs are seen.
People Also Read The Top Guide: Convert iTunes to MP3 And Enjoy Them Anywhere Tidal Vs Apple Music: Which one's Streaming Service's Better
Written By Rosie
Last updated: 2023-08-02