


In today's digital age, streaming music has become the norm, offering instant access to a vast library of songs at our fingertips. Apple Music, with its extensive collection of tracks and playlists, has undoubtedly become one of the go-to platforms for music enthusiasts. While streaming is convenient, there's still something nostalgic and delightful about listening to your favorite tunes on a good old-fashioned CD.
Many subscribers wonder whether they can burn Apple Music to CD to enjoy in the car, share with friends, or keep a physical collection of their most cherished songs. Fortunately, the answer is yes!
In this article, we'll walk you through the step-by-step process of converting and burning Apple Music to a CD, making your music accessible offline and playable on any CD player. Whether you're a tech-savvy audiophile or a casual music lover, our comprehensive guide will help you create personalized music CDs hassle-free. Let's dive in and start burning those beats!
Contents Guide Part #1: Why Can't I Burn Apple Music to CDPart #2: Best Way to Burn Apple Music to CD by iTunesPart #2: Burn Apple Music to CD via VLCPart #3: Burn Apple Music to CD via Media PlayerPart #4: Conclusion
Part #1: Why Can't I Burn Apple Music to CD
Before you embark on the journey of burning your beloved Apple Music tracks to a CD, there are a few essential prerequisites you'll need to ensure a smooth and successful process. If you fail to burn Apple Music to CD, it may be because you do not meet the following conditions. Let's take a closer look at what you'll need:
Blank CD or CD-RW:
To start, you'll need a blank CD or a rewritable CD (CD-RW) to burn your converted Apple Music tracks onto. Make sure the CD is compatible with your CD writer and that it has enough free space to accommodate the tracks you wish to burn.
CD Writer or Optical Drive:
Most modern computers come with a built-in CD writer or optical drive. If your computer doesn't have one, you can use an external CD writer that connects via USB. Ensure that your CD writer is in working condition and supports burning CDs.
CD Burning Software:
Next, you'll require CD-burning software. This software facilitates the process of transferring your music files to the CD in a format that can be played on standard CD players. Some popular CD-burning software options include Nero Burning ROM, Windows Media Player (for Windows users), and iTunes (for macOS users).
Conversion Software:
As Apple Music tracks are protected by Digital Rights Management (DRM), you'll need to convert them to an open format like MP3 before burning them to a CD. Conversion software helps you remove the DRM protection and convert the tracks into a compatible format.
Converted Music Files:
After successfully converting the Apple Music tracks to an open format (such as MP3), you'll have the actual audio files ready for CD burning. These converted files can be stored on your computer's local storage, ready to be transferred to the CD.
It's crucial to emphasize that the conversion process should be done for personal use only, respecting copyright laws and terms of service of Apple Music. Distributing or sharing copyrighted material without permission is illegal and unethical.
Now that you have all the prerequisites in place, you're well-prepared to move on to the next steps of burning your Apple Music tracks to a CD. Stay tuned for Part 2 of our guide, where we'll walk you through the step-by-step process of converting and burning your favorite tunes for offline listening pleasure!
Part #2: Best Way to Burn Apple Music to CD by iTunes
When it comes to converting and grabbing tracks from Apple Music to MP3 for the purpose of burning them onto a CD, one of the most effective and user-friendly tools available is "Apple Music Unlocker." This powerful software is designed to bypass the DRM protection on Apple Music tracks, enabling users to convert them into standard MP3 files so that Apple Music can be played on iPod, or any other devices, including CD players. Let's explore the key features and benefits of using Apple Music Unlocker:
- DRM Removal: Apple Music songs are encrypted with DRM to prevent unauthorized distribution. Apple Music Unlocker is designed to remove this DRM protection legally, allowing you to convert the tracks to an open format like MP3 without any loss of quality.
- Preserve Audio Quality: Apple Music Unlocker ensures that the converted MP3 files maintain their original audio quality. This means you can enjoy your favorite songs in the same high fidelity as they were available on Apple Music.
- Batch Conversion: This handy feature allows you to convert multiple Apple Music tracks to MP3 simultaneously. It saves time and effort, especially if you have an extensive music library you want to convert for burning onto CDs.
- User-Friendly Interface: Apple Music Unlocker offers an intuitive and user-friendly interface, making it accessible for both tech-savvy users and those who may not be as familiar with conversion software.
- Metadata Retention: The software ensures that the essential metadata, such as song titles, artists, album information, and cover art, are retained during the conversion process. This way, your music library stays organized and visually appealing.
- Platform Compatibility: Apple Music Unlocker is compatible with both Windows and macOS operating systems, making it accessible to a wide range of users.
Below is an overview of how to burn Apple Music to CD using Apple Music Unlocker and a burning tool on your computer:
Step #1: Use Apple Music Unlocker to Grab Your Favorite Tracks
Here are the steps to use it:
- Install iTunes on your computer and log in to your account.
- Launch the Apple Music Unlocker application.
- In the Apple Music Unlocker application, click on "Open the Apple web player ".
- Sign in to your Apple ID in the top right corner of the web player window.
- To import a specific song or playlist, drag and drop the title onto the red add icon.
- To import all songs from a playlist, open the playlist and click on the red add icon.
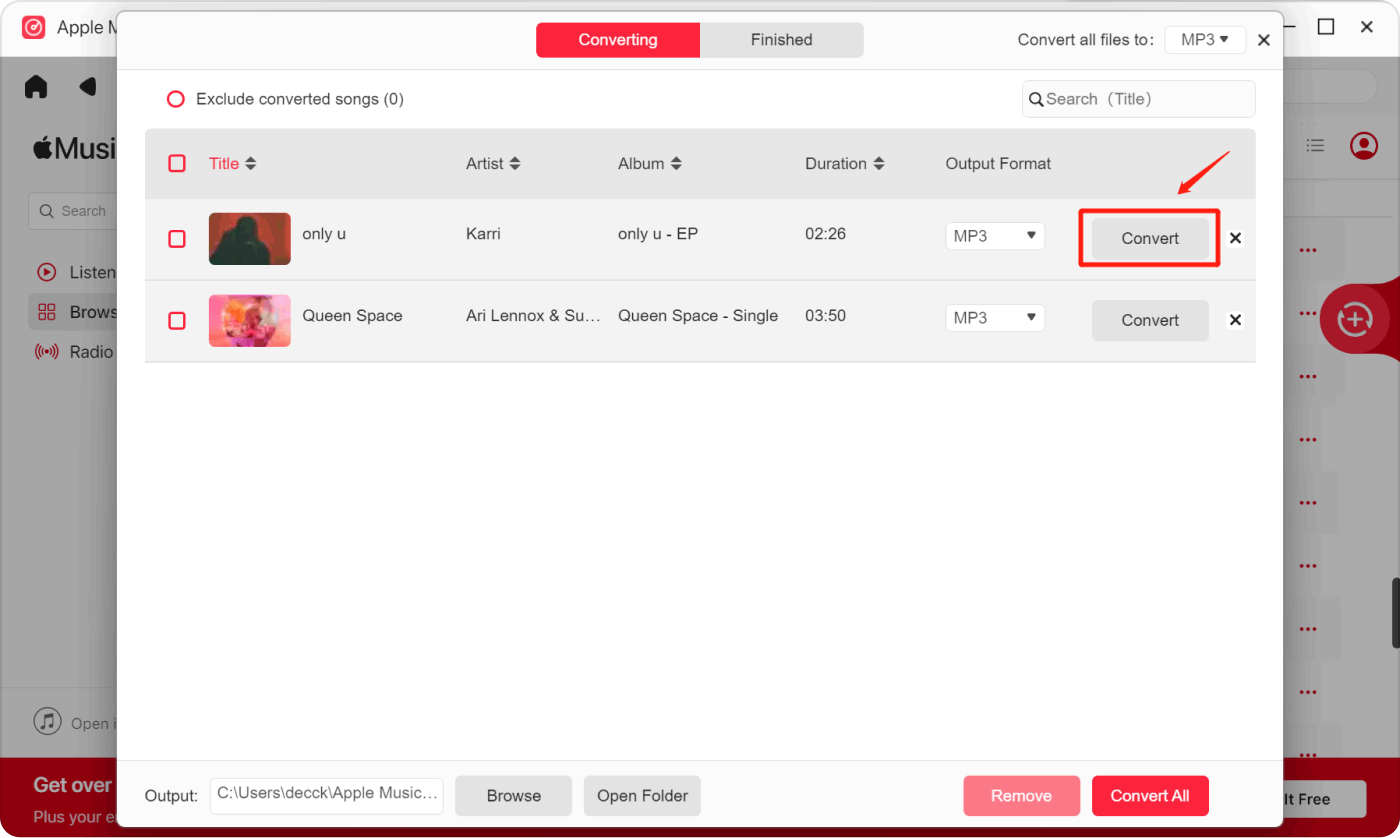
- Choose the desired output format for your converted files. Available formats include MP3, WAV, M4A, and FLAC.
- Click the "Change " button to select a different folder as the output destination.
- Click the "Convert " button to initiate the conversion process.
Step #2: Burn Your MP3 Files to a CD Using Burning Software
One popular CD-burning tool that works on both Mac and Windows is "iTunes." While iTunes was officially discontinued on macOS starting from macOS Catalina, it is still available on Windows and can be used to burn CDs. For macOS users running macOS Mojave or earlier versions, they can still use iTunes for CD burning.
Here are the steps to burn your converted MP3 files to a CD using iTunes:
- Open iTunes. Launch iTunes on your computer. If you don’t have iTunes installed, you can download it from the Apple website (for Windows users) or the Mac App Store (for macOS Mojave or earlier versions).
- Create a Playlist. Before you burn the CD, it’s a good idea to organize your MP3 files in a playlist. To create a new playlist, click on the “File ” menu and select “New Playlist.” Give the playlist a name and drag your converted MP3 files into the playlist.
- Insert a Blank CD. Insert a blank CD or CD-RW into your computer’s CD writer.
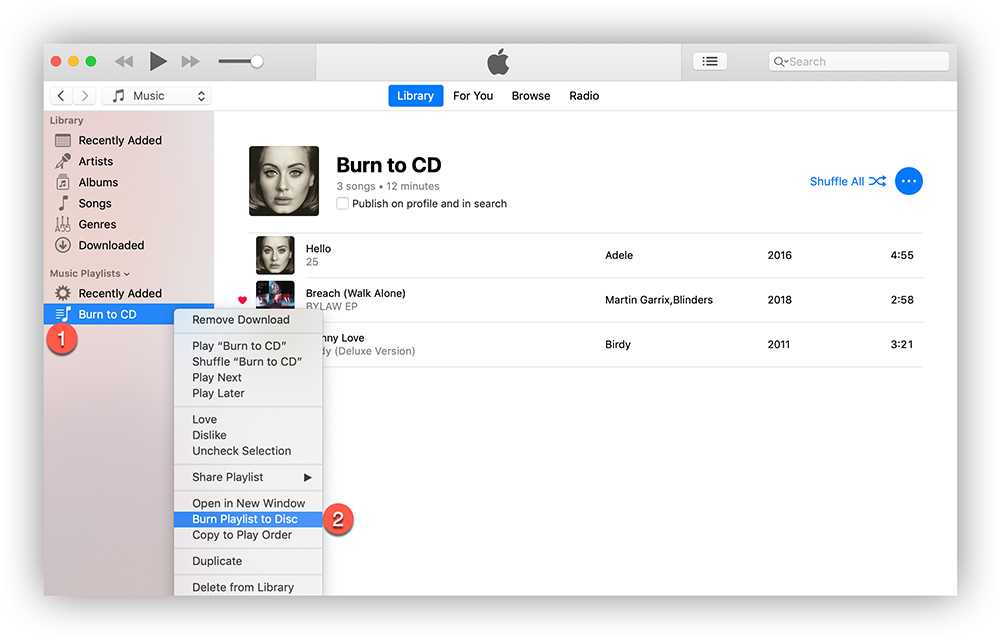
- Select the Playlist. Go to the “Library ” section in iTunes and select the playlist containing the MP3 files you want to burn to the CD.
- Initiate CD Burning. With the playlist selected, go to the “File ” menu, hover over “Burn Playlist to Disc,” and choose the appropriate burning speed (if prompted). Select “Audio CD” as the disc format.
- Start Burning. Click the “Burn ” button to start the CD burning process. iTunes will begin writing the selected MP3 files to the CD.
- Finalize the CD (Optional). After the burning is complete, you may have the option to finalize the CD. Finalizing the CD makes it playable on other devices, such as CD players in cars or stereo systems. If prompted, select the option to finalize the CD.
- Eject the CD. Once the burning process is successfully completed and, if applicable, the CD is finalized, eject the CD from your computer’s CD writer.
That's it! You've successfully burned your converted MP3 files to a CD using iTunes. Now, you can enjoy your personalized music CD on any standard CD player, regardless of whether you're using a Mac or a Windows computer. Remember to label the CD for easy identification and store it in a safe place to preserve the quality of the content.
By utilizing Apple Music Unlocker, you can convert your cherished Apple Music tracks to MP3 hassle-free, making them ready to be burned onto CDs and enjoyed offline on any standard CD player. With the right tools at your disposal, the process of creating personalized music CDs becomes a breeze. Happy burning!
Part #2: Burn Apple Music to CD via VLC
VLC is a popular free media player that can play a wide range of multimedia files, including music and video formats. Its easy-to-use interface and additional CD-burning functions make it a convenient all-in-one solution for media playback and CD burning, allowing you to simply burn the downloaded Apple Music to CD on your Windows or macOS computer.
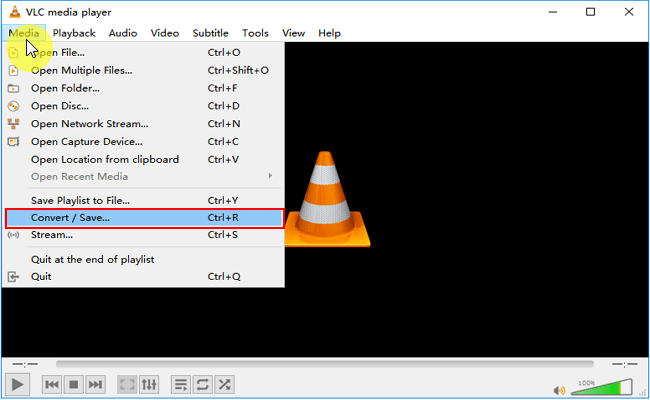
Step #1: Insert a blank CD to the disc drive and launch the VLC player on your computer.
Step #2: Click the "Media" button and choose the "Convert/Save" option.
Step #3: Click the "Disc" at the top of the Open Media window.
Step #4: Select the "Audio CD" then click the "Browse" to select the CD drive, and click "Convert/Save".
Step #5: Select MP3 as the preferred format in the Convert window by clicking the “tool button” and then clicking “Save”.
Step #6: Click "Browse" to add the downloaded Apple Music files. Then click "Start" to burn Apple Music to CD.
Part #3: Burn Apple Music to CD via Media Player
If you primarily use a Windows PC, you can burn Apple Music to CD using Windows Media Player without installing additional software. Because the software is simple to use and absolutely free, you may launch it and begin burning music to CD from Apple right away. Now read the steps and figure out how to execute it.
Step #1: Import the downloaded Apple Music songs to Windows Media Player. Create a new playlist by clicking the Playlist panel.
Step #2: Add the Apple Music songs to the new playlist and insert the blank CD to the disc drive.
Step #3: Select the "Burn" button in the upper right corner of the screen.
Step #4: Drag and drop the playlist you created to the Burn List.
Step #5: Choose the "Audio CD" option and click the "Start Burn" button.
People Also Read How to Play Apple Music on Roku: Unlocking Music Streaming How to Sync Spotify to Apple Watch: A Step-by-Step Guide
Part #4: Conclusion
Burning Apple Music tracks to a CD opens up a whole new world of music enjoyment, allowing you to savor your favorite tunes offline and share them with friends and family. Throughout this comprehensive guide, we've explored the prerequisites for CD burning, the importance of using conversion software like Apple Music Unlocker, and the step-by-step process of burning your converted MP3 files to a CD using iTunes.
When it comes to converting and grabbing tracks from Apple Music to MP3, Apple Music Unlocker stands out as a reliable and efficient tool. By removing DRM protection, it enables you to convert your Apple Music tracks into a standard MP3 format without compromising on audio quality. This legal solution ensures that you can enjoy your music offline on any device and create personalized music CDs to cherish for years to come.
For the actual CD-burning process, iTunes emerges as a versatile and accessible option for both Mac and Windows users. Its intuitive interface and playlist organization make it a user-friendly choice. By following a few simple steps, you can burn your converted MP3 files to a CD and finalize it for compatibility with various CD players.
With this guide at your disposal, you're now equipped to embark on your journey of creating custom music CDs from your treasured Apple Music collection. So, gather your favorite tracks, convert them with Apple Music Unlocker, and burn them using iTunes to craft your personalized music compilation. Let the melodies resonate, and the nostalgia of physical CDs take you back to simpler times while enjoying your music, your way. Happy listening!
Written By Rosie
Last updated: 2023-07-19