


As an Apple Music fanatic, you must be immersed in your favorite music library every day. If you find yourself in the depressing situation of losing your Apple Music library someday, don’t worry; it’s not that difficult to solve such Apple Music problems.
In our article, we provide a comprehensive guide on how to restore Apple Music library. By following our guide, you will get your Apple Music library back again. Let’s begin.
Contents Guide Part 1. Why Your Apple Music Library Is Lost?Part 2. Ways to Restore Apple Music LibraryPart 3. Keep Apple Music Library ForeverPart 4. Summary
Part 1. Why Your Apple Music Library Is Lost?
Before we start explaining the specific solutions, let’s analyze the possible causes of this issue first.
Library sync issues. Your music library might not be syncing to other devices properly.
Subscription problems with Apple Music. The subscription to your Apple Music library may expire.
Apple ID issues. If you change to a different Apple ID, it may cause a loss of your music library.
Storage is not enough. Limited space on your iPhone or Mac may cause the loss of your music library.
Device version are outdated. Out of your devices.
Accidental file removal or deletion. Your music file might be moved to another location or deleted by accident.
Part 2. Ways to Restore Apple Music Library
Method 1. Sync Your Apple Music Library Again
In some situations, your library could be lost due to syncing problems, particularly if your internet connection is lost. In order to fix this problem, your library needs to be manually synced again. Here are the steps to sync the library:
- On iPhone
- Open “Settings” on your phone. Find “Music” and tab on it.
- Find the “Sync Library” option. Turn it off for several seconds, and then turn it on.
- Wait for a while to sync the Apple Music library to your phone.
- On MAC
- Launch the Apple Music app, and click “Account” on the menu.
- Then select "File"--"Library"--"Organize Library", and choose the consolidate files.
- Choose "Music"-- "Settings"-- "Preferences".
- Choose the "General' option, confirm the "Sync Library", and click the red button "OK".
Method 2. Check Apple Music Subscription
If your subscription has expired, your access to the music library may be affected. So, you need to confirm that your Apple Music subscription is active. Here is how to check:
- On iPhone
- Open “Settings” on your phone, and tap the profile picture at the top of the Settings list.
- Choose “Subscriptions”.
- Tap “Apple Music” to check the subscription information.
- Renewing your subscription if you find the subscription has expired.
- On MAC
- Launch the “App Store” and click the profile picture.
- Then choose “Account Settings”.
- Find “Subscriptions” and click “Manage” on the pop-up window.
- Find “Apple Music Subscription” and click “Edit”.
- You can check and change your Apple Music subscription.
Method 3. Check Your Apple ID
Check whether the Apple ID you are logged in with is the account used to subscribe to Apple Music. Sometimes you may be logged out of your account accidentally, even if you haven't changed your account settings. All you need to do is log in to Apple Music again.
Here is how to do it on the iPhone:
- Open “Settings” and choose “iTunes”. Check if the Apple ID account is the correct one.
- If there is no problem with the account, try to log out and log in with the correct iTunes account to retrieve Apple Music. To check if it's working, simply log out, enter the right Apple ID, and then log back in.
Method 4. Free up Storage Space
If the storage on your device is not enough, it may cause many bugs.
- On iPhone
- Uninstall the unnecessary apps: Settings -- General -- iPhone Storage -- Tab an app -- Tab on "Delete App".
- Remove unnecessary data: Settings--General-- iPhone Storage--Tab on "Offload Unused Apps" or "Review Large Attachments".
- Settings--SafariàTab "Clear History and Website Data".
- On MAC
- Delete files from your Downloads folder: Click "Go"-- Find and choose "Downloads"--Delete the files you don’t need.
- Uninstall the software you don’t use.
- Empty the Trash: The storage space doesn’t become available until you empty the Trash.
- Delete the email: MailboxàErase Junk Mail from the menu.
Method 5. Update Your Devices
Updating your iPhone and Mac to the latest version can solve many problems and app bugs. Here is how to do it:
- Update your iPhone
- Launch the “Settings” app on your phone.
- Tab on “General” and “Software Update”.
- Follow the steps provided when updating.
- Update your MAC
- Open “System Settings” and click “General”.
- Click on “Software Update”.
- Check if the system needs updating and follow the steps to update.
Part 3. Keep Apple Music Library Forever
As mentioned in the first part of the article, if you accidentally delete the file, your Apple Music library may be lost. In this case, we will share a method to prevent this situation from happening again.
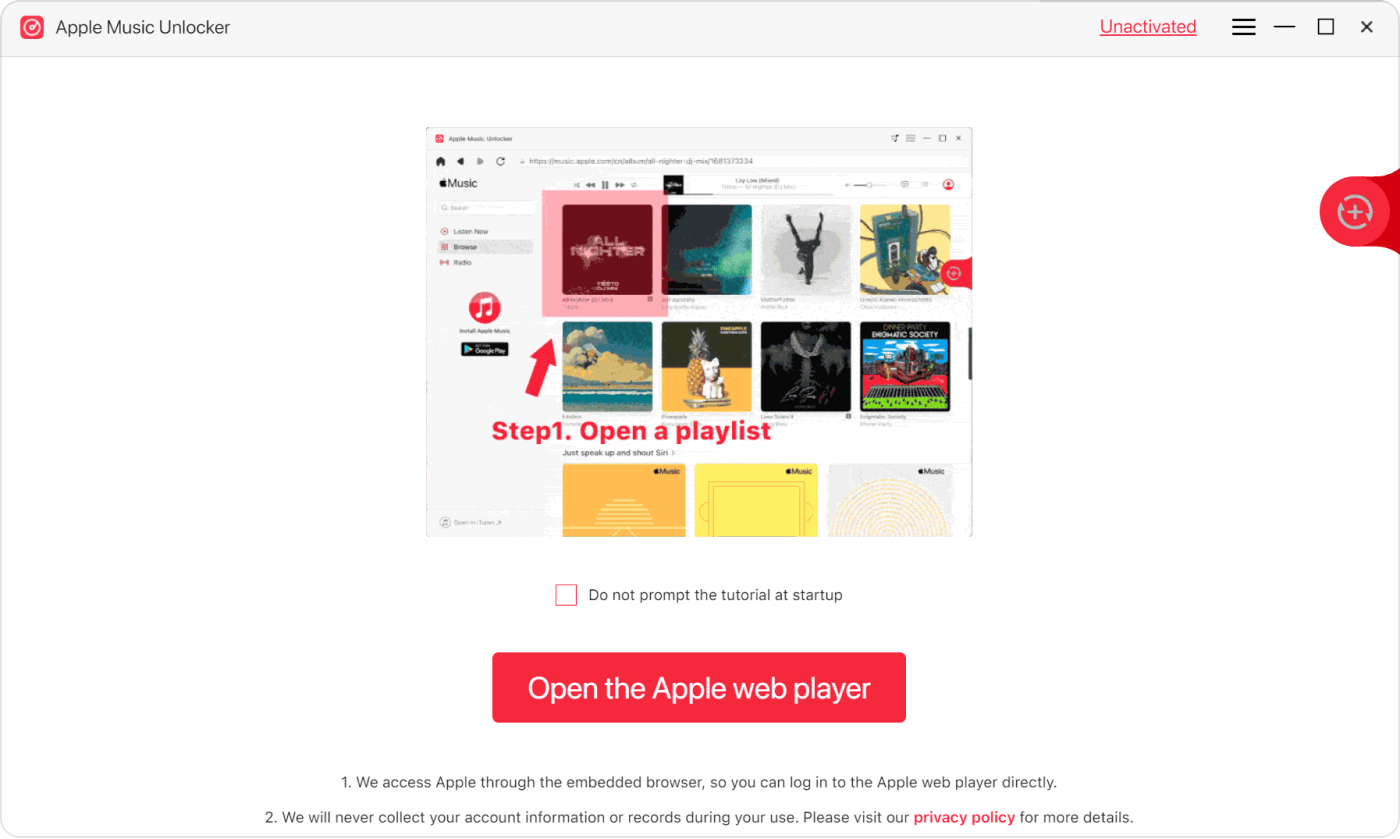
Apple Music Unlocker is a tool that allows you to get tracks from Apple Music and convert them to supported formats, including MP3. Thus, you have a copy of the tracks you love. Here is how to use:
- Get Ready to Unlock:
- Make sure iTunes is installed and you're logged in on your PC.
- Launch Apple Music Unlocker and click "Open the Apple web player."
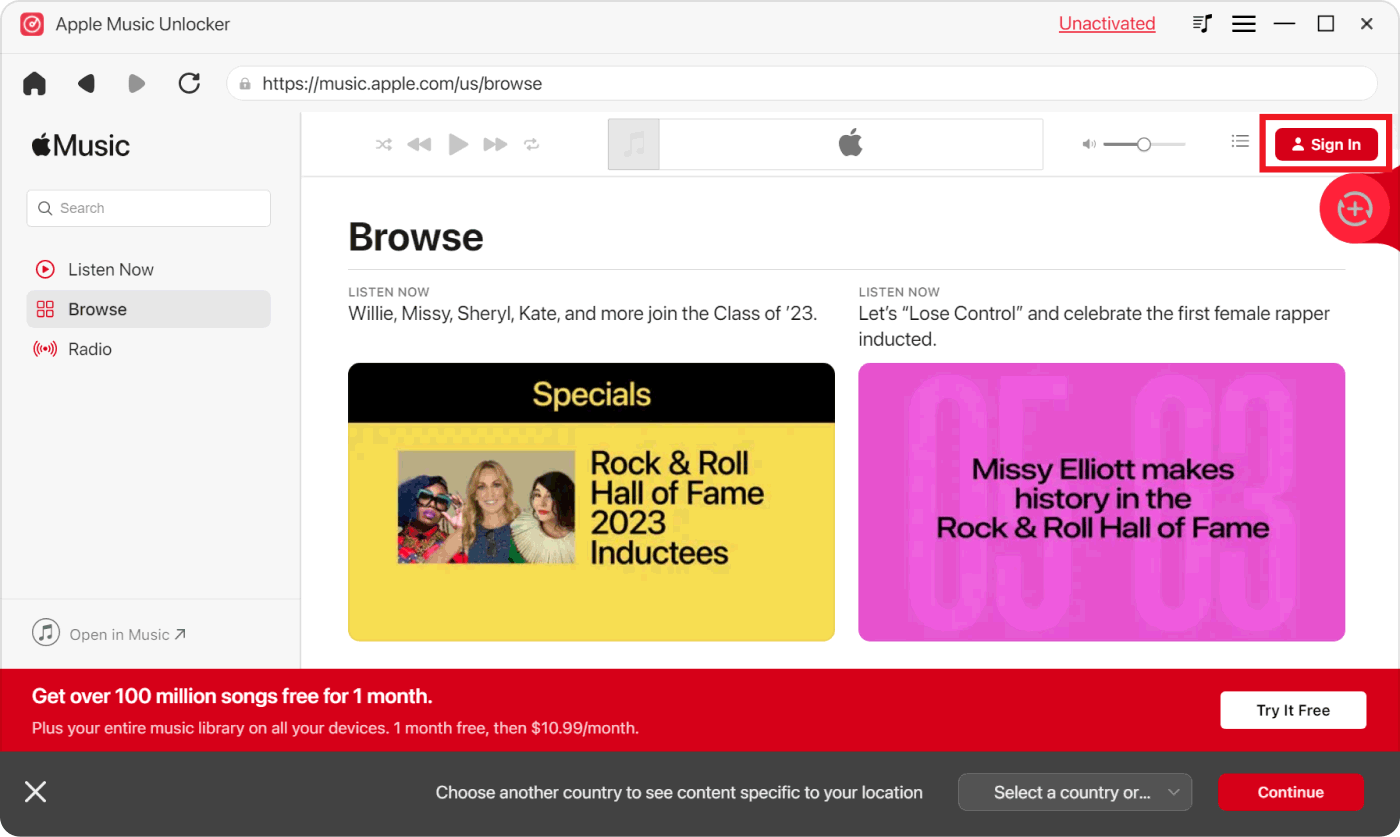
2. Get Ready to Unlock:
- Click "Sign in" in the upper right corner and enter your Apple ID info.
- Don't worry, your privacy is protected—no personal info is stored.
3. Pick Your Favorite Tunes:
- Drag individual songs or playlists to the red add icon.
- Or, open a playlist and click the red add icon to select all songs at once.
- Relax, Apple Music Unlocker will catch any duplicates for you.

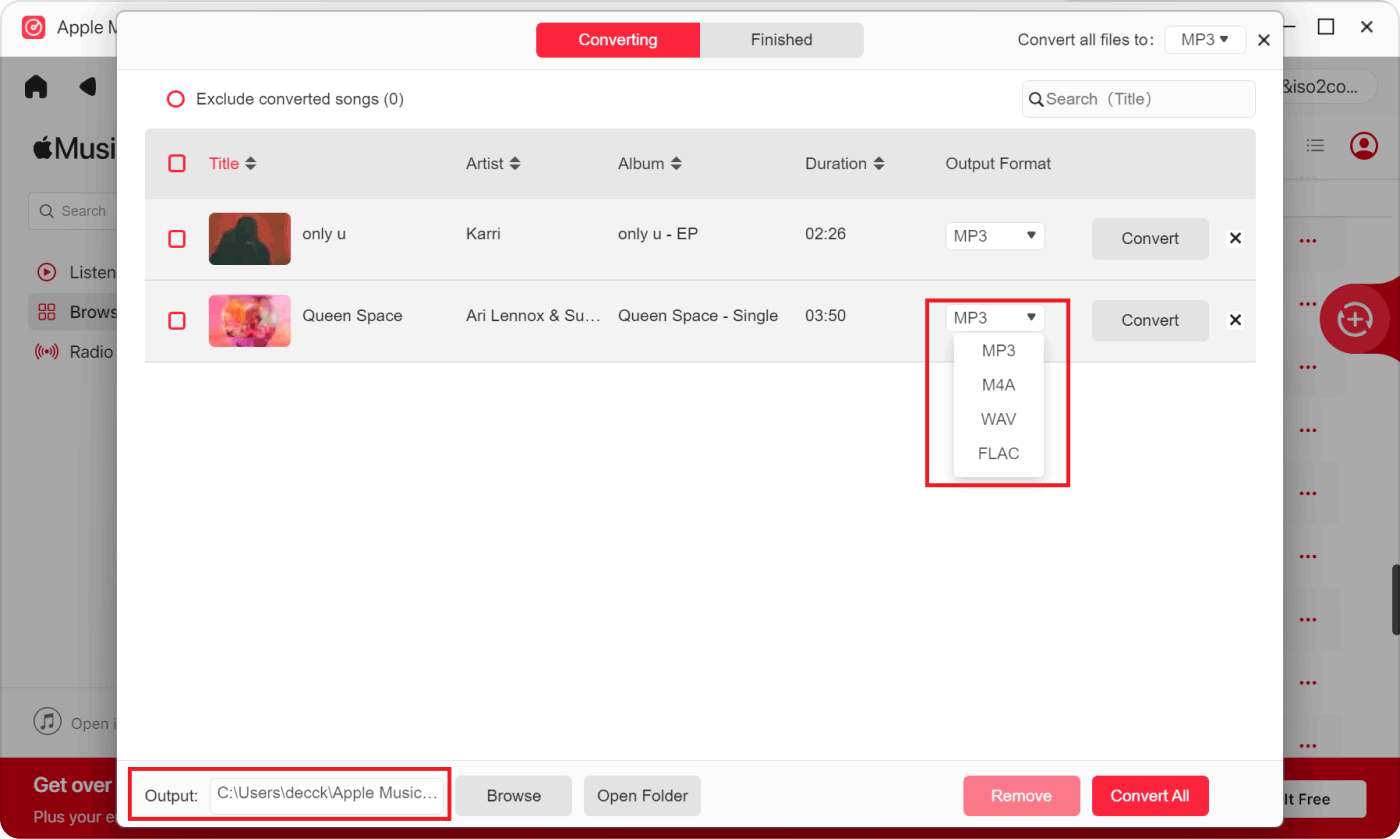
4. Customize Your Music:
- Select your preferred output format (MP3, M4A, WAV, or FLAC).
- Choose a destination folder to save your converted files, if you like.
5. Let the Music Flow:
- Click "Convert" for individual songs or "Convert All" to unlock everything in one go.
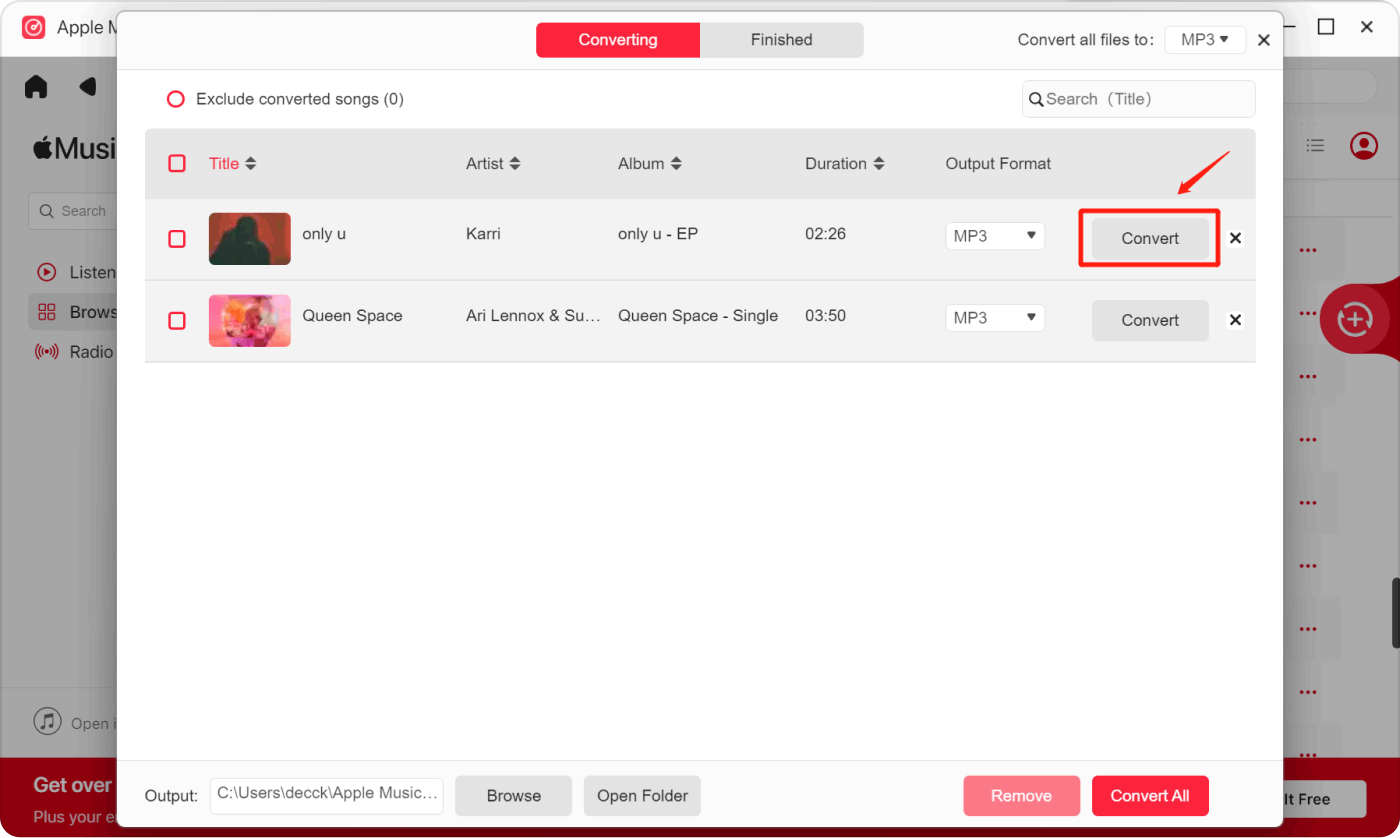
After finishing the upper 5 steps, the DRM of the Apple Music songs have been removed, your Apple Music library will be stored on your PC forever.
Part 4. Summary
The article offers complete guidance for Apple Music users who are concerned about the possibility of losing their music library.
It addresses a variety of difficulties that contribute to library loss, including as sync issues, subscription expiration, Apple ID changes, storage constraints, older device versions, and inadvertent file deletion.
Part 2 details the restoration techniques, which include processes for manually syncing the library, checking and renewing subscriptions, verifying Apple ID, freeing up storage space, and updating devices.
The article finishes with suggestions on how to avoid future losses by using the Apple Music Unlocker application, which converts and permanently stores users' favorite tunes in compatible formats.
The step-by-step instructions include secure sign-in, music selection and customization, and file conversion to preserve the Apple Music library's lifetime on your devices.
People Also Read A Comprehensive Guide to Apple Music Student Plan 2024 How to Convert iTunes to MP3? A Step-by-Step Guide in 2024
Written By Rosie
Last updated: 2024-02-18