


It is really essential to have backups of most of your files, it is like basic record keeping. To many music lovers, it would be a very useful thing to gather enough ideas on methods of how to backup music on iTunes. Even if you have the chance or the privilege to listen to songs you love with the help of ripped CDs or online streaming platforms, there is nothing more guaranteed than having your Apple music files converted to MP3 format and safely backed up.
It is good news that there are a variety of methods how to backup music on your iTunes, we can refer to these methods depending on the resources that we have. Over the years, most of us might have gathered a vast collection of songs stored on our devices like our iPhones or Macbooks, but nothing beats the real thing of having copies of them, ready to be accessed just when we like it.
In this post, we are going to share with you ideas about the different methods and tools that we can use to proceed on how to backup music on your iTunes.
Contents Guide Part #1: How Can You Backup Music on Your iTunes?Part #2: What Is the Best Tool to Use to Access, Stream, And Download Apple Music Tracks?Summary
Part #1: How Can You Backup Music on Your iTunes?
It is the proper time to talk about how to backup music on iTunes using procedures, and by following each of them as well. In this part of the article, we are going to show you the step-by-step procedures on how you execute such a task.
The initial thing that you have to do is to download music files from your iCloud Music Library going to your Mac’s drive, in order to do it you need to:
Step #1: Start launching the Music app on your Mac computer.
Step #2: Search for the Artist, Songs, or Albums that you prefer to download.
Step #3: Then you need to tap the three dots button in order to see the pop-up menu. You can also alternatively use the secondary click that you have set up for your trackpad or mouse.
Step #4: Then you have to choose the Download button in order to start the downloading of music files.
Then, if you want to automatically start downloading all the music files that you want to add to your Apple Music library starting from now, you need to:
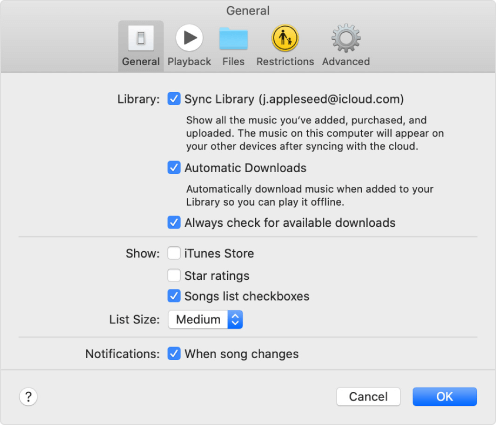
Step #1: Open the Music app on your Mac, if you are using a macOS Mojave or an earlier version, you will see iTunes.
Step #2: Tap the Music option which you will see at the Menu bar.
Step #3: Choose Preferences on the options that you will see.
Step #4: Then, go to the General tab.
Step #5: Choose the box intended for Automatic Downloads in order to turn it on.
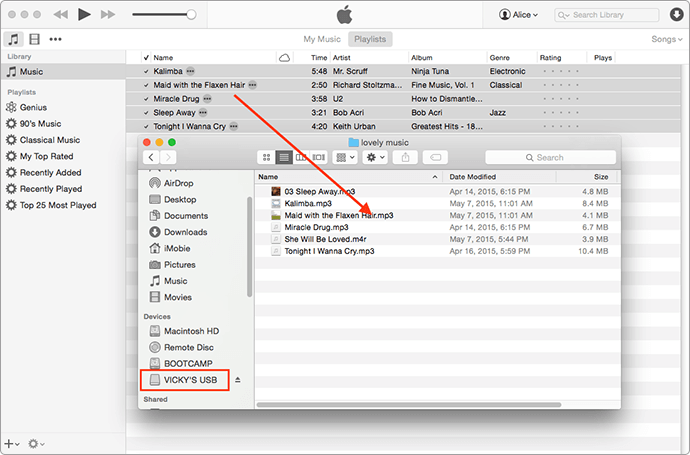
Once you have downloaded all the music files you want, you can now transfer the music files to your designated external hard drive. To do this:
- Use a USB cable to connect your backup source to your computer.
- Then tap Finder in order to launch the Finder window.
- Then choose your Mac’s Hard Drive.
- Then tap Music which you will see in the sidebar. In case the Music isn’t seen on the sidebar, drag and drop the Music Folder going to the sidebar.
- Then choose the Music folder and then start dragging the folder to the external hard drive icon on your desktop or copy it to the backup service online.
Part #2: What Is the Best Tool to Use to Access, Stream, And Download Apple Music Tracks?
It will always be necessary to figure out the right procedures on how to backup music on iTunes. You get a copy of songs you like and store them until the day that you want to get rid of them. It would be useful in case you want to use the songs in the future or keep them for sentimental value purposes.
Even if you have ways to back up music on iTunes, it would help to know the right procedures on how to download songs from Apple Music. It is common knowledge to most people that it is hard to deal with music tracks from iTunes or Apple Music, sometimes Apple Music not downloading the wanted songs and this is because of the Digital Rights Management encryption that protects these music files from illegal use, selling, and distribution.
However, if you are to use the music files for your personal purposes, we have a way to share them with you, and this method could be the most awaited solution that you will ever have. This is through the use of the professional tool called the Apple Music Unlocker.
This tool can help you unlock and convert Apple Music tracks with ease! With its use, you can have popular formats like M4P, M4A, and MP3, so accessibility would not be an issue.
The Apple Music Unlocker can be used by getting it through the use of the links below:
For Mac computers: https://www.ios-unlocker.com/download/apple-music-unlocker.dmg
For Windows computers: https://www.ios-unlocker.com/download/apple-music-unlocker.exe
By clicking the links, you will see a download package that can help you with the installation of the professional tool. Once done, you can launch the Apple Music Unlocker to see how the tool works.
Once you are done with the installation process, the next thing that you have to do is to focus on the registration process.
When it comes to the registration of the tool, the steps are really simple. But before you start, you will receive an email that contains the license key which you will need to process the registration of the tool.
To register the tool, you need to:
Step #1: The initial thing that you must do is to run the Apple Music Unlocker tool, and then hit the “Unactivated” option.
Step #2: You will see a designated place where you have to type in your email address and license key. You have to remember that you need to use the license key which you used to get the license key.
Step #3: Tap “Activate” and once done, you have successfully processed the registration. In case you have not bought the license key yet, and you want to get rid of the restrictions, you can hit the “Buy Now” option to buy a license.
Even if it seems so easy to follow the steps, there are chances that you may fail, and if this happens, you might want to consider some reasons why things went this way. These reasons could be:
- There is a chance that an incorrect email address was used.
- The user has typed in additional spaces before or after the email address or the registration code.
- Or It is also possible that the wrong version of the license has been purchased. It is not possible to use a license key on a Mac computer if it was intended for Windows, and vice versa.
If the wrong version of the license has been brought, or if the registration failed but you can’t find any particular reason, you can always contact customer support.
Now, you knew how to backup music on iTunes, let us make things easy to unlock and convert with the use of steps on how to utilize the Apple Music Unlocker, below.
Step #1: Open the Apple Music Unlocker
On your PC, you have to make sure that you have installed the iTunes app. Then log into the app using your credentials, then once logged in, open the Apple Music Unlocker. As you open the tool, you will see the “Open the Apple web player” option, click it.
Step #2: Log into Your Apple ID Account
Secondly, as you open the window to sign in to your Apple ID, you will see the “Sign In” option from the top right corner of the screen. All your personal details are safe with Apple Music Unlocker, so there is nothing to worry about.
Step #3: Start Adding the Playlists Or Songs That You Want to Convert
Thirdly, it is now time for you to start choosing albums, playlists, or specific songs that you desire to convert, you can drag them to the red add icon. There is also an alternative thing that you can do which is to launch a playlist and then tap the red add icon so you can start adding all the songs you love from a playlist to your list.
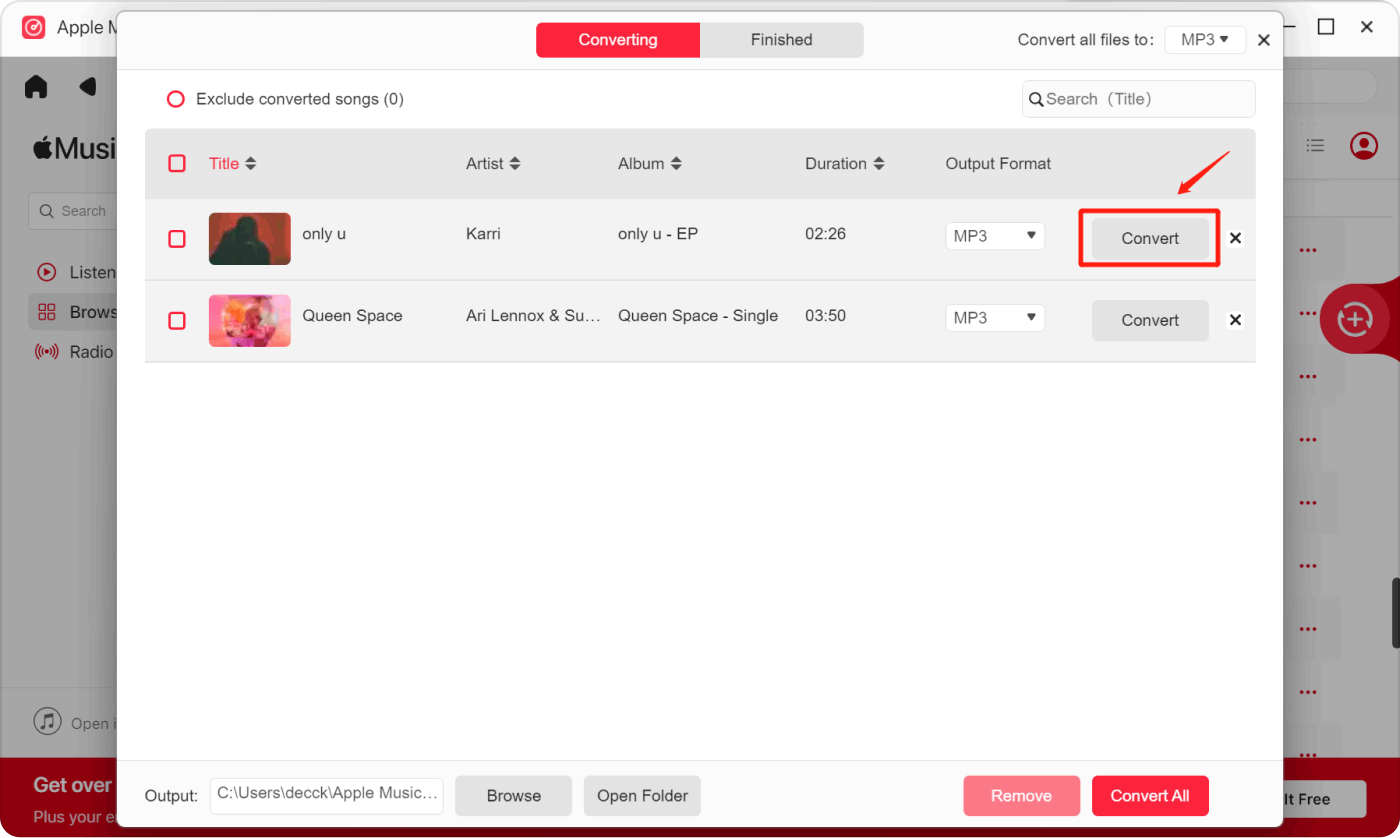
Step #4: Set Your Output Settings
Then, you can choose the output that you want from what the tool offers. We have MP3, WAV, FLAC, and M4A. You can also set the folder where to save the files once the process of conversion is finally completed.
Step #5: Hit the Convert Tab
To finally start the conversion process, you need to click the “Convert” button. There is also an option for you to choose the “Convert All” button to start the conversion of multiple songs.
People Also Read Apple Music Family Plan: Share the Rhythm with Your Loved Ones! A Comprehensive Guide to Apple Music Student Plan 2024
Summary
When you love music and you use online music platforms like Apple Music to have these songs, it would always be nice to have a copy of them with you. It is as if, you are keeping a core memory that resembles how you feel, or how you want to express yourself. That’s why you need to learn how to backup music on iTunes.
To other people, music is a way to earn a living, and it could also be a huge help to store music files that can help you get through with what you need as long as it is not illegal. The presence of Apple Music Unlocker is a game changer that can stand as a more convenient way to access and convert music files without encountering any annoying delay or hassle.
Written By Rosie
Last updated: 2023-07-17