


Canceling a subscription can sometimes be a confusing process, especially when it comes to music streaming services. If you're an iPhone user and have been using Amazon Music but now wish to cancel your subscription, you're in the right place. In this article, we will walk you through the step-by-step process of on how to cancel Amazon Music on iPhone.
Amazon Music offers a wide range of music content, including an extensive library of songs, playlists, and personalized recommendations. However, if you no longer find value in the service or simply want to explore other options, canceling your Amazon Music subscription is a straightforward process.
By following the instructions outlined in this guide, you'll be able to cancel your subscription hassle-free and stop any recurring charges on your iPhone. So, let's get started and learn how to cancel Amazon Music on your iPhone.
Contents Guide Part #1: How to Cancel Amazon Music on iPhone through SettingsPart #2: How to Cancel Amazon Music on iPhone Using Amazon AppPart #3: How to Cancel Amazon Music on iPhone Using WebsitePart #4: Listen to Amazon Music after Ending Your SubscriptionConclusion
Part #1: How to Cancel Amazon Music on iPhone through Settings
Canceling your Amazon Music subscription through Apple Settings on your iPhone is a simple process that can be done in just a few steps. Here's a step-by-step guide to help you on how to cancel Amazon Music on iPhone hassle-free:
Step #1: Open the Settings App on Your iPhone.
Launch the Settings app from your home screen. It is represented by a gear icon and is typically located on the first page of your app.
Step #2: Tap On Your Apple ID at the Top of the Screen.
Scroll down the Settings menu and tap on your Apple ID, which will display your name and profile picture. This will take you to your Apple ID settings.
Step #3: Select "Subscriptions" from the List.
On your Apple ID settings page, locate and tap on the "Subscriptions " option. This will show you a list of all the subscriptions associated with your Apple ID.

Step #4: Find And Select Your Amazon Music Subscription.
Scroll through the list of subscriptions until you find "Amazon Music". Tap on it to access the subscription details.
Step #5: Tap On "Cancel Subscription".
On the Amazon Music subscription page, you will see various details about your subscription. Look for the "Cancel Subscription " option and tap on it.
Step #6: Confirm the Cancellation.
A confirmation prompt will appear, asking you to confirm the cancellation. Read through the information provided, and if you still wish to proceed, tap on "Confirm" or "Cancel Subscription" again to finalize the cancellation.
Step #7: Verify the Cancellation.
After confirming the cancellation, you will receive a pop-up message verifying that your Amazon Music subscription has been successfully canceled. This means that you will no longer be charged for the subscription, and your access to Amazon Music's premium features will be discontinued at the end of the current billing cycle. Downloading Amazon Prime songs to your computer is no longer available.
It's important to note that canceling your Amazon Music subscription through Apple Settings only applies to subscriptions billed through your Apple ID. If you signed up for Amazon Music directly through the Amazon website or app, you may need to cancel your subscription separately through your Amazon account settings.
By following these simple steps, you can easily cancel your Amazon Music subscription on your iPhone through Apple Settings. Remember to check your billing statements to ensure that the subscription has been successfully canceled to avoid any unexpected charges in the future.
Part #2: How to Cancel Amazon Music on iPhone Using Amazon App
Here are the steps you should follow if you want to implement how to cancel Amazon Music on iPhone using the dedicated application of Amazon:
Step #1: Open the Amazon App on Your iPhone.
Locate the Amazon app on your iPhone's home screen, which is represented by a shopping cart icon. Tap on it to launch the app.
Step #2: Sign In to Your Amazon Account.
If you're not already signed in, enter your Amazon account credentials (email address and password) to access your account.
Step #3: Tap On the Menu Icon.
Look for the three horizontal lines (menu icon) in the top-left or top-right corner of the app's interface. Tap on it to open the side menu.
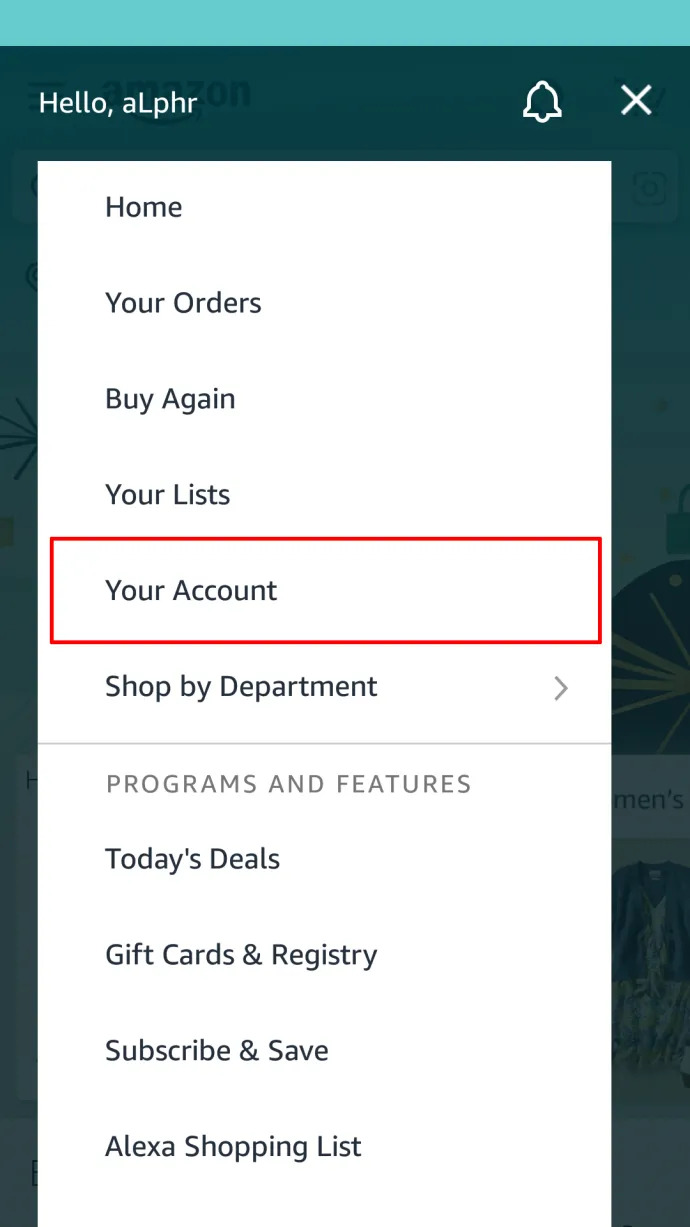
Step #4: Select "Your Account".
Scroll through the side menu and find the "Your Account " option. Tap on it to navigate to your Amazon account settings.
Step #5: Tap On "Memberships & Subscriptions".
On the "Your Account" page, locate and tap on "Memberships & Subscriptions " to view a list of your current subscriptions.
Step #6: Choose "Amazon Music" from the List.
Scroll through the list of memberships and subscriptions until you find "Amazon Music". Tap on it to access the subscription details.
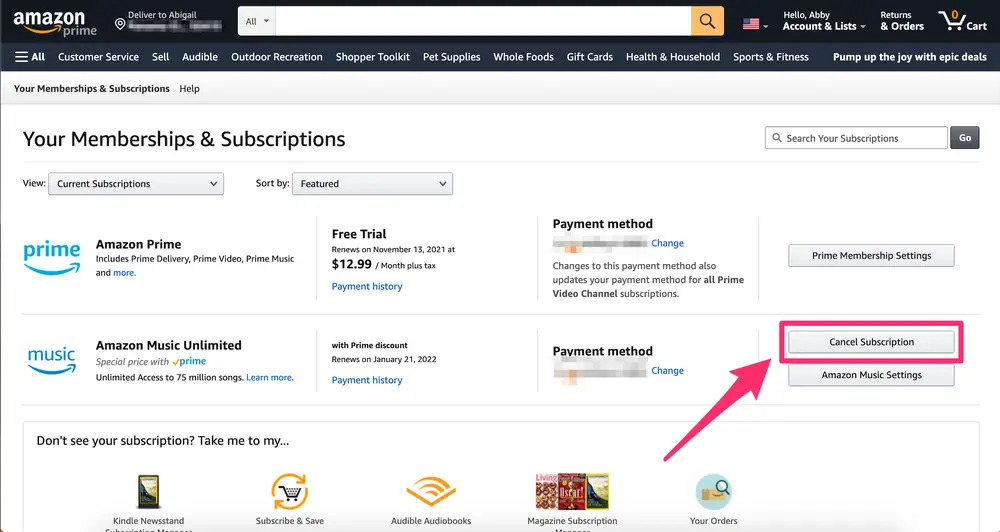
Step #7: Tap On "Cancel Subscription".
On the Amazon Music subscription page, look for the "Cancel Subscription " option and tap on it.
Step #8: Confirm the Cancellation.
You will be presented with a confirmation prompt. Review the details provided, and if you still wish to cancel your subscription, tap on "Confirm" or "Cancel Subscription" to finalize the cancellation.
Step #9: Verify the Cancellation.
Once the cancellation is confirmed, you will receive a confirmation message stating that your Amazon Music subscription has been successfully canceled. This means you won't be charged for the subscription moving forward, and your access to premium features will end at the conclusion of the current billing cycle.
Part #3: How to Cancel Amazon Music on iPhone Using Website
Here are the steps you should follow if you want to implement how to cancel Amazon Music on iPhone using the browser website:
Step #1: Log In to the Amazon Website.
Go to www.amazon.com with your favorite web browser. Sign in with your email address and password to your Amazon account.
Step #2: Navigate to Your Account Settings.
Hover your mouse over the "Account & Lists " option in the top right corner of the Amazon page. Click "Your Account " from the dropdown menu that appears to access your account settings page.
Step #3: Scroll Down to "Memberships & Subscriptions".
Scroll down to the "Digital content and devices" section on your Amazon account page. Click "Memberships & Subscriptions " to display your current subscriptions.
Step #4: Find Your Amazon Music Membership.
Find the "Amazon Music" subscription in the "Memberships & Subscriptions" area and click the "Manage Subscription " or "Manage Your Membership " option next to it.
Step #5: View the Subscription Information.
You may discover information about your Amazon Music membership, including its perks and renewal date, on the subscription management page. Look for the "Cancel Subscription" or "End Membership" option and click on it.
Step #6: If Prompted, Provide A Reason for the Cancellation.
You may be prompted to explain why you want to terminate your Amazon Music membership. Select an applicable choice from the list or "Other" if none of the reasons apply to you.
Step #7: Accept the Cancellation.
A confirmation page will display once you specify the reason for cancellation (if applicable). Examine the information and then click "Cancel Subscription" or "Cancel Membership" to complete the cancellation.
Step #8: Double-check the Cancellation.
You will receive a confirmation message saying that your Amazon Music membership has been successfully terminated after the cancellation is validated. This implies that you will no longer be paid for the subscription, and your access to premium features will expire at the end of the subscription period.
You may quickly cancel your Amazon Music membership by following these step-by-step steps on the Amazon website. Remember to double-check the cancellation and go over your billing bills to ensure no further costs are incurred.
Part #4: Listen to Amazon Music after Ending Your Subscription
Now you have learned how to cancel Amazon Music on iPhone, so after the unsub, how can you get access to Amazon tracks? Well, iOS Unlocker's Amazon Music Unlocker is a remarkable software designed to eliminate DRM protection from Amazon Music songs and audiobooks. This enables users to enjoy their Amazon Music library on any device, even those incompatible with DRM-protected content.
Utilizing iOS Unlocker's Amazon Music Unlocker is a breeze. Simply import your Amazon Music songs and audiobooks into the software, and it will effortlessly strip away the DRM protection, and convert those Amazon Prime songs into MP3 format that can be played on any device.
By leveraging Amazon Music Unlocker, you can liberate your Amazon Music library from the confines of DRM restrictions. This empowers you to relish your music on any device without the constant concern of encountering DRM limitations.
Here is a simplified breakdown of the steps to utilize the iOS Unlocker's Amazon Music Unlocker:
- Begin by downloading, installing, and launching the application on your device.
- Within the Amazon Music Unlocker interface, locate and click on the option that says "Open the Amazon Web Player ".
- In the Amazon online player that opens, navigate to the upper-right corner and click on "Sign In " to access your Amazon Music Unlocker account. Enter your login credentials to proceed.
- Open the desired playlist and click on the blue "+" symbol to add all the music within the playlist to the conversion list. Alternatively, you can drag the playlist title itself onto the blue symbol.
- To add individual tracks, simply drag the title of a specific track onto the blue "+" symbol.
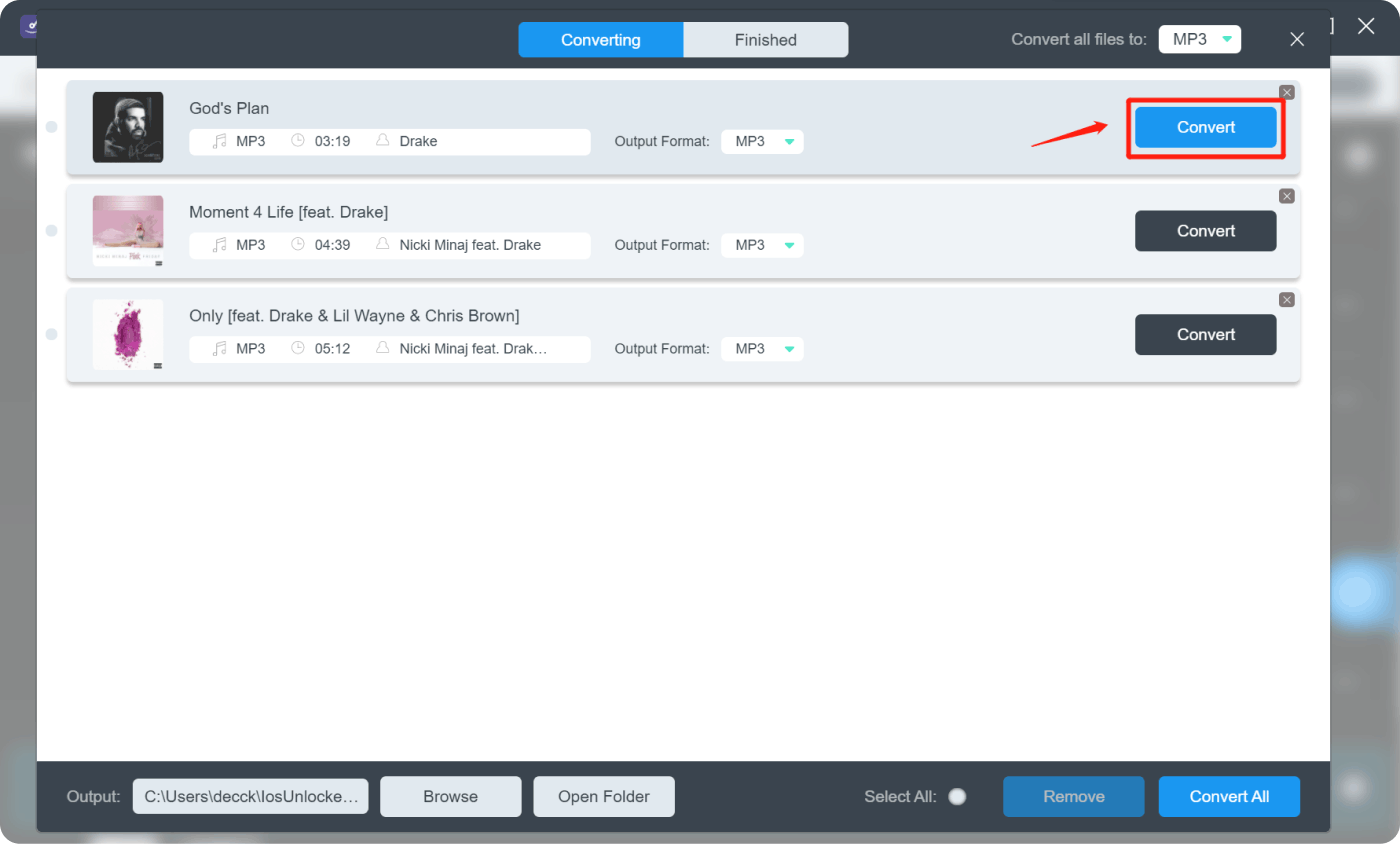
- Choose the output format for the converted files, such as MP3, M4A, WAV, or FLAC. If needed, you can also specify the output folder where the converted files will be saved.
- Select the songs you want to convert from the list and click on the "Convert " button to initiate the conversion process.
People Also Read How to Set Ringtone from Amazon Music: The Ultimate Guide Download Amazon Music to Computer: 2023 Ultimate Guide
Conclusion
“How to cancel Amazon Music on iPhone ” is an easy deal, but after you might regret it. It is kind of hard to get those songs back without a sub. Luckily, iOS Unlocker's Amazon Music Unlocker is a robust and efficient solution for removing DRM protection from your Amazon Music library.
With its user-friendly interface, quick processing speed, and broad device compatibility, it provides an excellent choice for anyone seeking to eliminate DRM restrictions from their Amazon Music collection. If you're in search of a reliable method to unlock DRM protection from your Amazon Music library, look no further than iOS Unlocker's Amazon Music Unlocker.
Written By Rosie
Last updated: 2023-05-25