


In today's digital age, music has become an integral part of our lives, and with the abundance of online streaming platforms and music stores, accessing your favorite tunes has never been easier. However, what if you want to listen to your music offline and create a personalized, portable collection? This is where a USB drive comes in handy!
Whether you're preparing for a road trip, setting up the perfect playlist for a party, or simply looking to free up some space on your device, learning how to download music to USB drive can be incredibly beneficial.
In this comprehensive guide, we'll walk you through the step-by-step process of downloading music to a USB drive, ensuring you can carry your favorite tracks with you wherever you go. Whether you're a tech-savvy individual or a complete novice, fear not! We'll cover everything you need to know to make the process smooth and hassle-free. So, let's dive in and create your personalized music library on a USB drive, ready to elevate your listening experience to new heights!
Contents Guide Part 1. Methods on How to Download Music to USB DrivePart 2. The Best Way on How to Download Music to USB [Via Third-party Tools]Part 3. Summary
Part 1. Methods on How to Download Music to USB Drive
Method 01. Download Music from Free Music Sites
Here are some examples of free music download sites where you can find a wide range of music across different genres:
- Internet Archive’s Audio Archive: The Internet Archive’s Audio Archive is a vast collection of music, including live performances, public domain recordings, and creative commons tracks. It offers a diverse selection of music from various artists and eras.
- Jamendo: Jamendo is a popular platform that provides free music for personal use under the Creative Commons license. It features music from independent artists and offers easy browsing and downloading options.
- SoundCloud: SoundCloud is a well-known music sharing platform where independent artists and musicians upload their tracks. Many artists offer their music for free download, providing an excellent resource for discovering new music.
- Free Music Archive (FMA): Despite its name being similar to the Internet Archive, the Free Music Archive is a separate platform. FMA offers a vast collection of curated music, including tracks with Creative Commons licenses that allow for free downloads and usage.
- NoiseTrade: NoiseTrade is a platform that allows artists to share their music directly with fans. In exchange for downloading free music, users have the option to leave a tip or support the artists by providing their email addresses.
- DatPiff: DatPiff focuses on hip-hop and mixtapes. It offers a vast selection of free mixtapes from both mainstream and independent artists.
- ReverbNation: ReverbNation is a platform that supports emerging artists. Many artists on this site offer free downloads of their songs to help promote their music.
Remember to respect copyright laws and usage rights when downloading music from these sites. Always check the licensing information associated with each track and ensure that you are complying with the terms provided by the artists or platforms.
Method 02. Use Audio Recording Tools to Save Music as MP3 Files
Audacity is a powerful and widely used open-source audio recording and editing software. In this method, we'll explore how you can utilize Audacity to save music from various sources, such as online streaming platforms or audio players, as MP3 files on your computer and then transfer them to a USB drive.
Step 1: Download and Install Audacity
First, download Audacity from its official website and install it on your computer. Audacity is available for Windows, macOS, and Linux, making it accessible to users on different operating systems.
Step 2: Set Up Audacity for Recording
Open Audacity and configure it for audio recording. Go to the "Edit" menu and select "Preferences." In the "Devices" section, choose the appropriate audio input source (usually "Stereo Mix" or "Loopback" if available) to capture the sound output from your computer. Click "OK" to save the settings.
Step 3: Choose the Music Source
Before you start recording, make sure to select the music source you want to capture. This could be a streaming service like Spotify, YouTube, or any other music player running on your computer.
Step 4: Start Recording
Press the "Record" button in Audacity and begin playing the music from your chosen source. Audacity will capture the audio being played through your computer's sound output.
Step 5: Stop Recording and Edit (if necessary)
Once you have recorded the music, press the "Stop" button in Audacity to end the recording. You can now edit the recording if needed, such as by trimming unwanted portions, adjusting volume levels, or applying effects.
Step 6: Export as MP3
To save the recording as an MP3 file, go to the "File" menu and choose "Export." Select "Export as MP3" and provide a filename for the track. Audacity might prompt you to locate and install the LAME MP3 encoder (a required plugin). Follow the instructions to complete the installation.
Step 7: Transfer to USB Drive
After saving the recording as an MP3 file on your computer, connect your USB drive to an available USB port. Drag and drop the MP3 file from your computer into the USB drive's folder to transfer the music. Alternatively, you can right-click on the MP3 file, select "Copy," navigate to the USB drive, and then right-click inside the USB drive's folder to "Paste" the file.
Step 8: Safely Eject the USB Drive
Once the transfer is complete, safely eject the USB drive from your computer.
Using Audacity to record and save music as MP3 files allows you to build a collection of your favorite songs from various sources and enjoy them offline on your USB drive without any restrictions. However, always be mindful of copyright laws and ensure you have the necessary rights to record and use the music.
Method 03. Use Online YouTube to MP3 Converters
Online YouTube to MP3 converters are convenient tools that allow you to extract audio from YouTube videos and save them as MP3 files. Here are three different online sites that offer this service:
YTMP3
YTMP3 is a popular and straightforward YouTube to MP3 converter. It allows you to convert YouTube videos to high-quality MP3 files quickly and easily. To use YTMP3, simply copy the URL of the YouTube video containing the audio you want to extract, paste it into the converter's input field, and click the "Convert" button. YTMP3 will process the video and provide you with a link to download the MP3 file. It's essential to note that using such converters should be done responsibly and with respect to copyright laws.
OnlineVideoConverter
OnlineVideoConverter is a versatile online platform that not only supports YouTube to MP3 conversion but also handles video conversion across various formats. With OnlineVideoConverter, you can convert YouTube videos to MP3 files in high quality with a few simple steps. Paste the YouTube video URL into the input box, choose the MP3 format, and click "Start" to initiate the conversion process. Once the conversion is complete, you'll be able to download the MP3 file to your computer.
Y2Mate
Y2Mate is another widely used YouTube to MP3 converter that offers various output formats and quality options. Besides MP3, you can also convert YouTube videos to other audio formats, like M4A. To use Y2Mate, copy the YouTube video URL, paste it into the converter's URL box, and select the desired output format and quality. Click the "Start" button to begin the conversion. Once the process is finished, you can download the MP3 file to your computer or directly save it to a connected USB drive.
Part 2. The Best Way on How to Download Music to USB [Via Third-party Tools]
iOS-Unlocker.com's tools are revolutionary and are designed to convert tracks from popular streaming services such as Spotify, Apple Music, and Audible into MP3 files. Unlike traditional online converters, this cutting-edge software offers a comprehensive solution for music enthusiasts who want to build their offline music libraries and enjoy their favorite tunes without any limitations. If you are thinking about converting Spotify tracks to MP3 files, you can simply click the button below and begin a free trial of Spotify Music Unlocker.
Here are some of the key benefits of the tools:
- Versatility and Compatibility: The Universal Music Converter is engineered to work seamlessly across multiple platforms and operating systems. Whether you're using Windows or macOS, this tool accommodates your needs, providing a consistent and user-friendly experience for all users.
- Wide Range of Supported Services: One of the tool's standout features is its ability to handle various music and audio streaming platforms. Users can convert tracks from Spotify, Apple Music, and Audible into universally compatible MP3 files, eliminating the need for multiple converters for different services.
- High-Quality Output: The Universal Music Converter ensures that the converted MP3 files maintain the highest audio quality possible. Whether you're converting songs, audiobooks, or podcasts, the tool preserves the integrity of the original content, allowing you to savor every beat and word in crystal-clear sound.
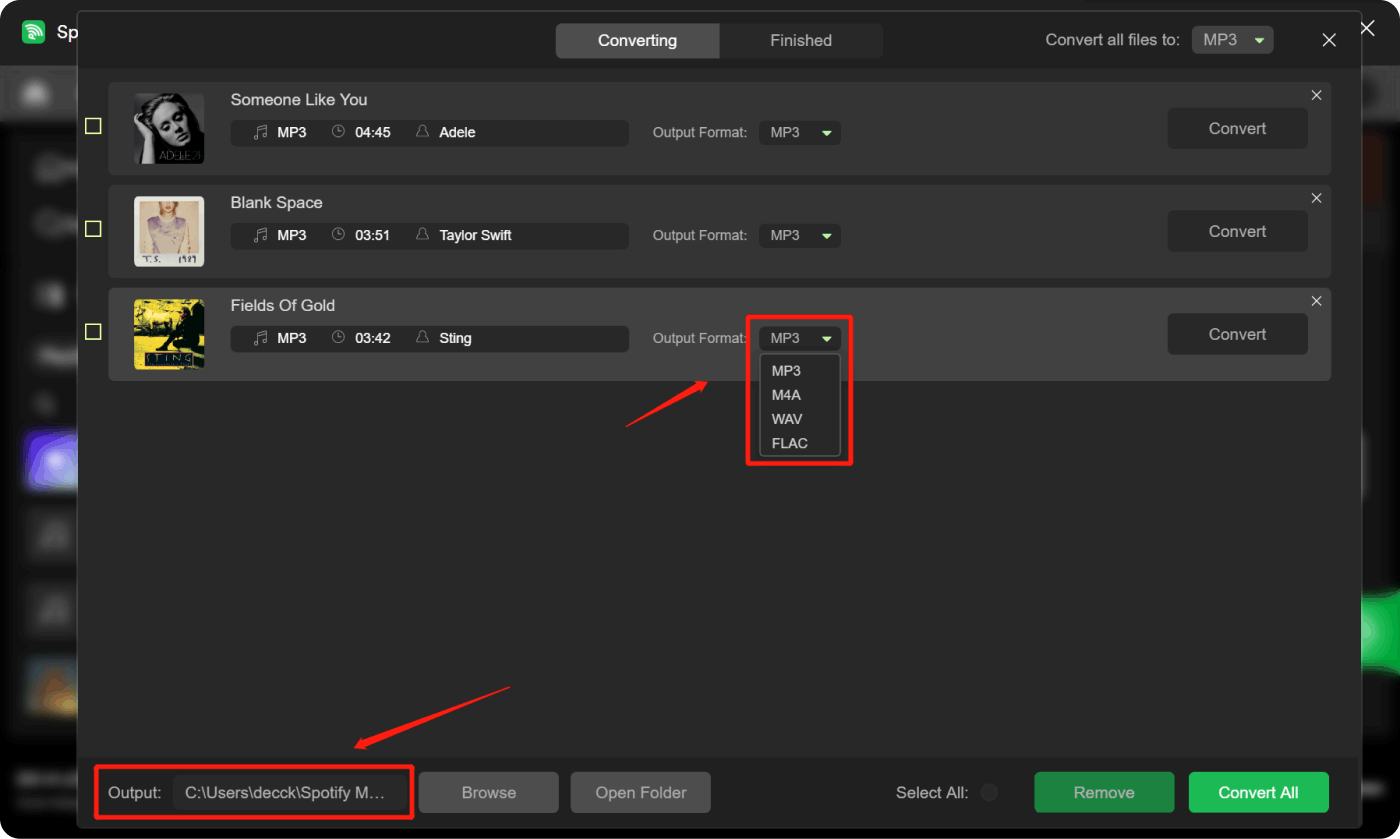
- Batch Conversion: To save time and effort, the tool enables batch conversion. Users can select multiple tracks from their preferred streaming service and convert them all at once, streamlining the process of building an extensive music library.
- Offline Playback and Portability: After converting tracks to MP3 format, users can effortlessly transfer the files to their USB drives. This feature empowers music lovers to create personalized playlists and take their favorite songs wherever they go, without the need for an internet connection.
- Regular Updates and Customer Support: These tools undergo continuous improvements and updates to keep pace with changes in streaming platforms and user needs. Furthermore, iOS-Unlocker.com provides dedicated customer support, ensuring a seamless user experience and swift resolution of any issues that may arise.
Part 3. Summary
Now, you may know how to download music to USB. Once you have the tracks with you, you can simply transfer them to your USB drive. That’s it! These tools are very easy to use even if you don’t have the technical knowledge most savvy users have. Visit the website of iOS-Unlocker.com for more details!
People Also Read Experience the Beat: How to Get Spotify Premium Free Connect And Share Music: How to Add Friends on Spotify
Written By Rosie
Last updated: 2023-08-02