


An Apple ID is a must-have for a Mac or Apple device. There is no harm in having two Apple IDs, especially for business executives who may not want to mix business with personal information. Therefore, you must know how to update New Apple ID on iPhone, for this is your passbook to access all iDevices content, including music and applications.
The advantage of two or more Apple ID you can easily separate content for easy access when using the device. Whatever your reason, it's a minute to change from one Apple ID to the other. How possible is it to add or update a new Apple ID on the iPhone? Take note that this is not a guide to changing the Apple ID but simply updating a new Apple ID, the most useful tool to erase the old Apple ID has also been given in this post, read on to learn more.
Part #1: What Content Changes When Switching Apple ID?Part #2: How to Update New Apple ID on iPhonePart #3: How to Update New Apple ID on iPhone Using iOS UnlockerPart #4: Conclusion
Part #1: What Content Changes When Switching Apple ID?
Standard content on the iPhone does not change even if you change the Apple IDs. These are like the program files on a computer. The essential functions of an iPhone never change with the change in Apple ID. Unless the specific content is saved on the Apple ID, the function is still available.
This includes contacts, calendar functions, and messages, among others. The moment you aren't able to access some content, then it means it's saved on the other Apple ID. These are the challenges of using different Apple IDs, you might think you have lost the data, no, it's on the inactive account since you can only use one Apple ID at a time. Read on and get information on how to update New Apple ID on iPhone.
Part #2: How to Update New Apple ID on iPhone
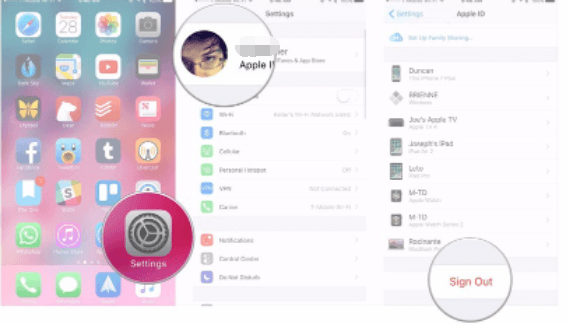
Action #1: Log Out The Current Apple ID on The iPhone
- GO to the Settings app on your iPhone, depending on the iOS version installed
- Click the Apple ID icon on top of the screen
- Scroll down and click the Sign out button
- Also, click the Sign Out iCloud icon tool in case you also have different iCloud profiles
- Key in the password in line with the Apple ID
- Switch off for Find My iPhone
- Permit data that you need to turn on and merge with the Apple ID information
- Click Sign Out and confirm
Action #2: Sign In With A Different Apple ID
This is the time to include another Apple ID on the system using the following steps.
- Go to the Settings option on your iPhone.
- Click Sign in
- Click Email and input the Email for the other Apple ID.
- Enter the password associated with the Email and the Apple ID
- Click Merge if you want the same data on both Apple ID accounts. In case you think otherwise, then click Don't Merge.
Action #3: Merge The Shared Content
Now that you've learned how to update new Apple ID on iPhone. For your shared content that you need to access on both accounts, like Email, contacts and some apps, you can command the iDevice to merge them to avoid switching from one Apple ID to another to access specific content that's a waste of time. Here is the procedure
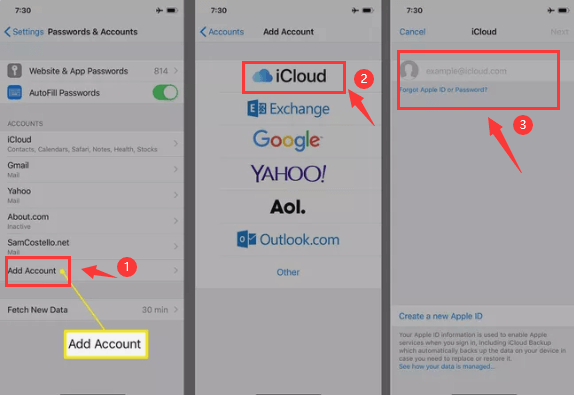
- Go to the Settings option
- Scroll down and choose the content you want to access for both accounts
- Click Accounts
- Click Add Account and choose iCloud
- Key in the Apple ID email and tap Next
- Enter the password and choose Next
- Turn on the features you want to have live with all the Apple ID accounts
To enhance your security, it's wise to include a two-point verification such that you get an alert when an unauthorized person tries to access the iPhone from a remote location.
In these three actions, you now know how to update New Apple ID on your iPhone with minimum hassle.
Part #3: How to Update New Apple ID on iPhone Using iOS Unlocker
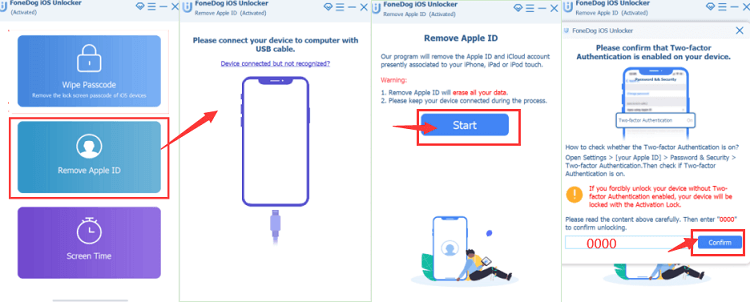
The iOS Unlocker is your go-to toolkit when you want to remove and even add an Apple ID on your iPhone. This simple application runs on a simple interface with three modes: Wipe Passcode, Remove Apple ID, and Screen Time Management.
This is your go-to application for iPhone users to be able to reset the iPhone passcode when forgot it without the fear of losing data. In case you have an iPhone and have no access to the old Apple ID, you can still update the new one on the system. Here is the procedure on how to update New Apple ID on iPhone.
- Download, install and run iOS Unlocker
- Choose Remove Apple ID - the second option
- Connect the iPhone to the PC using a USB cable
- Accept the Trust buttons and agreements
- Press Start to begin the process
- Confirm all authentications and input "0000 " to activate the device
- Confirm the device information and click start to download the firmware package
- Within minutes the iCloud account and Apple ID are deleted, ready for you to set up another one of choice.
What a simple toolkit to help you have another Apple ID live on your system. There is no harm in setting up multiple Apple IDs.
People Also ReadThe Ultimate Guide to Find Apple ID Password [2024 Updated]My Apple ID Greyed Out! Here’s What to Do
Part #4: Conclusion
The choice of the toolkit on how to update new Apple ID on iPhone is all dependent on what is easy for you at that time. Since you have access to the iPhone settings, you need no third-party integrations. However, when you aren't able to access the iPhone due to a locked screen or disabled Apple ID, that's when third-party solutions come in handy. Although we have only discussed iOS Unlocker in this article, there are several other applications out there you can explore to get the best out of what the digital market has to offer.
Written By Rosie
Last updated: 2022-06-16