


As time goes by, Spotify has found multiple ways to share its wonders with its affordable subscription plans and has created plenty of opportunities for a million artists. Although it is still doing great, identifying ways to improve Spotify audio quality would still change the usual way people listen to Spotify music.
And this improvement can be easily achieved even through the use of the Spotify app alone. There are ways for you to start customizing your settings so that you can make your musical entertainment experience closer to your heart.
If you are the type of individual who does not usually check the settings of the applications that they use, this article might help you a lot. We are going to focus on ways to improve Spotify audio quality so that every time you use the app, the sound quality of songs will be better than before.
So, if you are interested in getting to know procedures that will improve Spotify audio quality, you have to make sure that you have read every section of this article.
Contents Guide Part 1. Things To Do To Improve Spotify Audio QualityPart. 2 Bonus: An Easier Way To Download Spotify Music TracksPart 3. To Summarize It All
Part 1. Things To Do To Improve Spotify Audio Quality
It is easy to improve Spotify audio quality; we have enumerated some of the things that you can try to execute together with the steps that you have to follow in order to maximize your Spotify listening experience like no other.
Use Hardware Acceleration
If you want to make use of the existing hardware on your computer in order to maximize and optimize the performance of your app, you can make use of Spotify’s hardware acceleration. You can use it on your Mac and Windows computers. In order to enable it, you need to follow the steps that we have listed below.
If you are using a Windows computer:
- Open the Settings option.
- Hover over to the option that says “Show Advanced Settings”.
- Proceed to the “Compatibility” section.
- Once you have reached the “Compatibility” section, you have to toggle the “Enable hardware acceleration” option to On.
If you are using a Mac computer:
- Choose the Spotify app located in the upper left corner of your screen.
- Choose the “Hardware Acceleration” option.
It is a must to know that hardware acceleration can have a huge impact to improve Spotify audio quality; however, there are a few playback issues, like the emergence of songs that can’t be played on Spotify.
Automix
We also have Automix on this list. It is an artificial intelligence feature of Spotify that can be used to smooth transitions. If you utilize other methods like skipping, looping, crossfading, and even adding transition effects, you can’t even notice the tracks that you listen to changing. To find this feature, go to the "Gapless" section, and below it, you will see the Automix switch. Put it to "On", in order to get things started.
Try To Normalize Your Volume Level
Have you ever experienced listening to a song that is a lot louder than the previous music that you have played? With Normalize, the Spotify app can adjust the volume levels for you in order to prevent uneven sounds.
To start, you have to:
- Tap Home, hit your Profile, and then go to Settings.
- Tap the Volume Level, which you will see below the Audio Quality option.
- Choose the volume level, which automatically adjusts all of your Spotify tracks to the environment that you are in. You can use options such as Loud, Normal, and Quiet.
Try To Utilize Some Equalizers
If you want to improve Spotify audio quality, you can also try to use equalizers. It lets you adjust the volume of the spectrum range of audio, which varies from Low, Mid, and High. If you adjust the frequencies, it should help you enhance the quality of the sound of your favorite music.
How To Know If You Have The Best Equalizer Settings On Spotify?
It is important that you know that there is no one-size-fits-all when it comes to the best equalizer settings on Spotify. This will always depend on the genres of music, devices used, and even the individual songs that you listen to.
It usually depends on the specifications of the hardware that you use, so you better make sure that all your personal preferences were considered during the time that you got them.
There are other factors that might affect the quality of sound, such as hearing capabilities and even age. You might prefer something that your older family acquaintances don’t.
Well, it is a good thing that we can do something to change the Spotify Equalizer for your Android or iOS device, and to do it, you have to:
For iOS users:
- Proceed to Home and then Settings.
- Go to the Playback option, and then proceed to Equalizer. You have to switch it on.
- Choose one of the presets available to you, or you can try to customize one by dragging the dots yourself.
For Android users:
Before proceeding with the steps, it is important to know that not all Android devices can handle the use of the Spotify equalizer. It will always depend on the manufacturer of your device. In order to know if your device can handle it, you can check by:
- Tap Home, and then hit Settings.
- Go to Audio Quality.
- If you see the word “Equalize”, you have to tap it, and your device will lead you to the control panel of your equalizer.
There are instances where Android users can get warning messages saying that equalizers will alter the volume unexpectedly and that they can be disabled if problems are encountered. You should also use devices that are compatible, like speakers or headphones. You will also see options to use UHQ upscaler, Adapt Sound, and Dolby Atmos.
In order to properly use the equalizers on your other devices, there are things that you have to do. There can be many third-party equalizer options to choose from, but you should opt to try the equalizer tool of Spotify. In order to start executing the task, you have to follow the instructions below.
- Proceed to Settings on your Spotify app, and then start scrolling down until you see Playback.
- Then start customizing everything based on how you would like to have it and as necessary.
If you have a Macomputer, it is easier to use the Spotify equalizer, although availability may still vary for some Windows users.
Crossfade
You can also try to crossfade in order to improve Spotify audio quality. This is a feature that can be considered neat because it is able to take away all the awkward silences in between songs that you listen to. There is a way to customize your settings in crossfading, and it differs depending on the device that you use.
For iOS:
- Go to Home, and then tap Settings.
- Choose the Playback option.
- Under the Crossfade option, start dragging the slider to the level that you prefer.
For your Android device:
- Go to Home, and then hit Settings.
- Go to the Crossfade section, and then hit the slider to your desired level or preference.
For desktop users, you can also start to update the Crossfade feature by choosing “Settings”, scrolling down until you see the “Playback” option, and toggling the “Crossfade Songs” button to the “On” position. And then you can start clicking the “Crossfade Songs” option and adjust the slider to your desired crossfade length.
And these are only some of the things that you can try to execute if you want to improve Spotify audio quality. There are other things that you can try to do as you search the web! Now, let us talk about something that can help us access music files from Spotify without any type of restriction, anytime that we would like to.
Part. 2 Bonus: An Easier Way To Download Spotify Music Tracks
The previous parts of the article have given us generous information about how we a can improve Spotify audio quality. Thankfully, all of the methods or things that were suggested are easy to do, so we can surely enjoy the best quality music files we always deserve.
But the said things are not the only ones that can help you have a great listening experience; tools like the Spotify Music Unlocker can help you unlock Spotify music tracks and convert them to flexible formats! The transformation can help you remove the DRM encryption and can also help you convert your music files to be able to beat format and device incompatibilities!
If you want to try the tool, you have to download it on your computer and install it as well. Once you are done with the successful installation, you can now start converting your music files through its use!
The Spotify Music Unlocker has simple instructions to follow, and if you are just new to the tool, there would be no problem at all. We have listed the steps that you have to follow in order to start converting using the Spotify Music Unlocker.
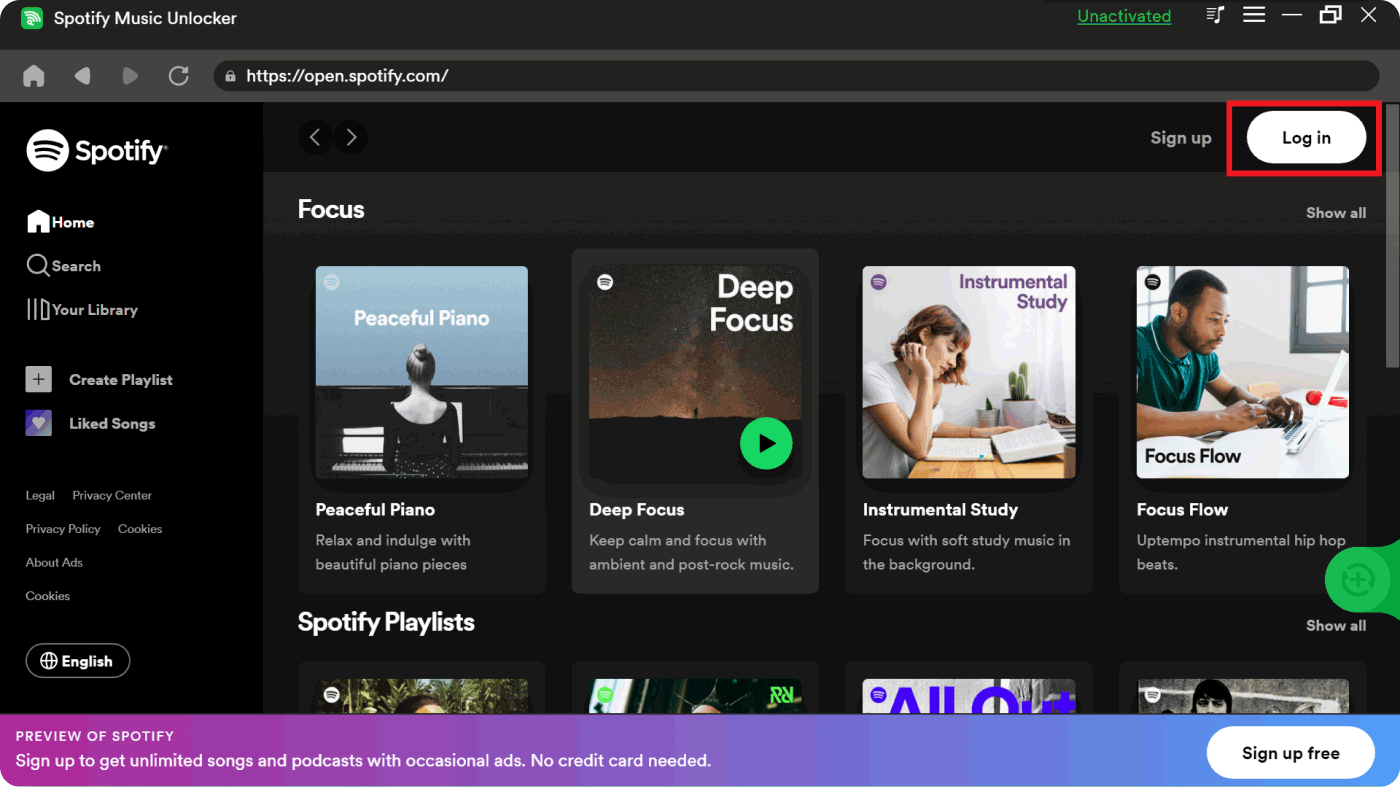
Step 1. Go to the Spotify web player by tapping the "Open Spotify web player" option. You can see the said option once you open the Spotify Music Unlocker.

Step 2. The next thing that you have to do is access your Spotify account. To log in, tap the “Log In” button, which you can see in the upper section of your screen. In case you do not have an account yet, tap the “Sign Up” option. There is no need to worry about your personal details; the tool will not take any information from your account.
Step 3. From the tracks, playlists, and albums on your Spotify account, you have to select the ones that you would like to download. Once you have chosen an album or a playlist, tap the green add icon, which is at the side of your screen. All the songs that the album or playlist contains will be added to Spotify automatically. You can also drag and drop the music files if you want to.

Individual tracks can also be added if you have a single track that you wish to download. The Spotify Music Unlocker will also make sure that duplicated files are prevented, so there is no need to worry about it.
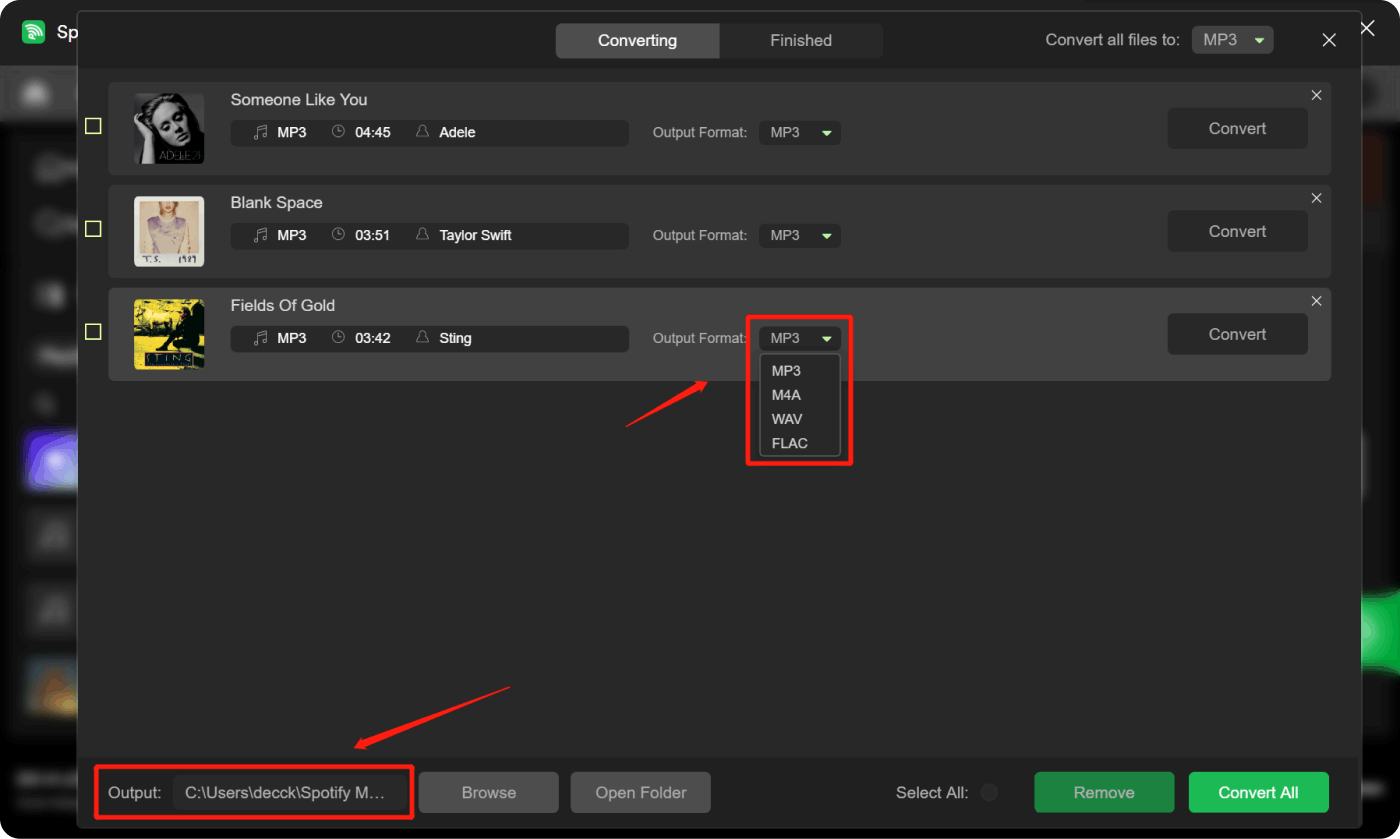
Step 4. Choose the formats, like M4A, FLAC and WAV, that you want to have as your final output and set the output folder as well.
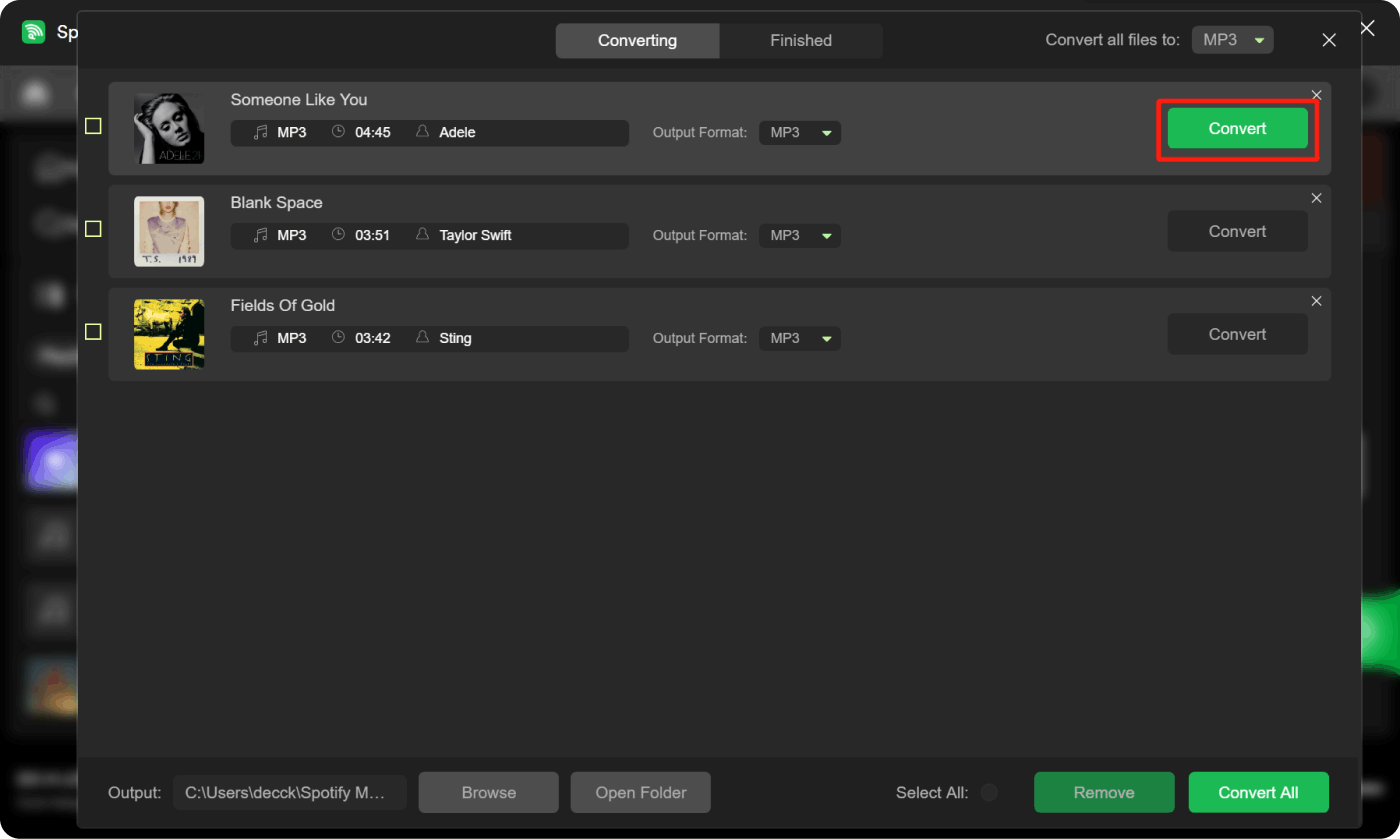
Step 5. To finally start the process of conversion, hit the “Convert” button for single tracks, and in case you want to convert multiple music tracks to MP3 or other formats, you can hit the “Convert All” option.
You can also see the results of the conversion process by going to the Finished tab and selecting the "View Output Files" menu.
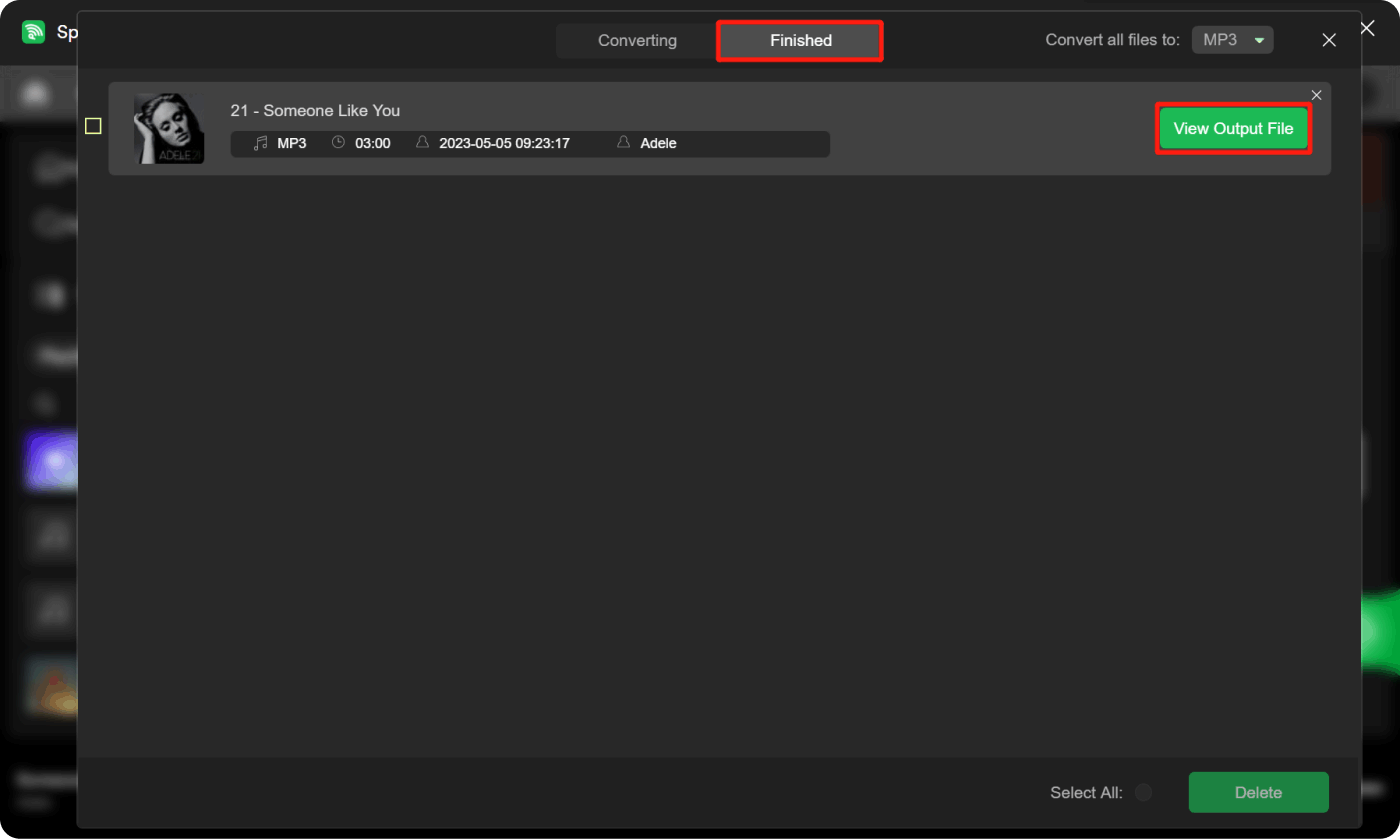
Once you are done, the DRM encryption will be lifted, and accessing the music files outside of Spotify will be possible even if you are using other media players or devices.
Part 3. To Summarize It All
It is a wonderful thing to learn about ways to improve Spotify audio quality! Being able to uplift the way any one of us can listen to Spotify songs can be a huge thing, especially if you really love to spend your time listening to audio tracks you love.
.Additionally, the presence of professional tools like the Spotify Music Unlocker can give us an even better experience to listening to songs we love without dealing with annoying incompatibilities and restrictions.
People Also Read How to Upload MP3 to Spotify: An Easy Step-by-Step Guide Connect And Share Music: How to Add Friends on Spotify
Written By Rosie
Last updated: 2023-08-03