


"Can you keep Apple Music after free trial offer ?”
Perhaps many users who have just tried Apple Music’s free trial offer are also wondering about the same query above – “is it possible to keep Apple Music after free trial?”. Apple Music is regarded as one of the best in the music streaming industry. Offering various paid subscription plans with unique benefits makes it flexible enough for some users to decide which one fits their needs the most when it comes to music listening.
It might be a shame that Apple Music does not have a free version like that of Spotify, but the good thing is that it has a free trial offer that can be enjoyed by first time Apple Music users. But since this is just a free trial offer, it won’t last that long. To continue enjoying Apple Music’s benefits, upgrading to a premium account would be the key. Well, that is, if you have no idea how to keep Apple Music after the free trial.
In this post, our main goal is to share how it would be possible and achievable to keep Apple Music after free trial.
Contents Guide Part 1: How to Sign Up for Apple Music [For First-time Users]Part 2: How to Cancel an Apple Music Subscription[To Not Be Charged]Part 3: How to Keep Apple Music Songs After the Free Trial Offer [THE BEST WAY]Part 4: Summary
Part 1: How to Sign Up for Apple Music [For First-time Users]
For first-time Apple Music users, the platform offers a three-month free trial. Before we head into the technique of how you can keep Apple Music after free trial, let us first see how easy it is to sign up for an Apple Music subscription.
Step #1. Using your iPhone, iPad, and Mac, launch the “Music” app (iTunes app for Windows). Press the “For You” tab.
Step #2. You will see the trial offer on the screen. Click it to select a subscription on Apple Music including Student plan, Individual plan, and Family plan.
Step #3. By providing your Apple ID and password, log into your account. You don’t have to worry just in case you don’t have an Apple ID yet. Creating one should be easy. You only have to press the “Create New Apple ID” button and then follow the on-screen instructions to continue.
Step #4. Provide your billing details as well to finally be able to tap the “Join” option.
After completing the above process, you will be able to finally enjoy Apple Music’s free trial offer. Just take note that if you won’t proceed with a paid subscription plan afterward, you should cancel your subscription before the next billing cycle. Otherwise, you’ll automatically be billed based on the plan that you chose in the second step.
If you aren’t sure how to cancel an Apple Music subscription, we have a detailed tutorial in the next part. It is also important to have such a reference. Let’s jump into it before finally moving on to the process of how to keep Apple Music after free trial.
Part 2: How to Cancel an Apple Music Subscription[To Not Be Charged]
If the subscription is not canceled on time, you will be charged on the next billing date. To prevent it from happening, the below tutorials must be followed accordingly.
Canceling Apple Music Subscription on Portable iOS Devices
- Go to your device’s “Settings”.
- Press your name.
- Click the “iTunes & App Store” option, then “Apple ID”, “View Apple ID”, and finally, hit the “Sign in” menu.
- Upon logging in, scroll until you see “Subscription”.
- Look for “Apple Music”.
- Press the “Cancel Subscription” menu.
- Just proceed and confirm the cancellation.
Canceling Apple Music Subscription on Mac
- Launch the App Store app.
- Press your name or the “Sign in” menu.
- Scroll until you see “Subscription”.
- Press the “View Information” option and then tap “Manage” from “Subscriptions”.
- Next to your Apple Music membership, press the “Edit” link.
- Hit the “Cancel Subscription” option.
- Proceed by confirming.
Canceling Apple Music Subscription on Windows PC
- Open the iTunes app.
- Press the “Account” menu and then select “View My Account”. If asked to sign in via your Apple ID details, just do so to continue.
- Head to the “Settings” section.
- Press “Manage” from “Subscriptions”.
- Look for Apple Music and tap the “Edit” link next to it.
- Tap the “Cancel Subscription” button.
- Confirm your cancellation action.
Upon making sure that you have canceled your subscription on time, you’ll be assured that you won’t be billed on the next billing statement. However, this also means that the songs you downloaded before will all be gone. In order to continuously listen to them, you must find a way to keep Apple Music after free trial. The best method will be presented as you head over to the next part of this post.
Part 3: How to Keep Apple Music Songs After the Free Trial Offer [THE BEST WAY]
Knowing that Apple Music is a subscription-based platform and its contents are protected with DRM encryption surely made you think that there is no way to keep Apple Music after free trial. You are definitely wrong!
Though Apple Music tracks are protected files, we are still lucky that there are trusted tools like the Apple Music Unlocker that can help us keep Apple Music after free trial and even make them playable on any device that we want to use. This tool offers a bunch of advantages. Listed below are the major ones.
- It can unlock Apple Music songs from DRM protection, making them flexible enough to be played anywhere.
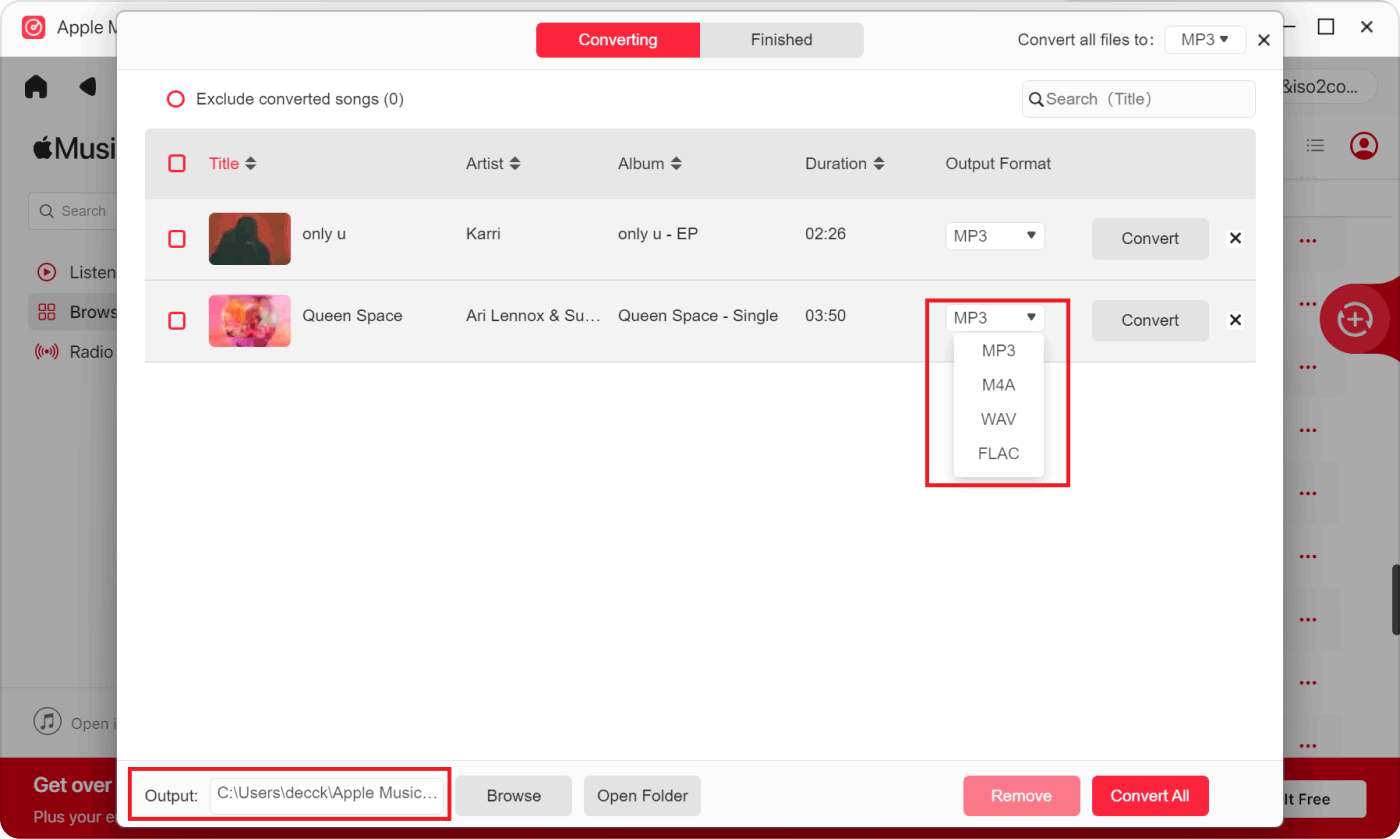
- It has the ability to support the conversion of songs to common formats like MP3, FLAC, WAV, and M4A.
- It does lossless transformation of tracks, so the output files are guaranteed to be high-quality.
- The interface is simple enough, even for novices.
To finally use Apple Music Unlocker and be able to keep Apple Music after free trial, this must first be downloaded and installed. Afterward, the below guide can be used to save unlocked and transformed Apple Music songs on any device.
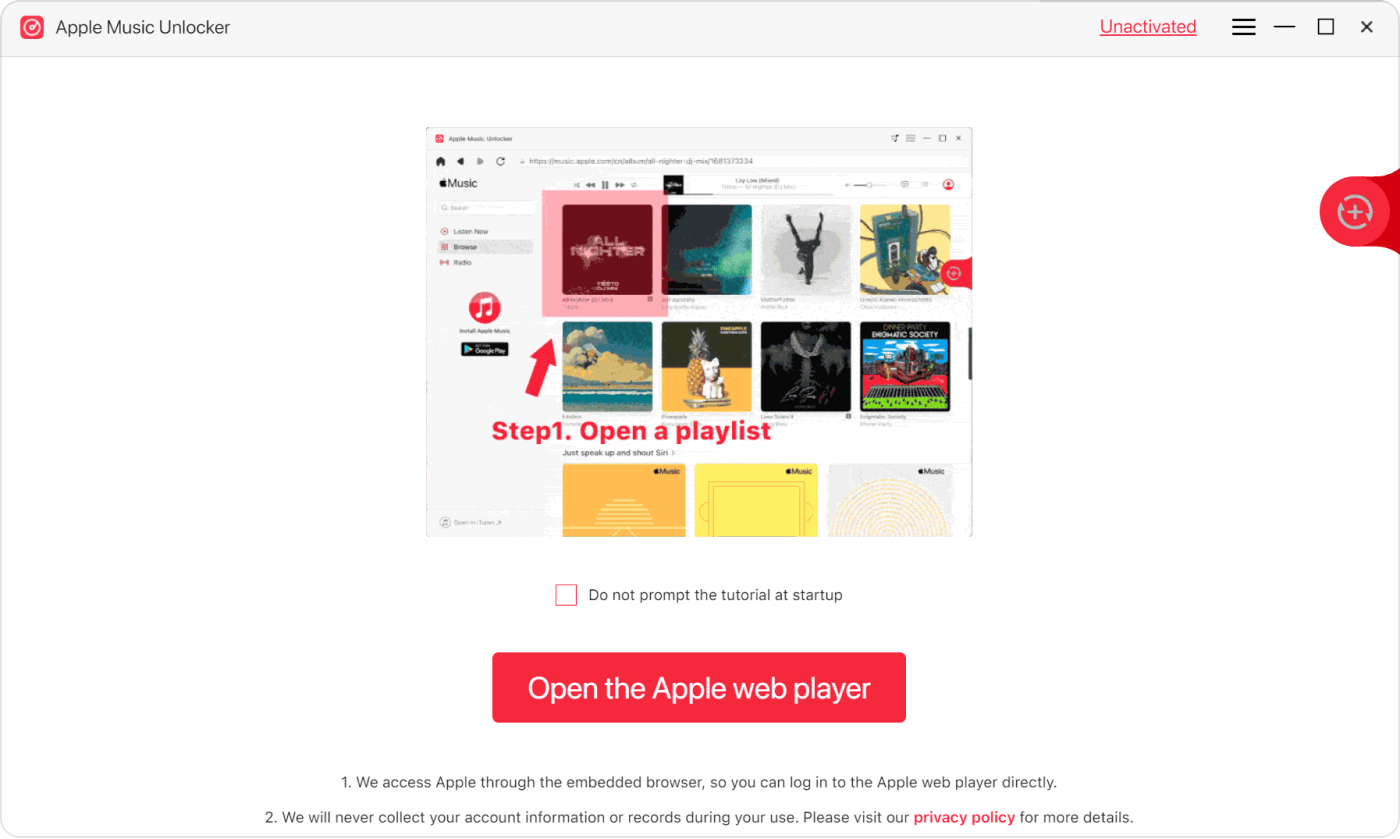
Step #1. Immediately tap the “Open the Apple web player” button that’s shown on the screen the moment Apple Music Unlocker is launched. Take note as well that the latest available version of iTunes must also be installed on your PC.
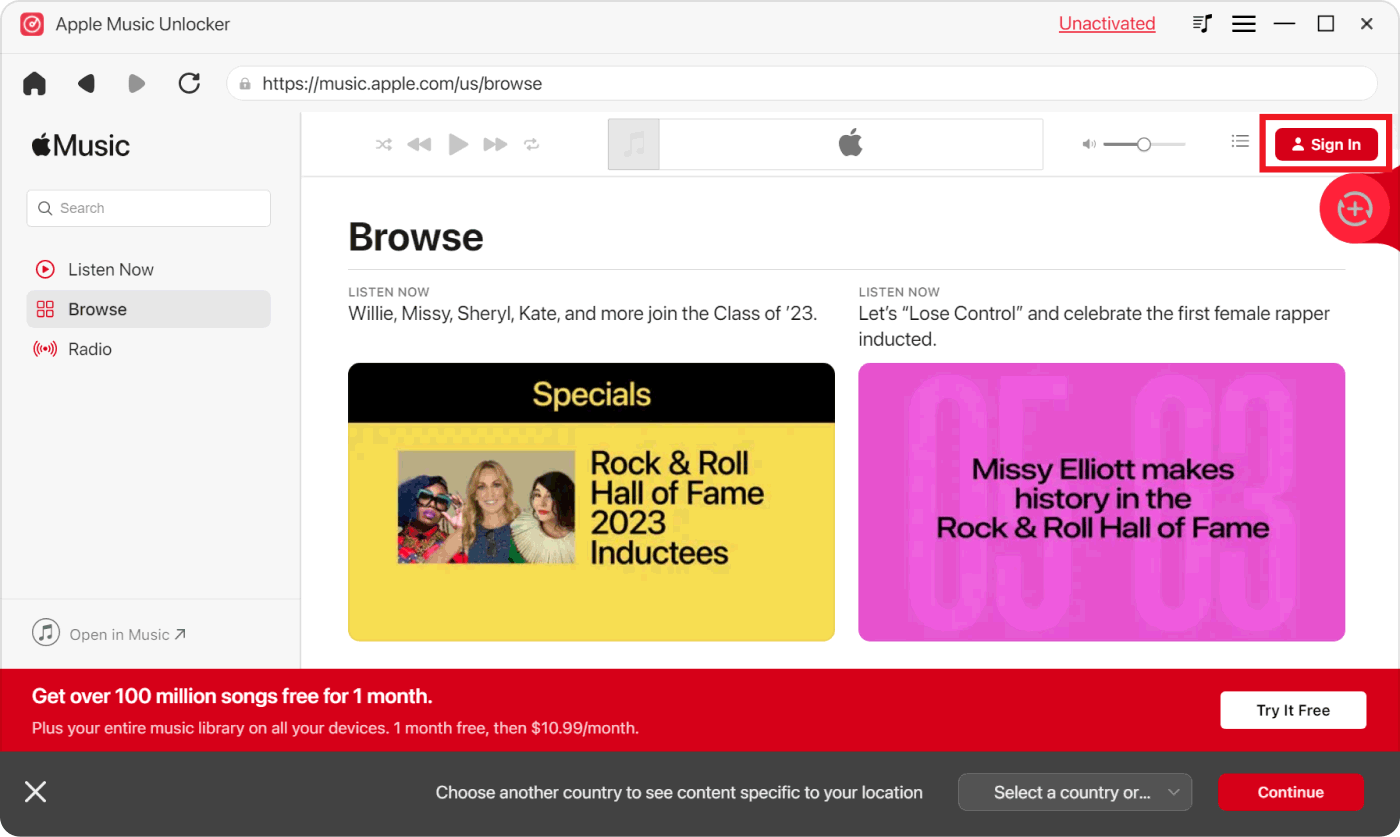
Step #2. Log into your Apple ID account by clicking the “Sign in” menu at the top and providing your account credentials.
Step #3. Choose the Apple Music content to be processed and drag them to the red “add” icon. Opening a certain playlist and tapping the red “add” icon afterward will let you add all the songs in that playlist to Apple Music Unlocker.

In case you are bothered by possible duplicated songs, you don’t have to. Apple Music Unlocker has the ability to detect them automatically, so this surely won’t happen.
Step #4. Once Apple Music songs and playlists have been selected and added, it is now time to choose the output parameters to use. Just simply select from the available output formats and set up the output folder location if you’d like to.
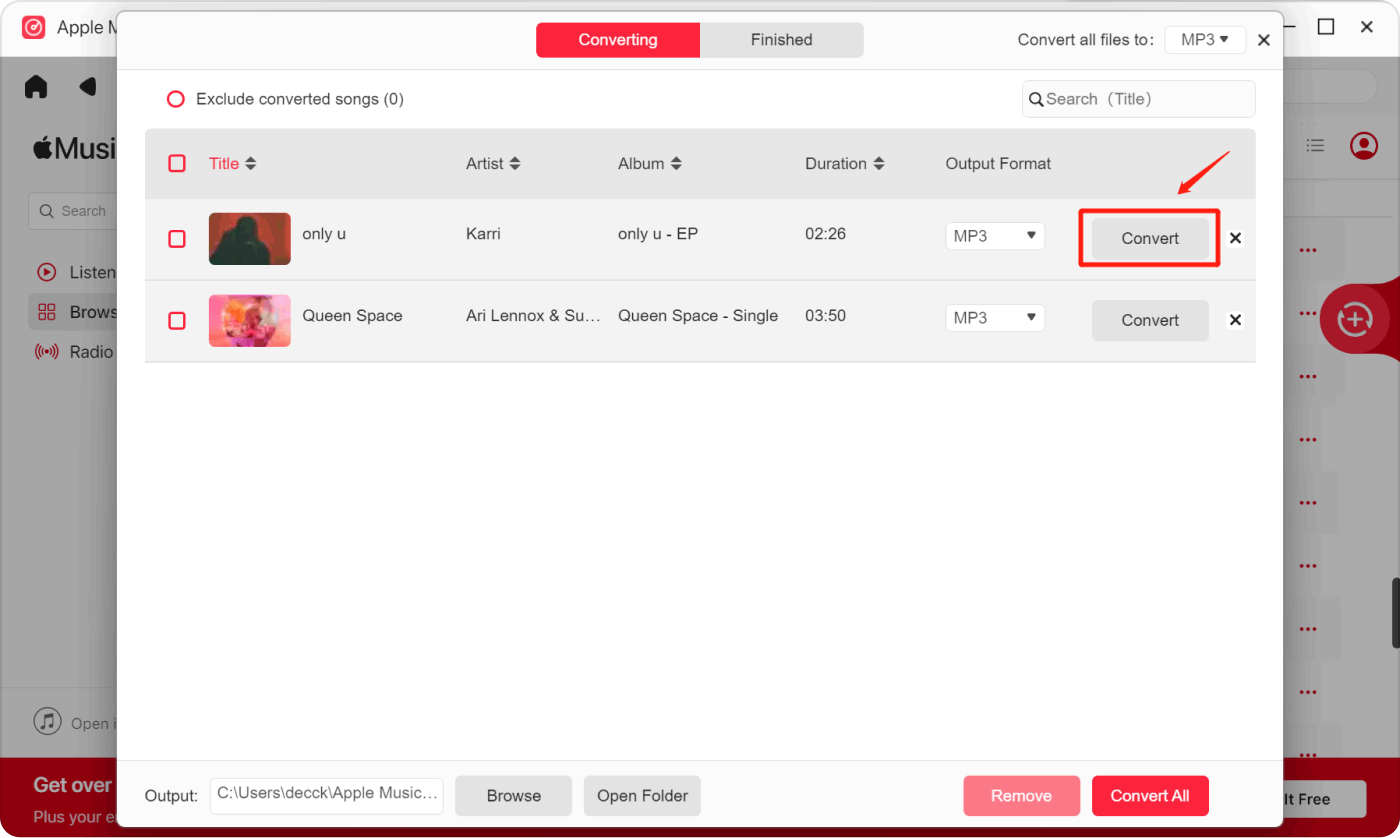
Step #5. The transformation of the Apple Music songs, albums, or playlists shall happen the moment the “Convert” (for selected multiple tracks) or “Convert All” (for all added tracks) button is tapped.
Once the conversion is complete, the transformed and DRM-free Apple Music songs will now be available for offline listening without any limitations. This is indeed the best way to keep Apple Music after free trial. One should also be able to save the tracks on external drives and listen to them on speakers or other media players. Processing them and using them on other apps will now be possible as well.
Part 4: Summary
Though Apple Music does not actually offer a free version like Spotify, Apple Music fanatics are still lucky to be given the chance to enjoy it for free via a free trial offer. However, this would only be applicable for first-time users. If you go to the web, there are even other offers that would give you free Apple Music access (via collaborations with other apps or companies, etc.).
However, all these would only be good for a certain period of time. If you’d like to keep Apple Music after free trial or access the songs forever on any gadget that you’d like to use, it would be best to download and convert them to common formats with the help of professional software apps like Apple Music Unlocker. Further details relative to this tool have been presented in the previous part for your easy reference.
People Also Read Apple Music Family Plan: Share the Rhythm with Your Loved Ones! Ultimate Guide: How to Convert Apple Music to MP3 with Ease
Written By Rosie
Last updated: 2023-08-17