


Apple Music is widely recognized as one of the top streaming services worldwide, catering to diverse preferences in the realm of streaming media. If you have subscribed the Apple Music plan, you can access and sync Apple Music to iPhone or different devices with the Apple Music. After syncing Apple Music library to your iPhone or other devices, you can enjoy the tracks anytime you want. But how to do it? This article will answer you with three solutions.
Contents Guide Part 1. How to Sync Apple Music to iPhone? [With Subscription]Part 2. How to Sync Apple Music to iPhone Manually? [Without Subscription]Part 3. How to Convert and Sync Apple Music Files to iPhone? [The Best Way]Part 4. Summary
Part 1. How to Sync Apple Music to iPhone? [With Subscription]
If you have subscribed Apple Music plan, then it’s easy to sync Apple Music Library to your iPhone. The only thing you need to do is using Sync Library with your Apple Music subscription.
How to turn on Sync Library on another iPhone/iPad/ iPod?
Before getting start, here are some of the tips for you.
- Update your devices and app to the latest version, including iPhone, iPod, Mac and iTunes.
- Sign in with the same Apple ID on your devices and ensure they’re in a some WIFI network.
Step 1. Open “Settings” and click “Music” on other iDevices.
Step 2. Turn on the “Sync Library” button.
Step 3. Wait for the music library syncing to your iDevices.
How to turn on Sync Library on your Mac?
Step 1. Launch the Apple Music app on Mac.
Step 2. Sign in with the Apple ID that you use with your Apple Music plan subscription.
Step 3. Find “Music” and click Settings.
Step 4. Choose the “General” button.
Step 5. Choose “Sync Library” and click “OK”.
Step 6. Wait for the music sync, then check the status by clicking “Updating Cloud Library”.
How to turn on Sync Library on Windows?
The “Sync Library” called “iCloud Music Library” on Windows computer. Here is how to do:
Step 1. Open the latest version of iTunes on your Windows computer.
Step 2. From the top menu bar, choose “Edit” and “Preferences”.
Step 3. Locate “General” and turn on the “iCloud Music Library” option.
Step 4. Tap “OK” and wait for the syncing.
Part 2. How to Sync Apple Music to iPhone Manually? [Without Subscription]
Using iTunes
If you don’t want a subscription to Apple Music or iTunes Match, then you can sync Apple Music Library manually. In this case, you have to sync songs to your iPhone using a USB data cable or WIFI. Here is how to do:
Step 1. Connect your iPhone to the computer with a USB data cable.
Step 2. Open iTunes App on your computer and choose your device.
Step 3. Choose “Summary” from the left bar.
Step 4. Select “Sync with this iPhone over Wi-Fi”.
Step 5. Click “Apply”.
Step 6. When your iPhone and PC share the same Wi-Fi, iTunes recognizes it and automatically syncs Apple Music to your iPhone when you turn it on and launch iTunes.
Using Finder
If you’re using a Mac running macOS Catalina or later, you can use Finder to sync your Apple Music playlist to your iPhone.
Step 1. Connect your iPhone with your MAC, and then open “Finder”.
Step 2. Find and select your iPhone from “Devices”.
Step 3. Choose “Music” from the top of the screen.
Step 4. Select “Sync Music Onto Your Device”.
Step 5. Then you can choose the songs you want to sync to your iPhone.
Step 6. Tap “Apply” after choosing your music.
Part 3. How to Convert and Sync Apple Music Files to iPhone? [The Best Way]
The two methods mentioned above are official methods, but the method we introduce in this part is the best method. For one thing, you don’t have to subscribe the Apple Music plan to use the “Sync Library” function. For another, because of the DRM protection, the songs from Apple Music can only be played on Apple Music and iTunes.
With Apple Music Unlocker, you can enjoy the songs offline on many devices. This program is compatible with Windows system and macOS. What’s more, you can get rid of the DRM and convert the Apple Music tracks to MP3 or other flexible formats like MP4, WAV, and FLAC. Once the tracks are converted, you can transfer them to the supported devices.
The program is available in both a free trial and a registered form; to register, you must acquire a license key, which will assist you in verifying and finalizing your registration. Once completed, you can use the tool without restriction, and if you want to get a sense of what it is capable of, you can also take advantage of its 30-day free trial.
Here are the steps to use it:
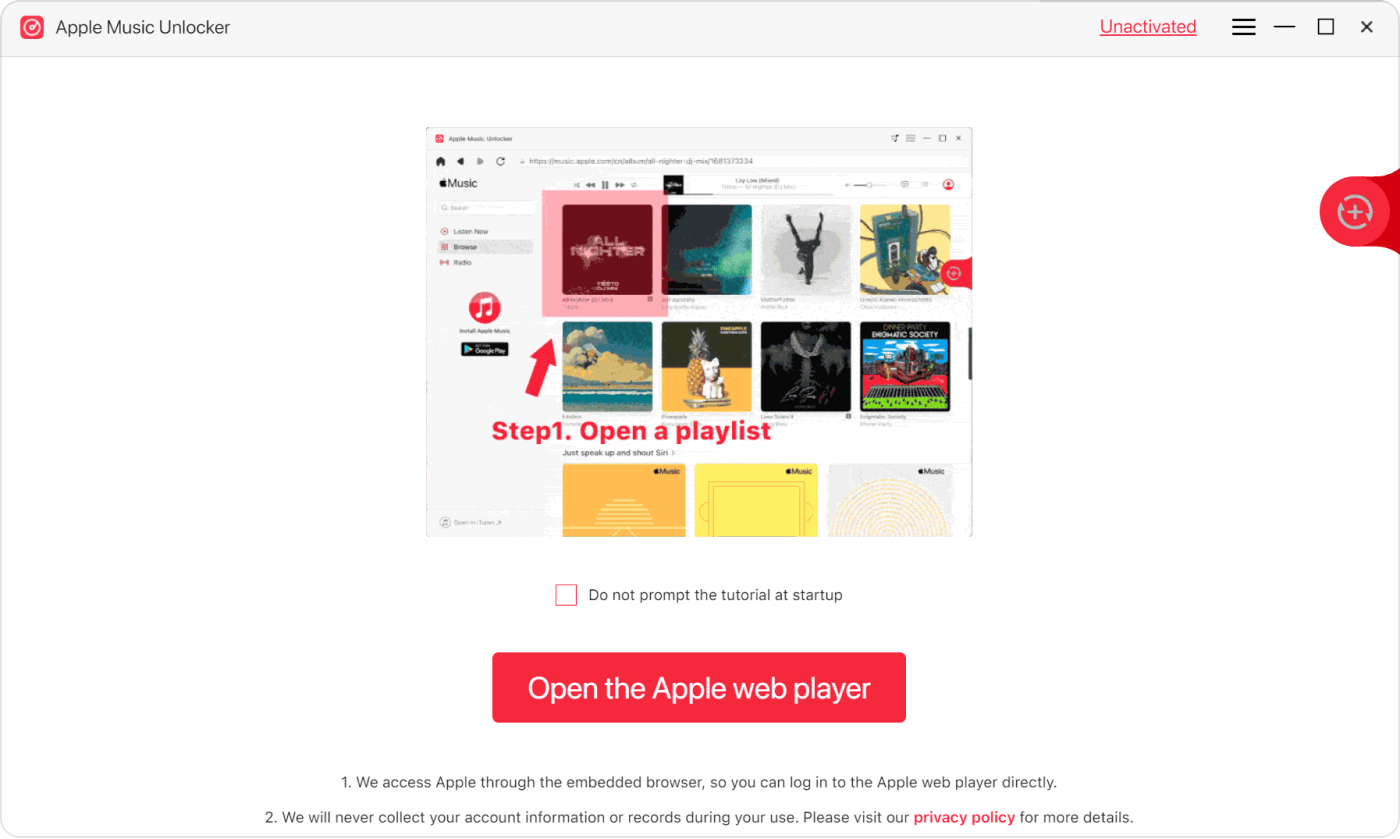
Step 1. Open the Apple Music Unlocker
Download and install the program on your computer first. Then you can launch the program and click the “Open the Apple Web Player”.
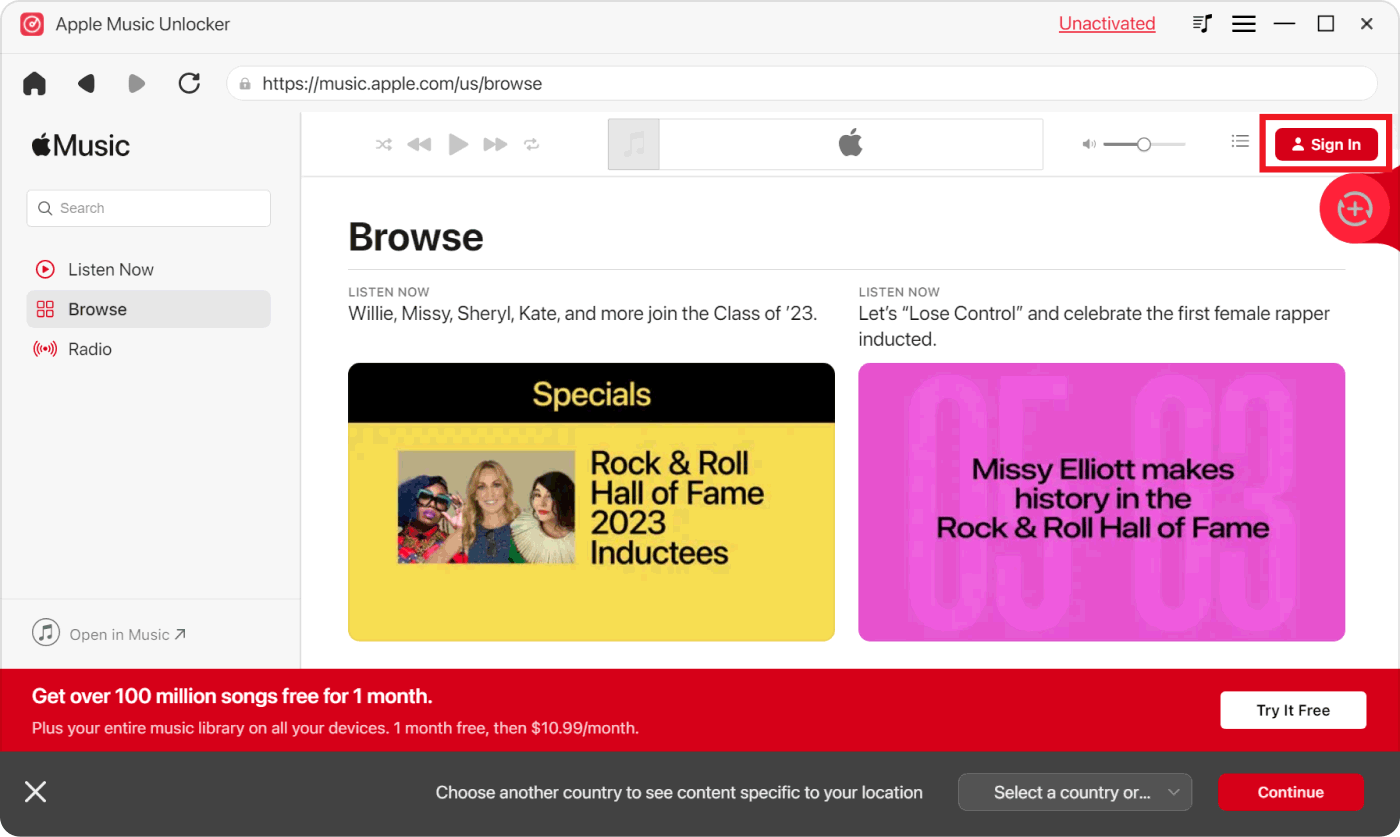
Step 2. Sign In to Your Apple ID Account
Tap the “Sign In” option from the top-right part of the windows. Enter in your Apple ID information. If you don’t have an account, then sign up for a new one. You don't have to worry about your personal information being leaked; Apple Music Unlocker keeps everything secure.
Step 3. Add The Songs And Playlists
You can now start choosing the songs and playlists to download. You can drag them to the red add icon one by one, or you can open a playlist you like and tap the red add icon to add all the songs from the playlist.

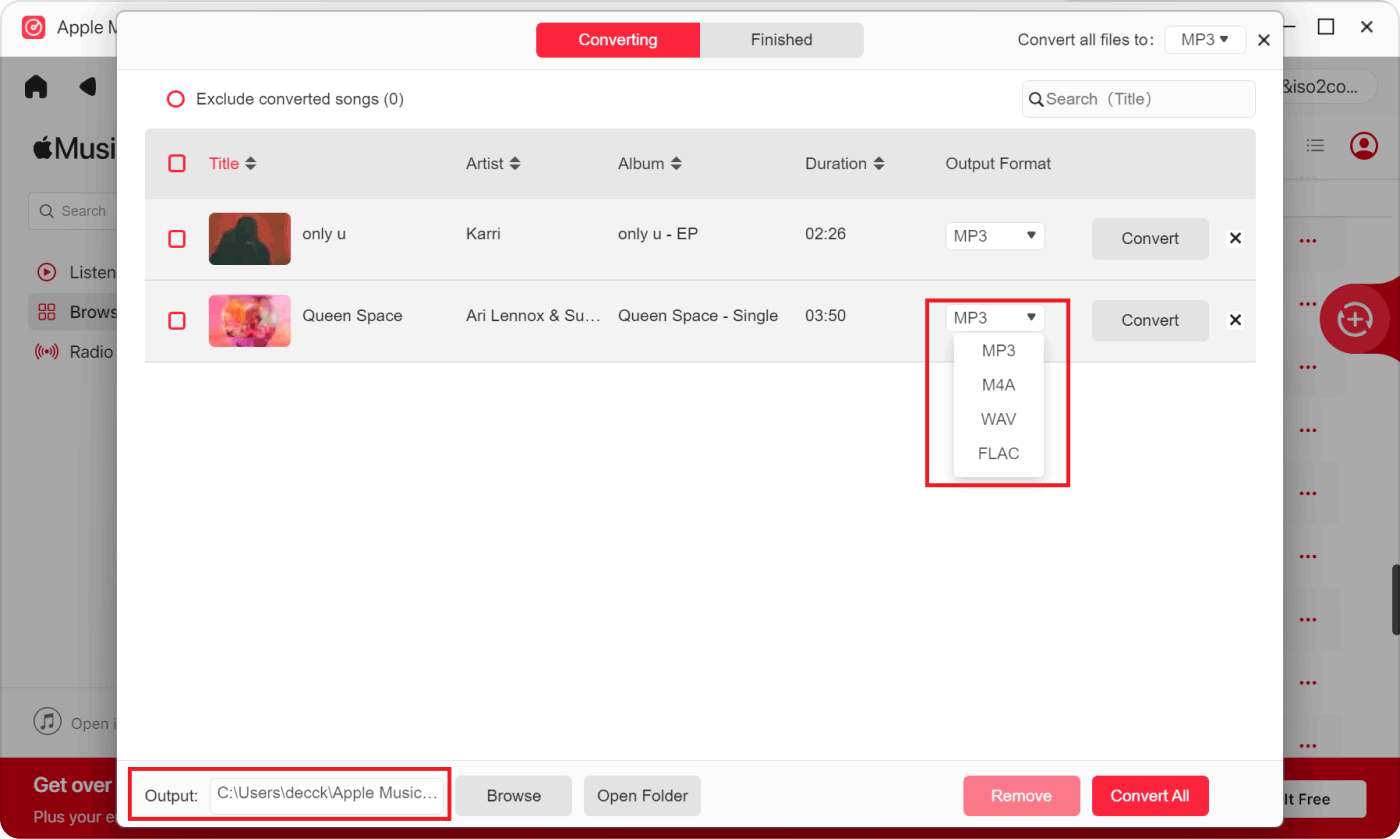
Step 4. Choose The Output Formats
After adding songs or playlists, you need to choose the output formats for the songs you want to convert. You can select the file formats like M4A, WAV, FLAC, and MP3.
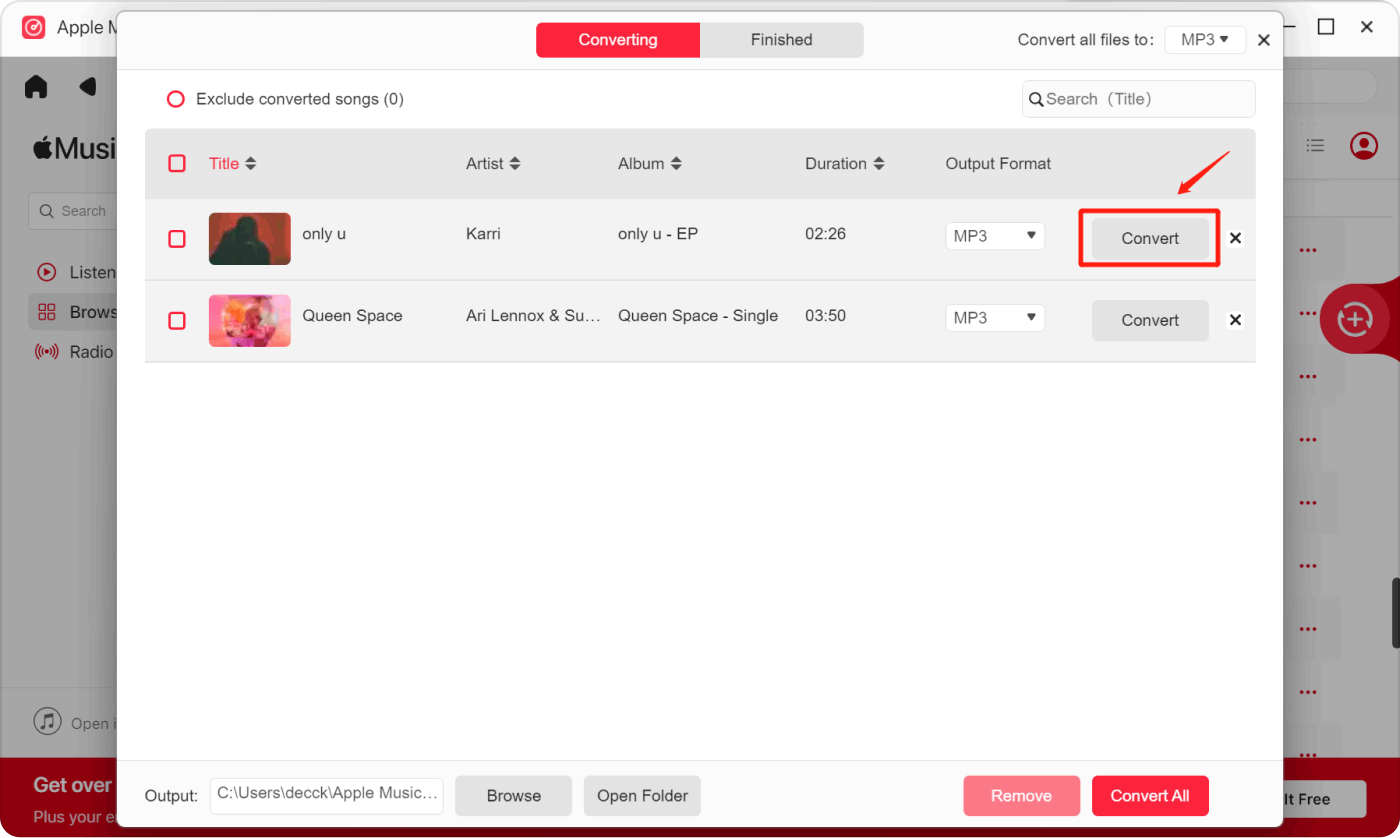
Step 5. Start Converting
After finishing all the settings, now can begin to convert. Click the “Convert” or “Convert All” button to convert the songs you choose. Wait for a few minutes and Apple Music Unlocker will download the DRM-free tracks on your computer.
Part 4. Summary
The article provides comprehensive guidance on syncing Apple Music to iPhones through various methods. It outlines steps for syncing with an Apple Music subscription, both on iOS devices and computers, emphasizing the importance of ensuring devices are updated and connected to the same Wi-Fi network.
Additionally, it details manual syncing methods using iTunes or Finder for users without subscriptions. Furthermore, it introduces a third-party solution, Apple Music Unlocker, for removing DRM protection and converting tracks to versatile formats like MP3. The article offers step-by-step instructions for each method, catering to different user preferences and needs.
People Also Read Apple Music Vs YouTube Music: Which Reigns the Supreme? Easily Sync iTunes Playlist to iPhone: A Step-by-Step Guide
Written By Rosie
Last updated: 2024-03-14