


Are you an avid iTunes user who loves creating and curating playlists? If so, you probably want to enjoy your carefully crafted music selections on your iPhone as well. Thankfully, the process to sync iTunes playlist to iPhone is straightforward and ensures your favorite tunes are always at your fingertips.
In this article, we will walk you through a step-by-step guide on how to effortlessly export your favorite iTunes playlist to your iPhone, allowing you to enjoy your personalized music library on the go. So, let's dive in and get your iPhone rocking with your beloved tunes!
Contents Guide Part #1: How to Sync iTunes Playlist to iPhone: The Standard MethodPart #2: The Best Way to Listen to Music on iPhone: Apple Music UnlockerConclusion
Part #1: How to Sync iTunes Playlist to iPhone: The Standard Method
Choosing to sync iTunes playlist to iPhone allows you to enjoy your favorite music seamlessly while on the go. In this section, we will guide you through the standard method of syncing your iTunes playlist to your iPhone using iTunes.
Step #1: Connect Your iPhone to Your Computer
Start by connecting your iPhone to your computer using a USB cable. Launch the iTunes application on your computer if it doesn't open automatically upon connection.
Step #2: Select Your iPhone in iTunes
Once your iPhone is connected, you'll see an iPhone icon appear in the top-left corner of the iTunes window. Click on it to access your iPhone's settings.
Step #3: Access the "Music" Tab
Within your iPhone settings, navigate to the "Music" tab located in the left sidebar. By default, it should be selected when you click on your iPhone icon.
Step #4: Choose the iTunes Playlist to Sync
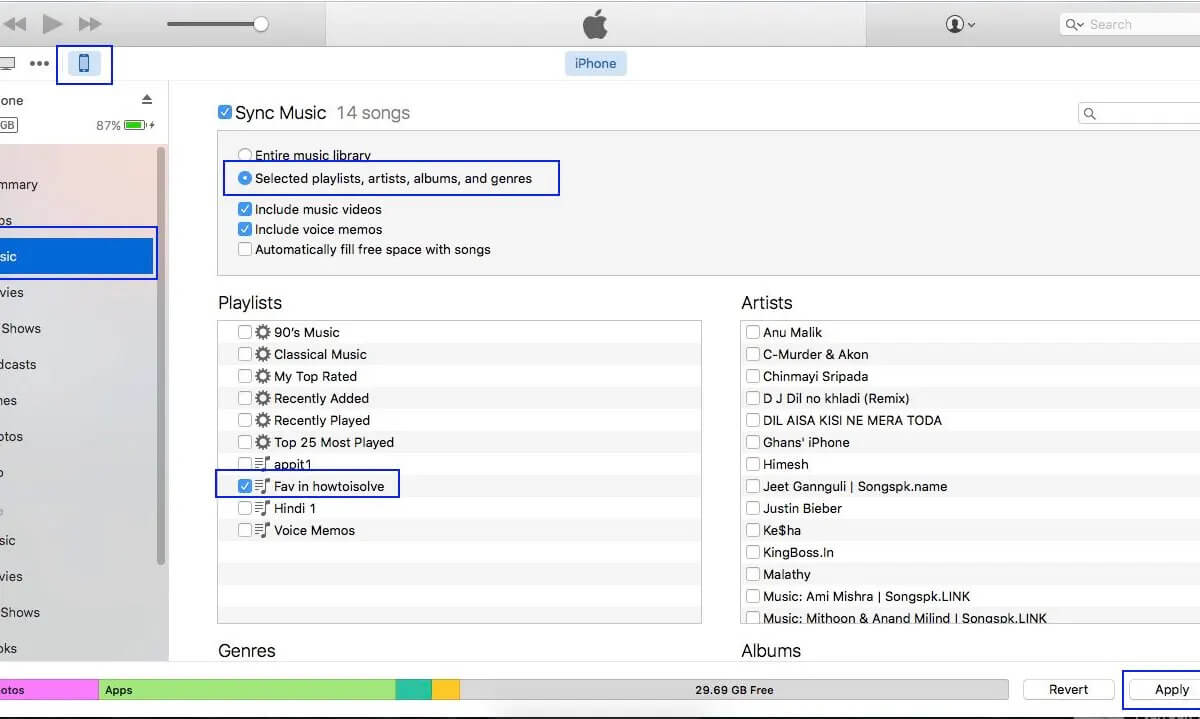
Under the "Music" tab, you'll find various options related to syncing music to your iPhone. Look for the "Sync Music" checkbox and select it. Then, choose whether you want to sync your entire music library or selected playlists.
Step #5: Select Specific Playlists
If you prefer to sync specific iTunes playlists to your iPhone, make sure the "Selected playlists, artists, albums, and genres" option is selected. Then, check the box next to the desired iTunes playlists you want to sync to your iPhone.
Step #6: Start the Syncing Process
Once you've chosen the desired iTunes playlists, click on the "Apply" or "Sync" button in the bottom-right corner of the iTunes window. This action will initiate the syncing process and transfer the selected playlists to your iPhone.
Step #7: Wait for the Sync to Complete
During the “Sync iTunes playlist to iPhone” process, iTunes will display a progress bar indicating the transfer of music files to your iPhone. The time required for syncing depends on the size of your playlist and the speed of your computer and iPhone. Ensure that you do not disconnect your iPhone until the sync is complete.
Step #8: Verify Your Playlist on Your iPhone
Once the syncing process is finished, you can disconnect your iPhone from your computer. Open the "Music" app on your iPhone and navigate to the "Playlists" tab to confirm that your iTunes playlist has successfully synced.
Congratulations! You have successfully synced your iTunes playlist to your iPhone using the standard method. Now you can enjoy your favorite music anytime, anywhere directly from your iPhone's Music app.
Part #2: The Best Way to Listen to Music on iPhone: Apple Music Unlocker
Now that you have learned how to sync iTunes playlist to iPhone, we will give a bonus tip. Apple Music Unlocker is a software that can remove DRM protection from Apple Music songs. This means that you can freely listen to your Apple Music songs on any device, even if you don't have an active Apple Music subscription.
Apple Music Unlocker works by converting your Apple Music songs to various format, such as MP3 or AAC. This process is lossless, so you won't lose any audio quality. Once your songs have been converted, you can transfer them to any device and listen to them without any restrictions.
Apple Music Unlocker is a very easy-to-use software. Simply install the software on your computer, launch it, and sign in to your Apple Music account. Then, select the songs that you want to convert and click on the "Convert" button. The software will start converting your songs and will save them in a DRM-free format.
Here are the steps to use it:
- Install iTunes and sign in to your account.
- Open Apple Music Unlocker. This will launch the application and open the Apple web player.
- Sign in to your Apple ID in the top right corner of the window.
- To select a specific song or playlist, drag and drop the title over the red add icon. This will add the song or playlist to the list of songs to be converted.
- To add all songs from a playlist, open it and click the red add icon. This will add all songs in the playlist to the list of songs to be converted.
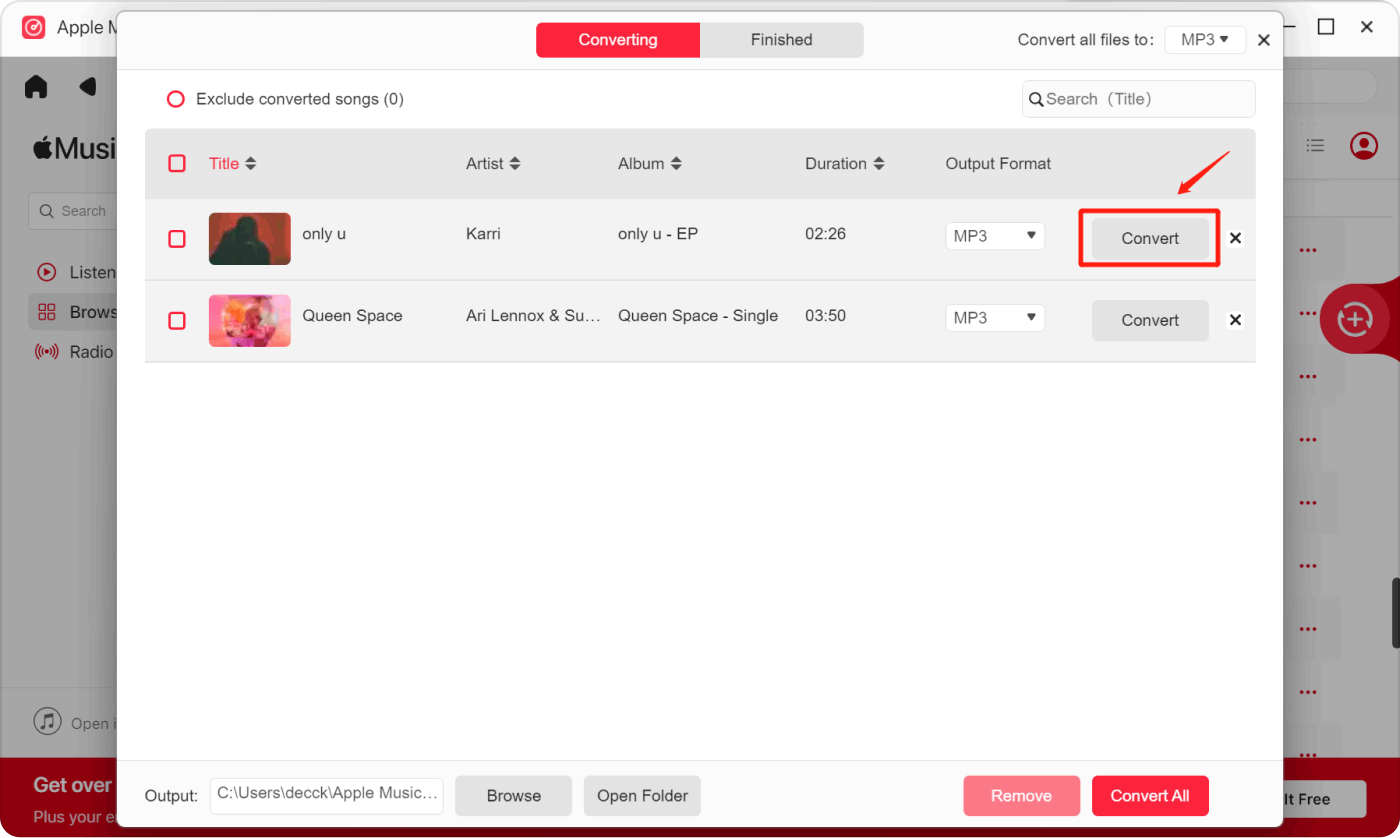
- Choose the output format for your converted files. The available formats are MP3, M4A, WAV, and FLAC. MP3 is the most common format, but you may want to choose a different format depending on your needs.
- Click on the "Change" button to select a different folder to change the output folder location. This is where the converted files will be saved.
- Click on the "Convert" button to start the conversion process. This will convert the selected songs to the chosen output format.
- Once you have the tracks, you can simply add them to iTunes and sync them to your iPhone.
Apple Music Unlocker is a very powerful tool that can give you more freedom with your Apple Music songs. If you're looking for a way to listen to your Apple Music songs on any device, then Apple Music Unlocker is a great option.
Here are some of the features of Apple Music Unlocker:
- Removes DRM protection from Apple Music songs.
- Converts Apple Music songs to MP3, AAC, and other DRM-free formats.
- Keeps the original audio quality of your songs.
- Easy to use.
- Compatible with Windows and macOS.
If you're looking for a way to remove DRM protection from your Apple Music songs, then Apple Music Unlocker is a great option. It's easy to use, affordable, and effective.
People Also Read Top Guide: Import iTunes Library from External Hard Drive How to Transfer Music from Spotify to iTunes on Windows
Conclusion
The process to sync iTunes playlist to iPhone opens up a world of musical possibilities, allowing you to enjoy your favorite tunes wherever you go. In this article, we've covered the standard method of syncing your iTunes playlist to your iPhone using iTunes. However, there are alternative methods that offer even more convenience and flexibility.
By using Apple Music Unlocker, you can effortlessly keep your music library up to date and enjoy the latest additions to your iTunes playlists on your iPhone. It offers a seamless and convenient way to listen to music, particularly for those who frequently update their playlists.
Written By Rosie
Last updated: 2023-07-13