


Indeed, the music listening service has been improving day by day. From the introduction of different music streaming service providers to advanced content collections and more, a music enthusiast surely wouldn’t want to miss out on anything.
Being torn between choosing which platform, like Apple Music, YouTube Music, Tidal, and Spotify, to use is already a given, especially in today’s era where almost all are excellent. If you have been using Tidal and are planning to switch over to Apple Music, what this post has – detailed guides on how to move Tidal playlists to Apple Music, would definitely be helpful to you.
You are probably thinking that it would be hard to move Tidal playlists to Apple Music directly. Well, that has a point given that these two are different subscription-based platforms. But, as always, there would be workarounds that we could apply.
We know you are looking for a tutorial to transfer Tidal playlists to Apple Music, as you don’t want your Tidal favorites to be all gone, though you’d be happy to use Apple Music. Don’t worry; we’ve got you covered. Right away, as we head over to the first part of this post, the methods that you can try and apply to transfer Tidal playlists to Apple Music will be presented in detail.

Contents Guide Part 1: How to Move Tidal Playlists to Apple Music [Via Online Methods]Part 2: How to Move Tidal Playlists to Apple Music [Via Apps on Mobile Devices]Part 3: Additional Tip: Keeping Apple Music Songs Forever AccessiblePart 4: Summary
Part 1: How to Move Tidal Playlists to Apple Music [Via Online Methods]
You will probably be delighted to know that there are online options that you can resort to when it comes to trying to move Tidal playlists to Apple Music. Just make sure that when using them, your device has been connected to a stable network to ensure that no issues will be encountered along the way. Additionally, you have to keep in mind that using these online tools won’t guarantee you copies of tracks from Apple Music that are DRM-free. These are only capable of helping you transfer Tidal content to the Apple Music platform.
If you are interested in checking out and trying these online options to switch Tidal playlists to Apple Music, we have listed them here with corresponding tutorials on how they can be used for your easy reference.
#1. Soundiiz
You’ve probably heard or read about Soundiiz before. In fact, this is one of the most popular online “go-to” sites when it comes to the need to transfer content from one platform to another. Apart from supporting Tidal and Apple Music, it also supports other music streaming platforms. With the help of Soundiiz, you can transfer Tidal playlists to Apple Music seamlessly. Its interface is so simple that first-time users won’t surely have any issues while using it.
Presented below is a detailed step-by-step guide to move Tidal playlists with the help of Soundiiz.
Step #1. On your computer, go to the official website of Soundiiz and then register or create an account.
Step #2. Once you have arrived at the main interface of Soundiiz, move to the left panel and then select the “Platform to Platform” option.
Step #3. When you see the next week, you must select “Tidal” as the source service (since we are aiming to move Tidal playlists to Apple Music).
Step #4. You must have your Tidal account connected to your Soundiiz account.
Step #5. Proceed to choose which categories or content (playlists) you’d like to transfer to your Apple Music account.
Step #6. Don’t forget to set up Apple Music as the destination platform.
Once the above has been completed, Soundiiz will then start moving the selected playlists from your Tidal account to your Apple Music account.
#2. TuneMyMusic
Aside from Soundiiz, you may try another web-based software app named TuneMyMusic as your tool to move Tidal playlists to Apple Music. The same with Soundiiz, it also supports a wide variety of music streaming platforms, including Tidal and Apple Music, of course, as well as Deezer, YouTube, SoundCloud, Spotify, and more.
It also has a simple view, so using it won’t be an issue even for first-time users. Here is an overview of the steps that must be followed to use TuneMyMusic to transfer Tidal playlists to Apple Music.
Step #1. Head over to the official website of TuneMyMusic. Press the “Let’s Start” button right away.
Step #2. As you move to the next week, select the source music platform. Of course, ensure that you will be choosing Tidal. Using your account details, log into your Tidal account.
Step #3. Locate and choose the playlists that you’d like to move to Apple Music.
Step #4. You will be asked which destination music platform you’d use. Apple Music must be chosen. Afterward, a new window would appear on the screen.
Step #5. Tap the “Start Moving My Music” option. The transfer will commence right away.
#3. FreeYourMusic
The third online tool that can also aid in the process of moving Tidal playlists to Apple Music is FreeYourMusic. It functions the same way as the first two and can also support a bunch of other music streaming platforms aside from Tidal and Apple Music.
Here is how you may use FreeYourMusic.
Step #1. Make sure to download FreeYourMusic first.
Step #2. Launch it and then start by selecting Tidal as the “Source Platform”. Choose the Tidal playlists that you are aiming to transfer to your Apple Music library.
Step #3. The “Destination Platform” must be set to Apple Music.
Step #4. To let the transfer start, the “Transfer Now” option must be tapped.
Part 2: How to Move Tidal Playlists to Apple Music [Via Apps on Mobile Devices]
If you are a fan of using your mobile devices, you’d surely be glad to know that you can also move Tidal playlists to Apple Music via some apps that are compatible with iOS and Android mobile devices. We will be sharing two of them in this section.
#1. SongShift
SongShift works on iOS devices. It has the power to allows an iOS user to seamlessly move Tidal playlists to Apple Music. It even has an intuitive user interface. Customizing the transfer process depending on the user’s preferences can even be done.
Take a look at how you can take advantage of SongShift.
Step #1. On your iOS device, open SongShift. Press the “gear” icon to launch “Music Services”. Both your Tidal and Apple Music accounts must be connected.
Step #2. Press the “+” icon next so you can add a shift.
Step #3. Click the “Playlists” option under Tidal to be able to start choosing which playlists you’d move to Apple Music.
Step #4. Hit the “Change Destination” menu and then select “Apple Music”.
Step #5. You may even choose to which folder the Tidal playlists should be moved – to your Apple Music library, to a newly created playlist, or to an existing playlist.
Step #6. Click the “Start Shifts” button.
Once the above is completed by SongShift, you may now head over to your Apple Music app and review if the selected Tidal playlists have been successfully moved or transferred to your Apple Music library.
#2. MusConv
We’ve got another tool here that can help with the process of how to move Tidal playlists to Apple Music. However, this tool is not free to use. Apart from supporting Tidal and Apple Music, it can also support other platforms like Spotify, YouTube Music, and more. It can also be used on computers.
If you still want to know more about this tool and how it can be used to transfer your Tidal favorites to your Apple Music account, then you may read the below guide for future reference.
Step #1. Once you have installed MusConv, just launch it.
Step #2. Make sure that you have chosen Tidal as the source service.
Step #3. Apple Music must, of course, be set as the destination platform.
Step #4. Look and browse for the specific Tidal playlists that you’d like to move to your Apple Music library. Select them.
Once the above is done, just confirm the action to finally start to move Tidal playlists to Apple Music. Just wait a few minutes until the process is completed.
Part 3: Additional Tip: Keeping Apple Music Songs Forever Accessible
Since we have already finished discussing the several different options or workarounds for how to move Tidal playlists to Apple Music with ease, it would also be good to learn about an additional tip when it comes to making your Apple Music favorites forever accessible.
Though Apple Music tracks are known to be protected with DRM, this shouldn’t be a hindrance to being able to listen to them whenever and wherever you want to. With the help of trusted tools like Apple Music Unlocker, the songs can actually be unlocked from this protection, making them DRM-free. In fact, apart from this great feature, this software app can even transform songs from Apple Music into MP3, or other flexible and popular formats. It does lossless conversion and has an easy-to-use interface.
To be able to finally use Apple Music Unlocker, it must first be downloaded and installed on your PC. Launch it right away upon successful installation to begin using it. Then, the below steps are what must be accomplished next.
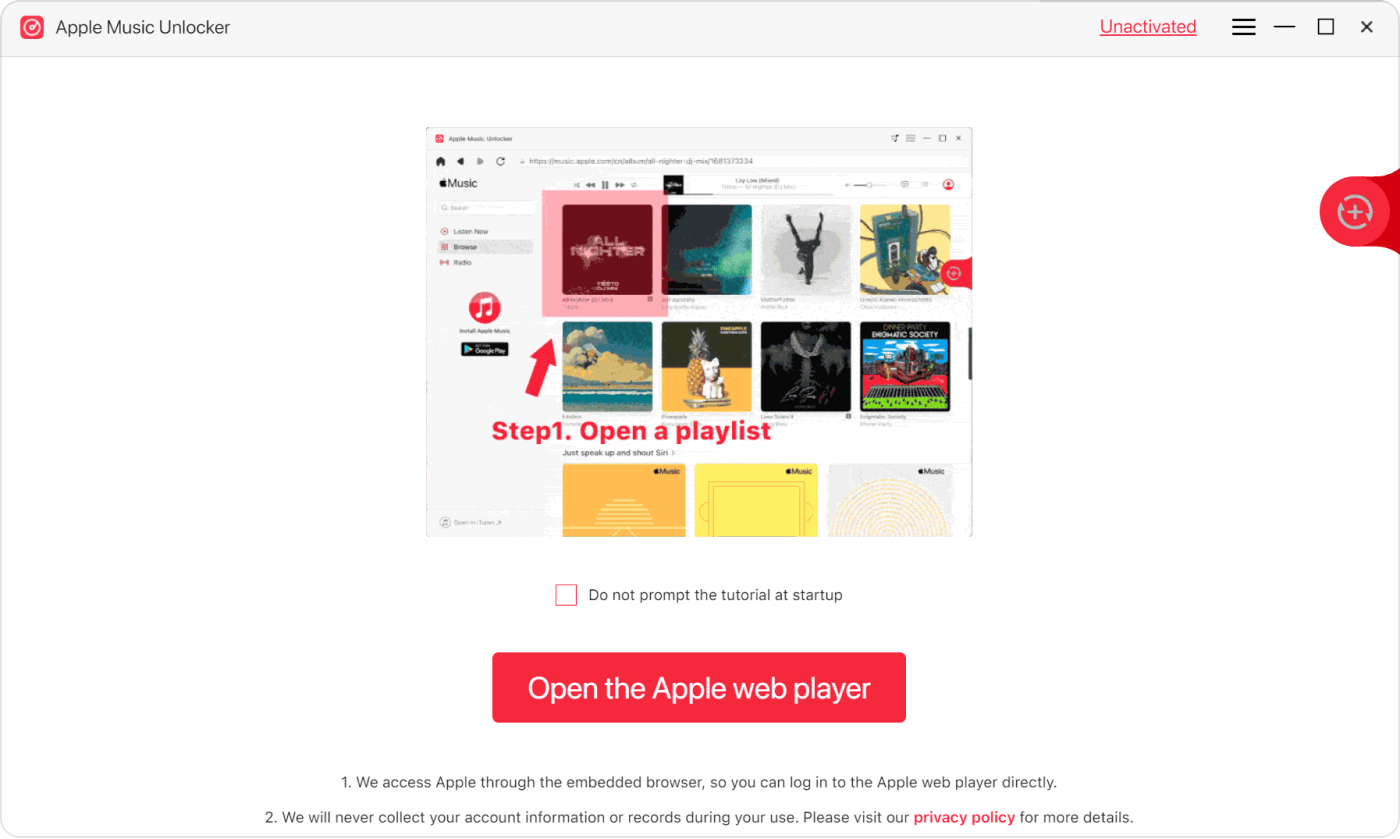
Step #1. Take note that you must have the iTunes app installed on your PC as well as your account already logged in. On Apple Music Unlocker’s main interface, press the “Open the Apple web player” menu.
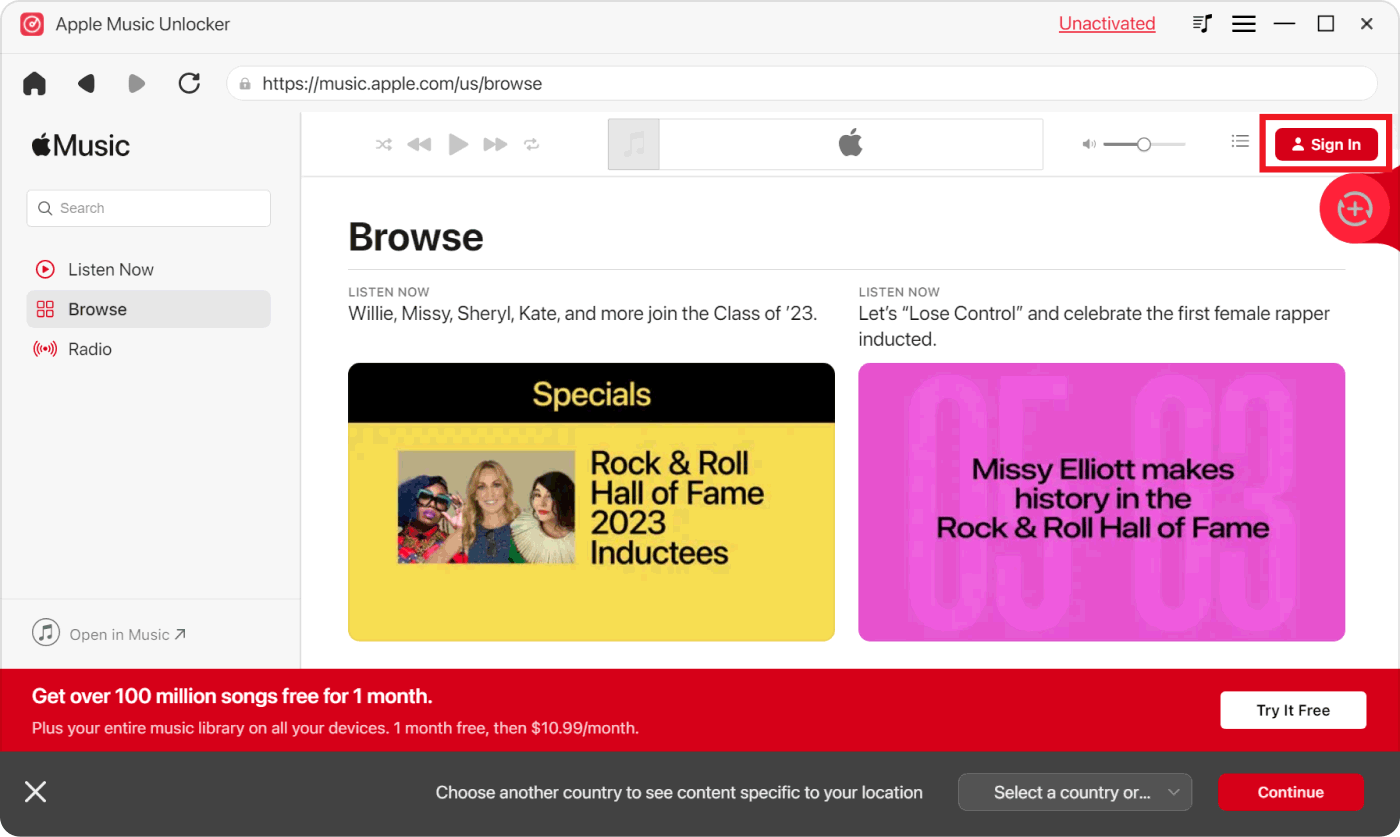
Step #2. When the Apple Music web player shows up, press the “Sign in” button at the top. Provide your Apple Music account credentials to log in.
Step #3. Select the albums or playlists that you’d want to access offline on any device, even without a subscription plan. Just drag and drop them to the red “add” icon. Opening a specific playlist and then tapping the same icon next will also give you the same result. Duplicate songs won’t happen, as this tool can detect doubled-up tracks.

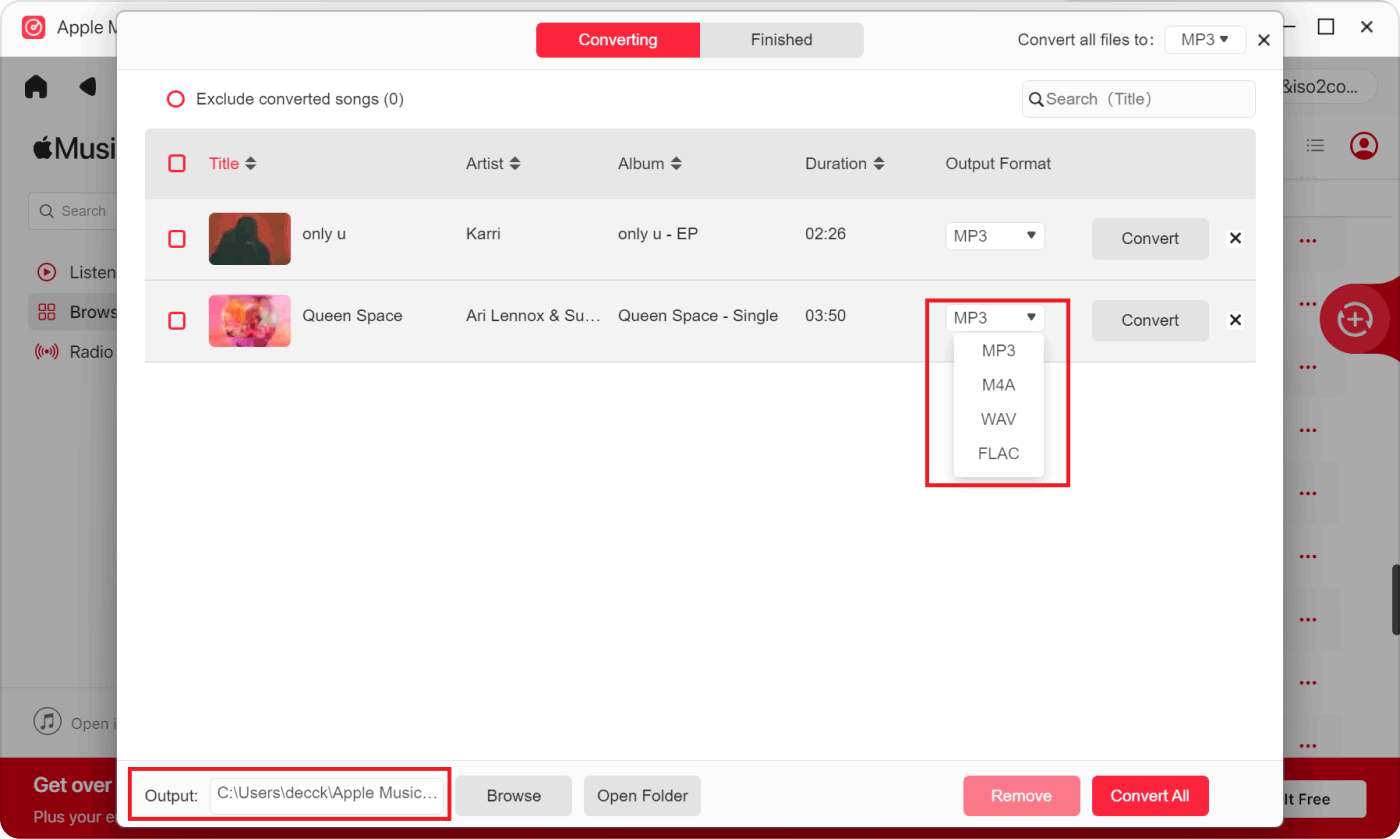
Step #4. Once the playlists have been selected, it is now time to choose which output format you’d like to use. You may also set up the output folder if you want to.
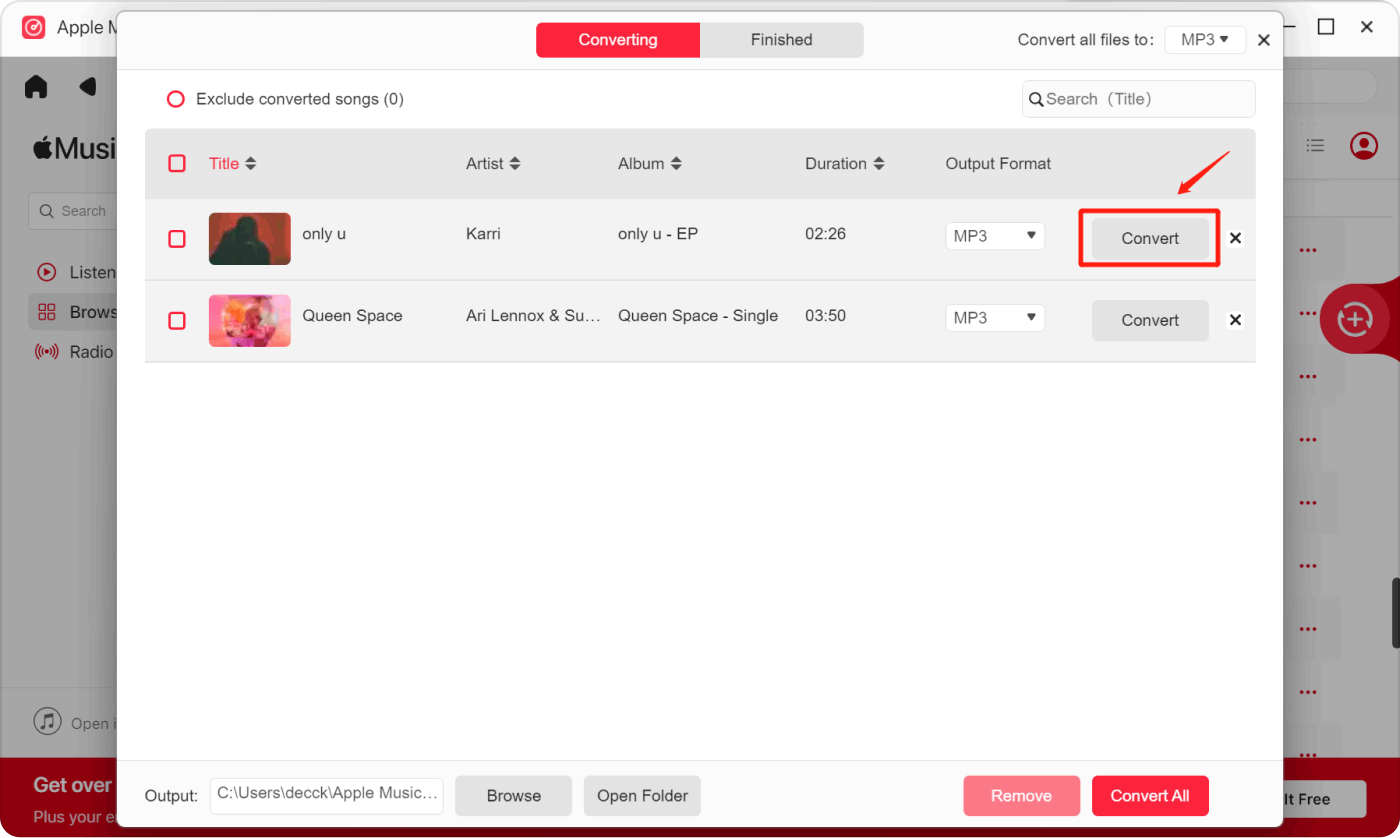
Step #5. To finally commence the conversion procedure, you may either tap the “Convert” or “Convert All” button. Converting all the imported tracks at once will happen once the “Convert All” menu is tapped. Otherwise, if you’d like to process only a few, press the “Convert” option instead.
The transformation of the imported Apple Music playlists will be done within just a few minutes. The resulting output files will all be unlocked and DRM-free. Saving them on other devices and playing them offline even without an active Apple Music subscription should be possible at any time! If you’d like to listen to the songs on your car’s stereo, saving them on external drives like USB can also be done.
Part 4: Summary
Luckily, there are lots of tools that can help us move Tidal playlists to Apple Music. We can use online options such as Soundiiz, TuneMyMusic, and FreeYourMusic. Tools that can be used on mobile devices, such as MusConv and SongShift, should also work. However, take note that when using these options, you are just transferring the tracks and not making copies of them (which are accessible in offline mode).
Once the songs are on the Apple Music platform, in order to access them forever on any device or media player, what you have to do is download and process their conversion through reliable and trusted apps like Apple Music Unlocker. It is a professional app that can help make Apple Music tracks DRM-free and playable anywhere.
People Also Read The Ultimate Showdown 2024: TIDAL VS Spotify Tidal Vs Apple Music: Which one's Streaming Service's Better
Written By Rosie
Last updated: 2023-08-10