


Amazon is indeed one of the many happy places for music lovers. There are plenty of albums, popular music, and playlists that can give absolute enjoyment to many people. If you want to download music from Amazon, it is better that you have an idea of how to save Amazon Music to SD card.
This is the modern way to create a backup of songs you love or save some internal storage for your phone or tablet. It is also useful if you want to listen to any song at any time.
Although there can be a little discomfort because of the DRM protection that protects music files from illegal selling and distribution, there are things that we can still do to be able to deal with it. Once DRM encryption is properly dealt with, things can be easier, and transferring your most loved music file from Amazon to an SD card would be easier as well.
We are going to put focus on the methods to save Amazon Music to SD card; this will surely help many music lovers who often experience difficulty dealing with format incompatibilities as well as DRM encryption, so let us begin.
Contents Guide Part 1. Download Amazon Music To An SD Card Directly [With Amazon Music Paid Plan]Part. 2 Download And Transfer Amazon Music To Your SD Card [Without Amazon Music Paid Plan]Part 3. Start Moving All Your Converted Amazon Music Songs To Your SD CardPart 4. To Summarize It All
Part 1. Download Amazon Music To An SD Card Directly [With Amazon Music Paid Plan]
If you are subscribed to an Amazon Prime Membership or Amazon Music Unlimited, it would be easy for you to directly download all your preferred Amazon songs to your SD card. You just have to modify the storage path from your device’s storage to your SD card. To change the default saving folder, you have to:
Step 1. Open the Amazon Music app on your Android phone, and then choose "My Music," which you will see from the bottom part of the menu.
Step 2. Look for "Settings" from your list, and then hit the "Storage" option.
Step 3. Hit "Save" in order to modify the default path to your SD card.
Once you are done changing the saving path, the next time that you try to save music tracks to SD card, it will be automatically done by default.
Part. 2 Download And Transfer Amazon Music To Your SD Card [Without Amazon Music Paid Plan]
The first method that we have talked about in the first part can only be applied if you are subscribed to Amazon or are using a device that is compatible with it as well. There can be players that do not support Amazon Music Players, and we should do something about it, especially if we want the issue to be immediately addressed.
If we want to save Amazon Music to SD card, we should always be ready for drawbacks, limitations, and difficulties. Also, it is a must to know that once your subscription to Amazon ceases, all your Amazon Music downloads will automatically disappear, and this is a situation that we would not want to happen.
We can make it happen through the use of the Amazon Music Unlocker. It is a professional tool that can help you download Amazon music to your computer locally and have it unlocked and converted to formats like MP3, FLAC, WAV, and M4A.
In order to start using the tool, it must be installed on your computer. You can use the allotted links to do the installation, depending on the device you have, whether it be a Mac or a Windows computer.
The Amazon Music Unlocker offers a free trial and a registered one. If you opt to continue using the service, you just have to buy a license key and use it to register the tool. Once you have bought a license key, you can start the registration process with your email address as well.
The procedures on how to use the Amazon Music Unlocker are also simple and easy to follow. These are:
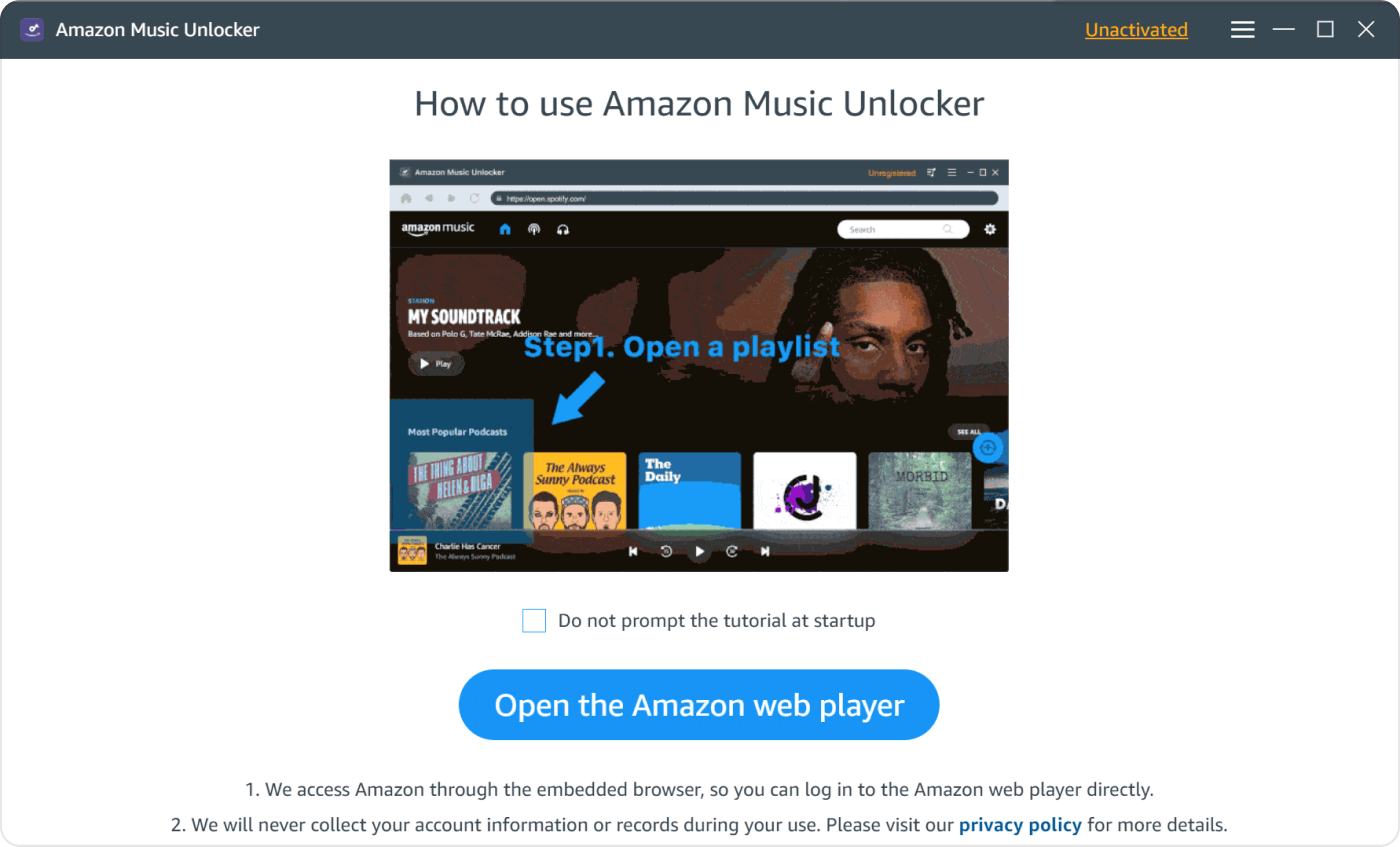
Step 1. Launch The Amazon Web Player
Go to the main screen of the Amazon Music Unlocker and hit the “Open the Amazon web player” option.
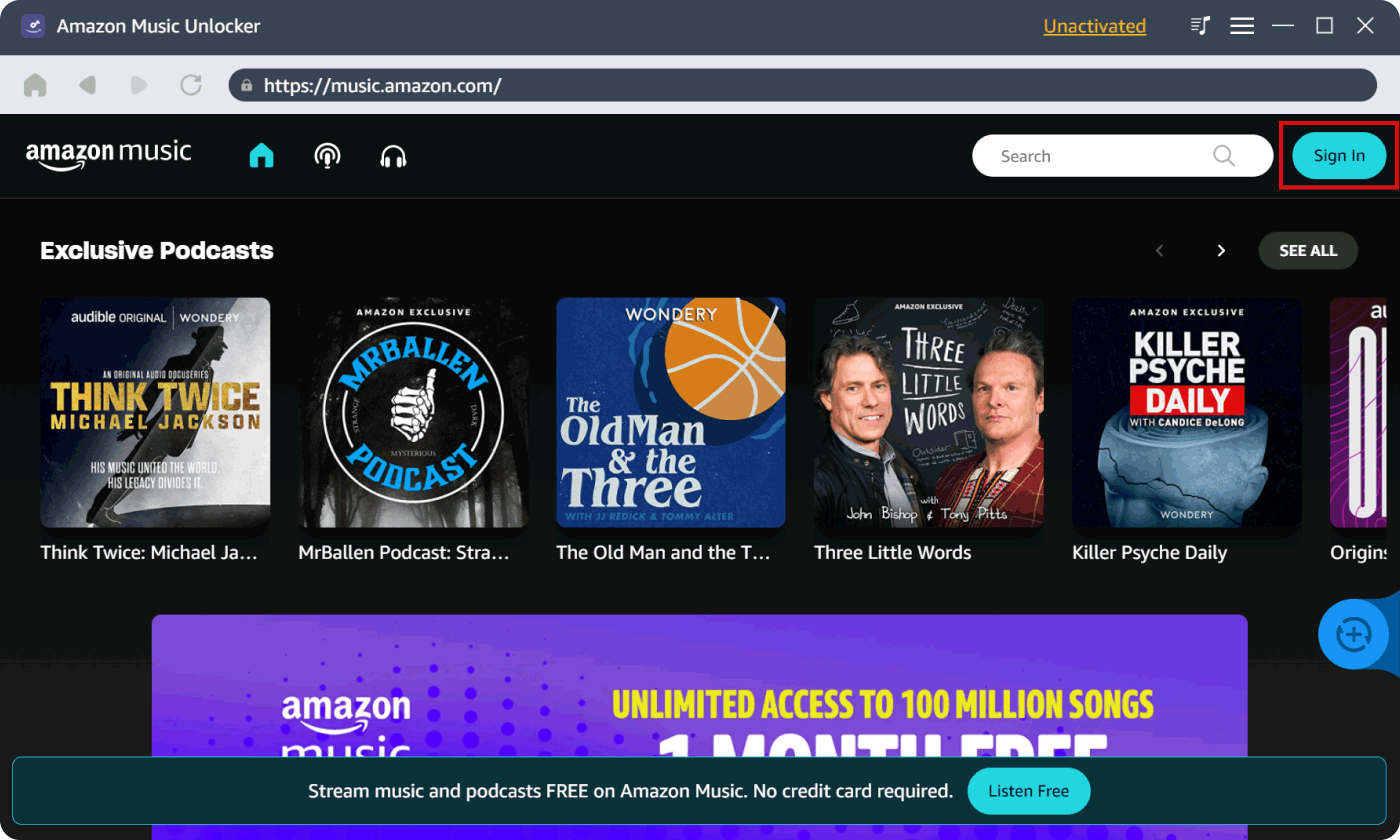
Step 2. Sign In To Your Amazon Account
Start by pressing the "Sign In" option (you can see it at the top right corner of the web player), and then input all the needed credentials. The professional tool will always take care of your account details and information, so there is nothing to worry about.
Step 3. Start Adding Amazon Music
Open an Amazon playlist and hit the blue add icon. You will see that all tracks in that playlist will be added to your list. You can also alternatively drag the title of the playlist to the blue add icon. You can also choose a specific track by simply dragging the title to the blue add icon to finally add it to your list.
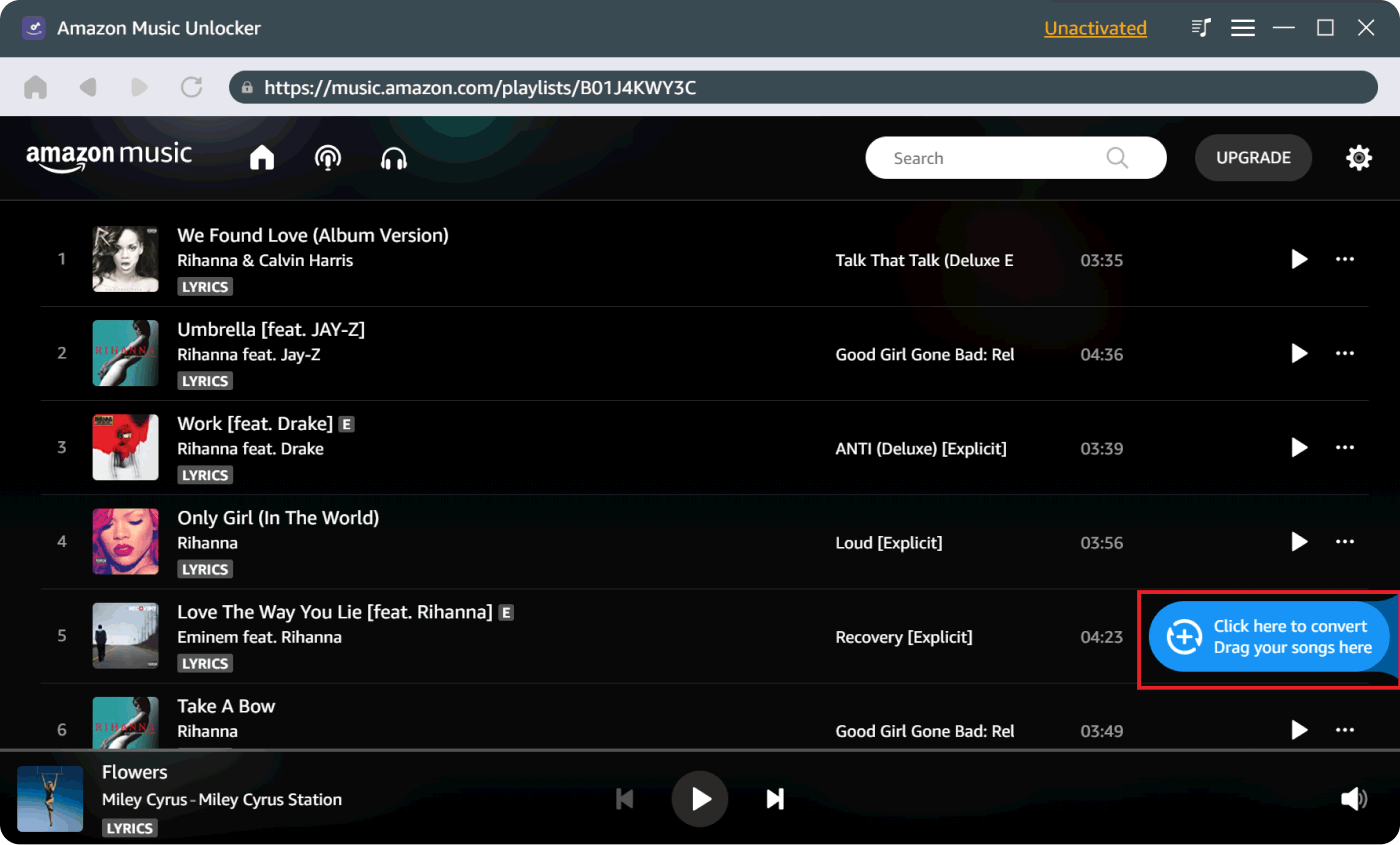
The Amazon Music Unlocker will determine if there are any duplicates; this will avoid adding these music files to the list, so you have nothing to worry about.
Step 4. Set The Formats That You Wish To Have
Select the formats that you wish to have; you can choose from MP3, M4A, FLAC, and WAV. Then set a folder that will be the home of all your converted music files from Amazon; you can also create one if you want. You just have to rename the folder to your liking for easier reference and to easily locate it in case you need it.
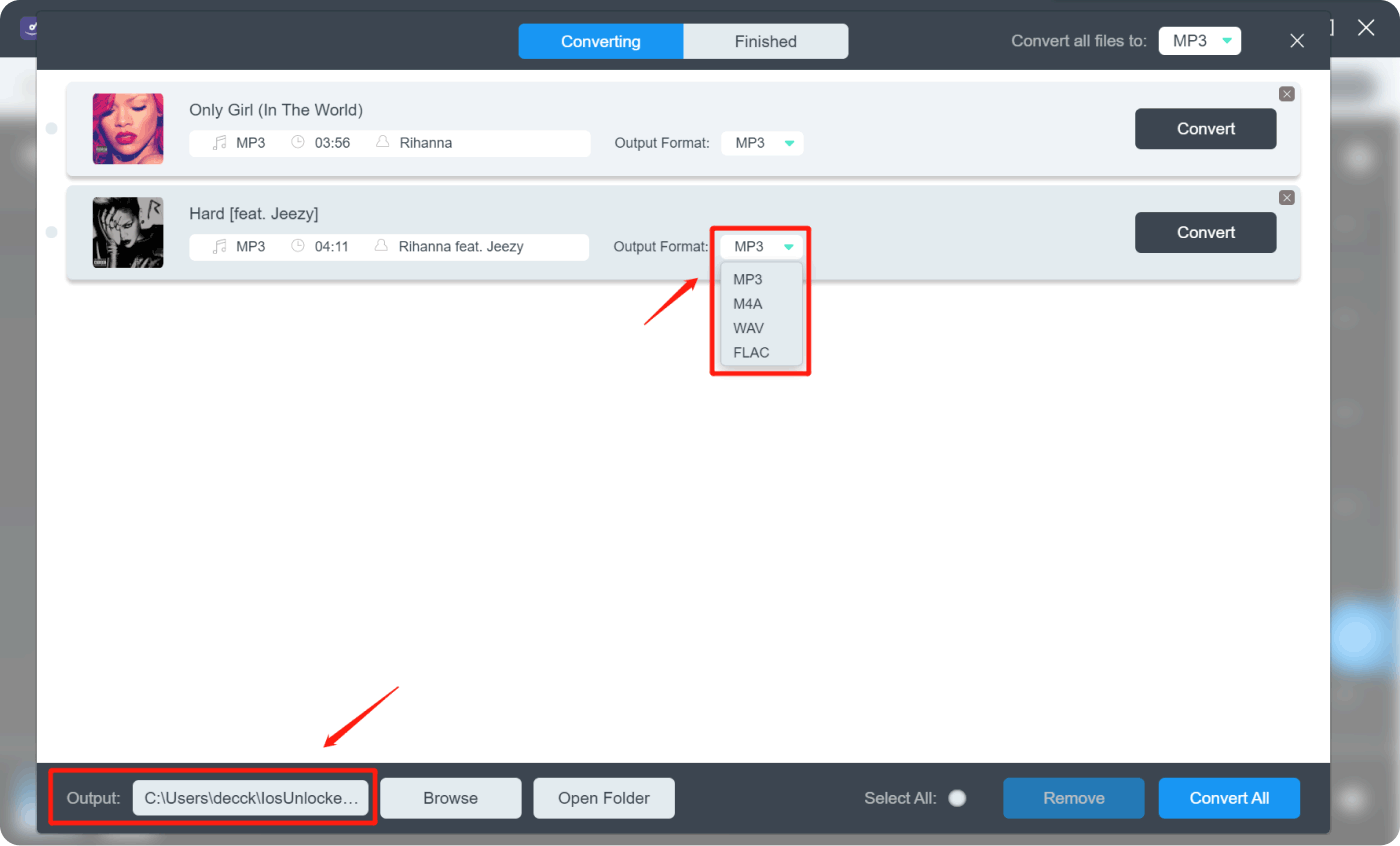
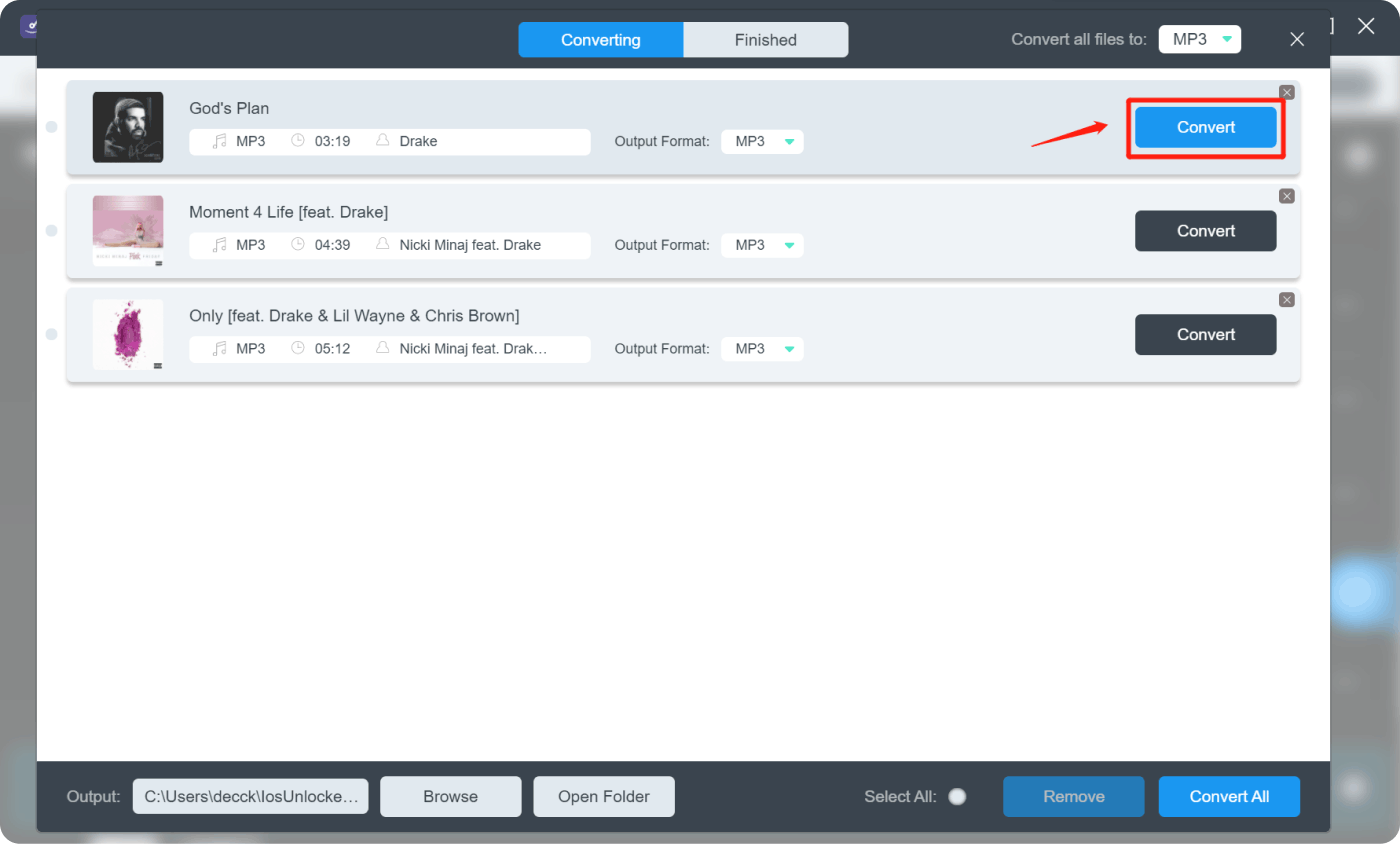
Step 5. Power Up The Conversion
And finally, the conversion process can be started by choosing a specific track and then hitting the “Convert” button. You can also choose multiple tracks if you want, and then tap the “Convert All” button to proceed with the process.
Step 6. See All Your Output Files
Now that the conversion process has been completed, it is time to take a look at your output files! You can choose the "View Output File" option, which you will see in the "Finished" module, to finally check all the music files that have been converted with the help of the Amazon Music Unlocker.

And now that you finally have all your most wanted music files without the DRM protection and in formats that are simpler, it is time that we talked about how to save Amazon Music to SD card, and we have enumerated the procedures below to help you do it the right way!
Part 3. Start Moving All Your Converted Amazon Music Songs To Your SD Card
Now that you are done with file conversion and have saved all the Amazon songs that you like to your computer, you can now save Amazon Music to an SD card. This can be done without any hassle or issue through the steps that we have listed below.
Step 1. The SD card must be inserted into your computer; you can use a card reader to do it.
Step 2. Locate the Amazon Music folder that you have downloaded on your computer.
Step 3. Right-click on the folder to enable the copying and pasting of all the Amazon songs to your SD card.
Step 4. Once you are done and you have checked all the copied songs, you can now remove your SD card and eject it.
How To Play Songs Saved On An SD Card On Amazon Music?
Step 1. Tap your Account Profile which is at the upper right corner of the screen, and then hit "Settings".
Step 2. Tap the "Settings" column, and you need to look for the "Music Management" list.
Step 3. Then, you can now proceed to "Automatically Import Music From" and then select this option to continue.
Step 4. Then hit the "Select Folder" button and select your SD card folder to start importing music files.
Once you are done with the steps that we have listed above, all the songs that are already downloaded to your SD card will start to appear in your Amazon Music Library. And once you see them, you are free to play them on your Amazon Music app.
Part 4. To Summarize It All
The process of saving Amazon Music to an SD card can be really tedious. The right steps or procedures must always be followed in order to make sure that there will be no issues along the way. It is nice that we have come up with this list of possible methods and tools that we can rely on in times of need.
Amongst the ones that we can use, the Amazon Music Unlocker is the best tool and the most fit in terms of the features that it has and its capability to convert as well. We hope that we have helped you learn how to save Amazon Music to SD card through the information imparted throughout the article. After all, music in any form should always be enjoyed by everyone at all times.
People Also Read Unveiling the Path: Where Does Amazon Music Download to? A Step-by-Step Guide: How to Cancel Amazon Music on iPhone
Written By Rosie
Last updated: 2023-07-27